background image

Hardware Options Installation 

4-12 

HP ProLiant DL145 Server User Guide 


7.


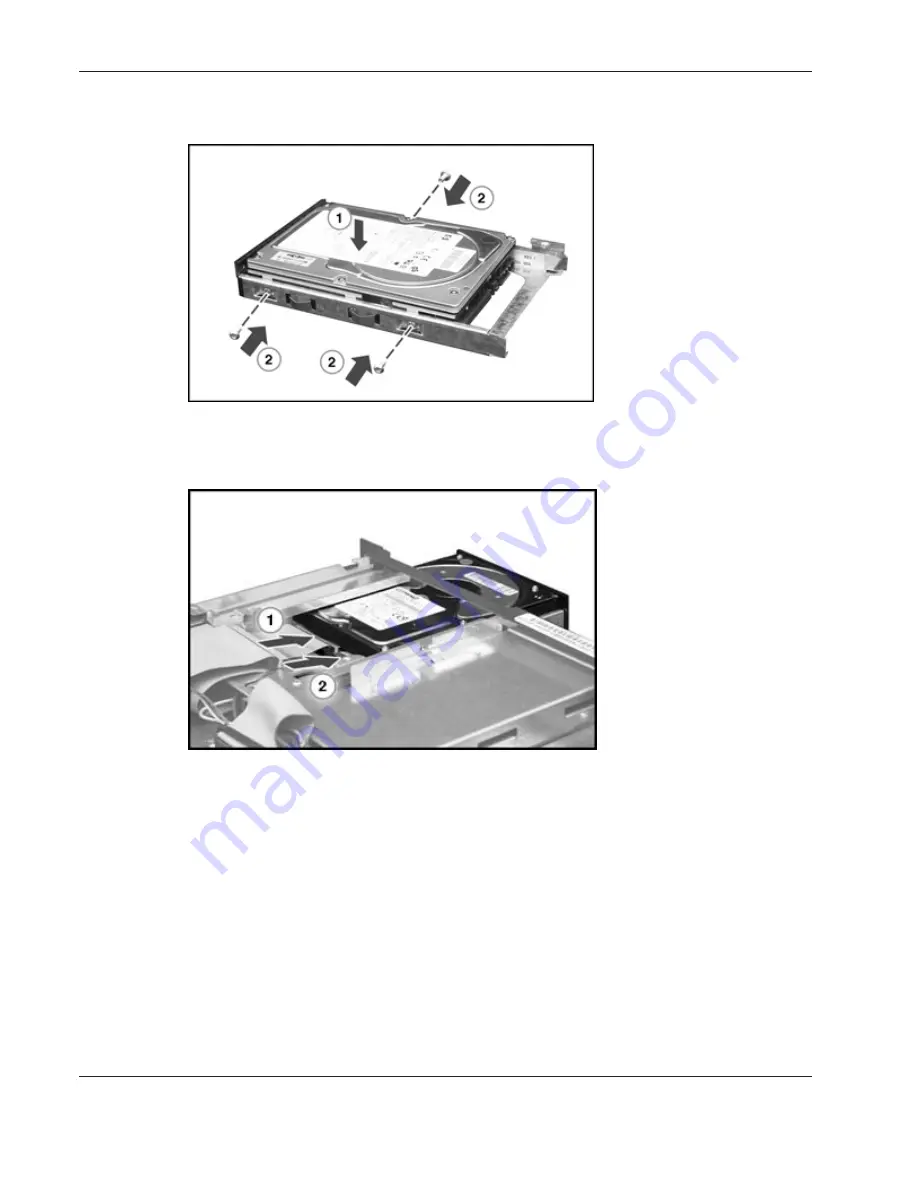
Install the drive in the drive tray. 


Figure 4-17:  Installing a drive in the drive tray 


8.


Connect the power and data cables to the hard drive. 


Figure 4-18:  Connecting the cables to the hard drive 

Summary of Contents for ProLiant DL145

Page 1: ...HP ProLiant DL145 Server User Guide April 2005 Fifth Edition Part Number 361542 005 ...

Page 2: ...is a trademark of Intel Corporation in the United States and other countries Hewlett Packard Company shall not be liable for technical or editorial errors or omissions contained herein The information in this document is provided as is without warranty of any kind and is subject to change without notice The warranties for HP products are set forth in the express limited warranty statements accompa...

Page 3: ...nts 1 1 Rear Panel Connectors 1 2 Rear Panel LEDs 1 3 System Board Components 1 4 J9 CMOS Jumper 1 5 Chapter 2 Server Operations Powering Up the Server 2 1 Powering Down the Server 2 1 Extending the Server from the Rack 2 2 Removing the Server from the Rack 2 2 Removing the Access Panel and Chassis Stiffener 2 3 Chapter 3 Server Setup Optional Installation Services 3 1 Rack Planning Resources 3 1 ...

Page 4: ...outing the SCSI Cable 4 23 Additional Information 4 25 Supported Features 4 25 Chapter 5 Operating System Installation and Software Overview 5 1 Operating System Installation 5 2 ProLiant DL145 Support CD 5 2 PXE Deployment 5 3 Software and Utilities 5 3 ROMPaq Utility 5 3 Management Processor Flash Utility 5 4 Diagnostics Utility 5 4 BIOS Setup Utility 5 5 Server Management 5 13 Configuring the S...

Page 5: ...A Equipment A 3 Class B Equipment A 3 Mouse Compliance Statement A 3 European Union Notice A 4 Japanese Notice A 4 BSMI Notice A 4 Laser Compliance A 5 Battery Replacement Notice A 5 Appendix B Electrostatic Discharge Preventing Electrostatic Damage B 1 Grounding Methods B 1 Appendix C System Battery Battery Replacement C 1 Appendix D Server Error Messages Appendix E Server Specifications Server S...

Page 6: ......

Page 7: ... in conjunction with any of the following symbols indicates the presence of a potential hazard The potential for injury exists if warnings are not observed Consult your documentation for specific details This symbol indicates the presence of hazardous energy circuits or electric shock hazards Refer all servicing to qualified personnel WARNING To reduce the risk of injury from electric shock hazard...

Page 8: ... To reduce the risk of personal injury or damage to the equipment be sure that The leveling jacks are extended to the floor The full weight of the rack rests on the leveling jacks The stabilizing feet are attached to the rack if it is a single rack installation The racks are coupled together in multiple rack installations Only one component is extended at a time A rack may become unstable if more ...

Page 9: ...red Outside North America call the nearest HP Technical Support Phone Center Telephone numbers for worldwide Technical Support Centers are listed on the HP website www hp com Be sure to have the following information available before you call HP Technical support registration number if applicable Product serial number Product model name and number Applicable error messages Add on boards or hardwar...

Page 10: ...About This Guide x HP ProLiant DL145 Server User Guide Reader s Comments HP welcomes your comments on this guide Please send your comments and suggestions by e mail to ServerDocumentation hp com ...

Page 11: ... 1 1 Front Panel Components Item Description Status 1 LAN activity LED On Network link Flashing Network link and activity Off No link to network 2 System health LED Off Normal On System degraded 3 Disk drive activity LED On Drive activity Flashing High drive activity Off No drive activity 4 Power LED On Power on Off Power off continued ...

Page 12: ... Description Status 5 USB port 6 Media bay 7 Hard drive bay 2 8 Hard drive bay 1 9 Power button Rear Panel Connectors Figure 1 2 Rear panel connectors Table 1 2 Rear Panel Connectors Item Description Item Description 1 Mouse 5 Dedicated Management NIC 2 Keyboard 6 NIC 2 3 Video 7 NIC 1 4 USB 8 COM1 Management Processor ...

Page 13: ...able 1 3 Rear Panel LEDs Item Description LED Color Status 1 Aux Power LED Amber On Aux power present Off No Aux power Green Green 1 GB connection Off no link to network 2 LAN Link LED Red Red 10 100 MB connection Off no link to network 3 LAN Activity LED Amber On or flashing network activity Off no network activity ...

Page 14: ...components Table 1 4 System Board Components Item Description 1 PCI X riser board slot 2 NVRAM Battery 3 Management Processor 4 Video board 5 J9 CMOS jumper 6 Processor socket 2 7 Memory banks 2A and 2B 8 Processor power module slot 2 9 Processor power module slot 1 10 Memory banks 1A and 1B 11 Processor 1 boot processor ...

Page 15: ...ing system documentation 3 Press the Power button to power down the server When the server powers down the system power LED turns off 4 Disconnect the power cord 5 Set the J9 CMOS jumper to Clear and hold in position for 3 seconds 6 Reset the J9 CMOS jumper to Set 7 Connect the power cord 8 Power up the system 9 Reconfigure the server using the BIOS Setup Utility Refer to Chapter 5 Operating Syste...

Page 16: ...ove power from the server The front panel Power button does not completely shut off system power Portions of the power supply and some internal circuitry remain active until AC power is removed 1 Back up the server data 2 Shut down the operating system as directed by the operating system documentation 3 Press the Power button to power down the server When the server powers down the system power LE...

Page 17: ... the rack rails until the server rail release latches engage Figure 2 1 Extending the server from the rack 2 Reverse the steps to restore the server to operating position Removing the Server from the Rack Press the side rail tabs to release the server from the rack rails Figure 2 2 Removing the server from the rack ...

Page 18: ...nal injury from hot surfaces allow the internal system components to cool before touching CAUTION Electrostatic discharge can damage electronic components Properly ground yourself before beginning any installation procedure 1 Power down the server Refer to the Powering Down the Server section earlier in this chapter 2 Extend the server from the rack Refer to the Extending the Server from the Rack ...

Page 19: ...Server Operations 2 4 HP ProLiant DL145 Server User Guide Figure 2 4 Removing the chassis stiffener 5 Reverse the steps to install the chassis stiffener and the access panel ...

Page 20: ...s optional hardware installation service is available in all countries where HP has a direct or indirect service presence Service may be ordered from and directly provided by an authorized service reseller or in the United States only service may be ordered by calling 1 800 633 3600 In the United States HP makes all the arrangements to have the system installed by qualified guaranteed service prov...

Page 21: ...vides the following important configuration steps Planning the site Installing rack servers and rack options Cabling servers in a rack Coupling multiple racks The Rack Products Documentation CD enables you to view search and print documentation for HP racks and rack options It also helps you set up and optimize a rack in a manner that best fits your environment Optimum Environment When installing ...

Page 22: ... and to prevent damage to the equipment Front and rear doors If the 42U server rack includes closing front and rear doors you must allow 5 350 sq cm 830 sq in of holes evenly distributed from top to bottom to permit adequate airflow equivalent to the required 64 percent open area for ventilation Side The clearance between the installed rack component and the side panels of the rack must be a minim...

Page 23: ...wer load must be balanced between available AC supply branch circuits The overall system AC current load must not exceed 80 percent of the branch circuit AC current rating Do not use common outlet strips for this equipment Provide a separate electrical circuit for the server Grounding Requirements For proper operation and safety the server must be properly grounded In the United States you must in...

Page 24: ...ount the heaviest item on the bottom of the rack and work from the bottom to the top Installing Hardware Options Install any hardware options before initializing the server For options installation information refer to the option documentation For server specific information refer to Chapter 4 Hardware Options Installation Server Shipping Contents Unpack the server shipping carton and locate the m...

Page 25: ...r the appropriate option kit at the RackSolutions com website Follow the server specific instructions on the website to install the rack brackets After installing the brackets follow the steps in this section WARNING When installing the server in a telco rack be sure that the rack frame is adequately secured to the top and bottom of the building structure WARNING Always plan the rack installation ...

Page 26: ...p HP ProLiant DL145 Server User Guide 3 7 1 Remove server rails from rack rails Figure 3 2 Removing server rails from rack rails 2 Attach and secure the server rails to the server Figure 3 3 Attaching server rails ...

Page 27: ... 3 4 Installing rack rails 4 Pull the inner slide rail forward from each rack rail assembly until it locks into place 5 Align the server and carefully insert the server rail into the inner slide rail until the rail release levers engage Figure 3 5 Loading the server onto the rack rails ...

Page 28: ...al devices to the server WARNING To reduce the risk of electric shock or fire do not plug telecommunications telephone connectors into the NIC connectors IMPORTANT To enable the embedded NIC functionality on servers running Microsoft Windows Server based operating systems it is necessary to load the NIC drivers provided on the HP ProLiant DL145 Server Support CD Figure 3 7 Rear panel connectors ...

Page 29: ...DVD drive or connect a USB CD ROM drive to a USB connector 2 Connect a monitor to the video connector 3 Connect a mouse to the mouse connector 4 Connect a keyboard to the keyboard connector 5 Place the operating system CD in the CD ROM drive and follow the instructions to complete the server initialization process IMPORTANT To enable the embedded NIC functionality on servers running Microsoft Wind...

Page 30: ...rvice Guide provides specific information required for general maintenance and component replacement including Spare part numbers Removal and replacement procedures Diagnostic tools The HP ProLiant DL145 Server Maintenance and Service Guide can be accessed through the HP website at www hp com support or at www docs hp com ...

Page 31: ...ors The server supports up to two processors CAUTION Processor socket 1 and processor power module PPM slot 1 must be populated at all times or the server will not function properly CAUTION If upgrading processor speed update the system ROM before installing the processor IMPORTANT Mixing processor speeds and cache sizes is not supported To install a processor and PPM 1 Power down the server Refer...

Page 32: ...2 HP ProLiant DL145 Server User Guide 5 Remove the processor air baffle Figure 4 1 Removing processor air baffle 6 Remove the processor blank Figure 4 2 Removing processor blank 7 Open the processor socket lever 8 Align the processor ...

Page 33: ... Guide 4 3 9 Install the processor Figure 4 3 Installing a processor 10 Close the processor socket lever 11 Remove the clear protective cover from the heatsink to expose the thermal pad 12 Install the processor heatsink Figure 4 4 Installing processor heatsink ...

Page 34: ...rather than on just the rising edge potentially doubling output The server features the following advanced memory technologies Support for up to 16 GB of industry standard PC2700 registered ECC DDR SDRAM memory Advanced ECC memory for single bit detection and multi bit memory error correction Dual channel memory architecture Memory Guidelines Bank 1A must always be populated DIMMs must be installe...

Page 35: ...r socket 1 6 Processor socket 2 7 DIMM slot 1 Bank 2A 8 DIMM slot 2 Bank 2A 9 DIMM slot 3 Bank 2B 10 DIMM slot 4 Bank 2B To install DIMMs 1 Power down the server Refer to Powering Down the Server in Chapter 2 Server Operations 2 Extend the server from the rack Refer to Extending the Server from the Rack in Chapter 2 Server Operations 3 Remove the access panel Refer to Removing the Access Panel and...

Page 36: ...he server Refer to Powering Down the Server in Chapter 2 Server Operations 2 Extend the server from the rack Refer to Extending the Server from the Rack in Chapter 2 Server Operations 3 Remove the access panel Refer to Removing the Access Panel and the Chassis Stiffener in Chapter 2 Server Operations 4 Remove the chassis stiffener Refer to Removing the Access Panel and the Chassis Stiffener in Cha...

Page 37: ...ver User Guide 4 7 5 Disconnect the DVD drive media cable if the option is installed Figure 4 8 Disconnecting the DVD drive media cable 6 Disconnect the DVD drive power cable if the option is installed Figure 4 9 Disconnecting the DVD drive power cable ...

Page 38: ...tall a DVD drive 1 Power down the server Refer to Powering Down the Server in Chapter 2 Server Operations 2 Extend the server from the rack Refer to Extending the Server from the Rack in Chapter 2 Server Operations 3 Remove the access panel Refer to Removing the Access Panel and the Chassis Stiffener in Chapter 2 Server Operations 4 Remove the chassis stiffener Refer to Removing the Access Panel a...

Page 39: ...e 4 9 5 Remove the media bay blank Refer to the Removing a Media Bay Blank or a DVD Drive section earlier in this chapter 6 Insert the DVD drive into the media bay Figure 4 12 Inserting a DVD drive 7 Install the retainer clip Figure 4 13 Installing the retainer clip ...

Page 40: ...r cable to the DVD drive Figure 4 14 Connecting the power cable 9 Connect the data cable to the DVD drive Figure 4 15 Connecting the data cable 10 Reinstall the chassis stiffener 11 Reinstall the access panel 12 Restore the server to its operating position in the rack 13 Power up the server ...

Page 41: ...e Rack in Chapter 2 Server Operations 3 Remove the access panel Refer to Removing the Access Panel and the Chassis Stiffener in Chapter 2 Server Operations 4 Remove the chassis stiffener Refer to Removing the Access Panel and the Chassis Stiffener in Chapter 2 Server Operations 5 Remove the DVD drive or media bay blank Refer to the Installing a DVD Drive section earlier in this chapter 6 Remove th...

Page 42: ... 12 HP ProLiant DL145 Server User Guide 7 Install the drive in the drive tray Figure 4 17 Installing a drive in the drive tray 8 Connect the power and data cables to the hard drive Figure 4 18 Connecting the cables to the hard drive ...

Page 43: ...ht drives are from the front of the server NOTE If two SCSI drives are to be installed only remove the right drive To remove the EIDE hard drives 1 Power down the server Refer to Powering Down the Server in Chapter 2 Server Operations 2 Extend the server from the rack Refer to Extending the Server from the Rack in Chapter 2 Server Operations 3 Remove the access panel Refer to Removing the Access P...

Page 44: ...e Figure 4 20 Removing the left drive tray NOTE If there is no drive installed in the right drive process to the SCSI Hard Drive Installation section later in this chapter 6 Remove the screw from the right drive tray Figure 4 21 Removing the screw from right drive tray 7 Disconnect the cable and remove the drive ...

Page 45: ...ptions Installation HP ProLiant DL145 Server User Guide 4 15 Figure 4 22 Disconnecting the cable and removing the drive 8 Remove the drives from the drive trays Figure 4 23 Removing the drives from the drive tray ...

Page 46: ... off position auxiliary power is still connected to the expansion slot and may damage the board To install an expansion board 1 Power down the server Refer to Powering Down the Server in Chapter 2 Server Operations 2 Extend the server from the rack Refer to Extending the Server from the Rack in Chapter 2 Server Operations 3 Remove the access panel Refer to Removing the Access Panel and the Chassis...

Page 47: ...llation HP ProLiant DL145 Server User Guide 4 17 5 Remove the expansion slot cover Figure 4 25 Removing the expansion slot cover 6 Install the expansion board in the slot and secure Figure 4 26 Installing an expansion board ...

Page 48: ...e installation perform the following steps 1 Power down the server Refer to Powering Down the Server in Chapter 2 Server Operations 2 Extend the server from the rack Refer to Extending the Server from the Rack in Chapter 2 Server Operations 3 Remove the access panel Refer to Removing the Access Panel and the Chassis Stiffener in Chapter 2 Server Operations 4 Remove the chassis stiffener Refer to R...

Page 49: ...h the drive for information on how to set the SCSI address 2 Mount the SCSI drive on the drive tray Figure 4 28 Mounting the first SCSI drive IMPORTANT Route the cable through drive bay one the left drive bay before connecting the SCSI cable to the SCSI drive NOTE Verify connector orientation before attaching 3 Connect the left SCSI connector to the SCSI drive Figure 4 29 Connecting SCSI connector...

Page 50: ...SCSI drive NOTE If installing only one drive proceed to the Installing the SCSI controller section IMPORTANT When installing a SCSI device in the left drive always connect the short power cable 5 Set the right drive SCSI address to 1 6 Mount the SCSI drive on the drive tray Figure 4 31 Mounting the second SCSI drive NOTE Verify connector orientation before attaching ...

Page 51: ...4 21 7 Install the drive and connect the power cable and the terminated end of the SCSI cable the SCSI connector nearest the terminator Figure 4 32 Connecting power and media cables to the second SCSI drive 8 Secure the drive Figure 4 33 Securing the second SCSI drive ...

Page 52: ... 22 HP ProLiant DL145 Server User Guide Installing the SCSI Controller To install the SCSI controller 1 Remove the PCI X riser cage Figure 4 34 Removing the PCI X riser cage 2 Remove the slot blank Figure 4 35 Removing the slot blank ...

Page 53: ...ect the power supply cable Figure 4 37 Disconnecting the power supply cable 2 Route the SCSI cable in the following manner a Around the power supply b Over the power supply connector ensuring that there is a gap between the cable and the fans CAUTION When routing the SCSI cable in the gap between the power supply and the PCI X riser cage ensure that the SCSI cable is flat across the gap so as not ...

Page 54: ...sition where it can be pinched or crimped by the access panel Figure 4 38 Routing the SCSI cable around the power supply 3 Connect the SCSI cable to the SCSI controller Figure 4 39 Connecting the SCSI cable to the SCSI controller 4 Reconnect the power supply cable 5 Install the chassis stiffener 6 Install the access panel The installation is complete ...

Page 55: ... refer to the following website http h18004 www1 hp com products servers proliantstorage adaptors index html NOTE Not all features of the Dual Channel ultra320 SCSI Host Bus Adaptor are supported by this server For additional information on the supported features refer to the HP ProLiant DL145 Server User Guide at http www hp com Supported Features The Dual Channel ultra320 SCSI Host Bus Adaptor s...

Page 56: ...ity Management Processor Flash Utility Diagnostics Utility BIOS Setup Utility Server Management Configuring the Serial Port Configuring Access Through the Serial Port Configuring Access Through the Network User Accounts Accessing the Management Processor CLI Using CLI Commands BIOS Console Text Redirection Linux Operating System Redirection Windows EMS Management Using the Watch Dog Timer System E...

Page 57: ...on process IMPORTANT To enable the embedded NIC functionality on servers running Microsoft Windows Server based operating systems it is necessary to load the NIC drivers provided on the HP ProLiant DL145 Support CD 6 Check the HP ProLiant DL145 Server Support CD for device drivers The most current drivers INF files ROM images and diagnostics can be downloaded from the web at www hp com support Pro...

Page 58: ...PXE enabled client boots it obtains an IP address from a dynamic host configuration protocol DHCP server The client obtains the name of the Network Boot Program NBP from the appropriate boot server Then the client uses trivial file transfer protocol TFTP to download the NBP from the boot server and executes the image Software and Utilities This section provides information about the following util...

Page 59: ... versions The default ROM version is the latest After ROMPaq has finished flashing the ROM it may be necessary to restore default values Management Processor Flash Utility To update the Management Processor firmware download the Management Processor Flash Utility and follow the instructions that come with the firmware The firmware can be downloaded at www hp com support Diagnostics Utility The HP ...

Page 60: ...iguring system devices and installed options Viewing system information Selecting the boot device and boot priority NOTE Features and settings available in the BIOS Setup Utility can change with updated ROM releases If the server s actual BIOS Setup Utility screens differ from this documentation then it is recommended to upgrade to the latest ROM release and download the latest user guide from htt...

Page 61: ...out saving utilities and allows management of custom settings Each menu occupies a single screen and presents a list of menu items Some menu items are submenus while others are settings that you can change from the screen Table 5 1 describes how to navigate between the utility screens and menus Table 5 1 Setup Screen Navigation Press To Scroll left through the main menu screens Scroll right throug...

Page 62: ...l purposes only Processor Type Speed Count N A N A N A The currently loaded processor information You cannot change these values They appear for informational purposes only System Memory Size N A The currently loaded system memory You cannot change this value It appears for informational purposes only System Serial ID 10 digit number You cannot change this value It appears for informational purpos...

Page 63: ...efault Value Comments IDE Configuration OnBoard PCI IDE Controller Both Primary IDE Master N A Primary IDE Slave N A Secondary IDE Master N A Secondary IDE Slave N A You cannot change these values They appear for informational purposes only EMS Console Configuration EMS Remote Console Disabled This option must be enabled for Windows EMS management For more information refer to Windows EMS Manageme...

Page 64: ...ately following this table Set PEF Configuration Disabled HP recommends this default setting Refer to the third party IPMI Utilities for further instructions Watch Dog Timer Action Disabled Allows the Management Processor to reset or power down the system if the operating systems crashes or hangs BIOS Serial Console Configuration BIOS Serial Console Enabled This option must be enabled for BIOS red...

Page 65: ...ubnet Mask is required for static IP configuration See the note below for more information NOTE A static IP address is automatically assigned permanently and manually to a computer in a TCP IP network environment Static IP addresses are usually assigned to networked devices that are consistently accessed by multiple users such as printers faxes or server computers A dynamic IP address is automatic...

Page 66: ...ription Boot Settings Configuration Quick Boot Enabled Bootup Num Lock On Select power on state for NumLock PS 2 Mouse Support Enabled Typematic Rate Fast Select keyboard typematic rate Wait for F1 if Error Disabled Wait for F1 key to be pressed if error occurs Restore on AC Power Loss Last State Absent Keyboard Error Warning Information only Onboard NIC Enabled Onboard NIC PXE Option ROM Enabled ...

Page 67: ...mmediately clears the user password Boot Sector Virus Protection Disabled Exit Table 5 7 describes the menu items available on the Exit screen Table 5 7 BIOS Setup Exit Screen Menu Items Menu Item Description Save Changes and Exit Exit system setup after saving the changes The F10 key can be used for this operation Discard Changes and Exit Exit system setup without saving any change The ESC key ca...

Page 68: ...nt Platform Management Interface IPMI v1 5 compliant Configuring the Serial Port The serial port can be configured to work in two different ways Shared The server uses the serial port as a regular system serial port and the serial port can be used to communicate with the Management Processor using terminal emulation software or through an existing serial infrastructure Not Shared The server uses t...

Page 69: ...remotely and access the text mode operating system consoles for Windows 2003 EMS or Linux Connect the serial port to an existing serial infrastructure or use a terminal emulation session to manage the server using the serial port To set up a terminal emulation session 1 Connect a null modem cable between the serial port on the server rear panel and a COM port on the host computer 2 Verify that the...

Page 70: ...Liant DL145 Server User Guide 5 15 4 Enter a name for the connection select an icon and click OK The Connect To window appears 5 Select the COM port on the host computer to which the serial cable is connected Click OK The COM Properties window appears ...

Page 71: ...the following port settings then click OK Bits per second 9600 Data bits 8 Parity None Stop bits 1 Flow control None The HyperTerminal session activates NOTE No information appears unless the EMS Remote Console or BIOS Serial Console option is set to Enabled on the Setup Utility Advanced screen ...

Page 72: ...he state command The Management Processor IP address appears e Exit network setup by entering the quit command The ProLiant prompt appears f Exit the Management Processor CLI Refer to Logging Out of the Management Processor CLI in this chapter 3 Launch Telnet by entering the following command at a DOS prompt or the command line Telnet xxx xxx xxx xxx where xxx xxx xxx xxx is the Management Process...

Page 73: ...LAN channel is User level Use third party IPMI software to set the access and the user privilege for the channel if more privileges are needed Accessing the Management Processor CLI Through either serial or Telnet access the ProLiant 100 series Management Processor provides system administrators with the capability to Freely switch between remote console Console Mode and the Management Processor C...

Page 74: ... described in Configuring Access Through the Network in this chapter 2 Press the Shift Esc 9 keys The Management Processor CLI appears 3 Enter the username at the login prompt 4 Enter the password at the password prompt NOTE The default usernames and passwords are OEM OEM admin admin Operator Operator null null Privileges for the different accounts are discussed in User Accounts in this chapter Th...

Page 75: ... Command Description changepassword Change the password power on Power on the server remotely power off Power off the server remotely ipmicommand command where command is a supported IPMI command Execute an IPMI command sdrread Display the sensor data records selread Display the System Event Log network setup Set up the network reset warm Reset the server reset cold Power off the server and reset ...

Page 76: ...cters 5 Re enter the new password when prompted Powering the Server On and Off and Resetting the Server Remotely Using the CLI Administrator and OEM level users can remotely operate the power button of a host server Virtual power support allows the user to power on power off and power cycle the host server This virtual power support is independent of the operating system and functions regardless o...

Page 77: ...escription state Display the current setup information delay Set the milliseconds to wait between pings host Set the default active IP host length Set the default ping packet length rtadd Manually add an IP route to the table rtdel Manually delete an IP route from the table routes Display the IP route table setip xxx xxx xxx xxx yyy yyy yyy yyy where xxx xxx xxx xxx is the IP address and yyy yyy y...

Page 78: ... F10 key If the server has an administrator password configured the system prompts you to enter the password If the server does not have a password configured the main screen of the BIOS Setup Utility appears 2 Press to navigate to the Advanced menu 3 Press to scroll to the BIOS Serial Console Configuration menu Press the Enter key 4 Press to scroll to the BIOS Serial Console option 5 Do one of th...

Page 79: ...g POST and Boot Loader Always Redirection is always active 5 Press the Esc key to return to the previous screen or press the F10 key to save the changes and exit Setup Linux Operating System Redirection Linux operating systems provide text based console access from the serial port The Management Processor supports operating system redirection so that an administrator can connect the server serial ...

Page 80: ...he Watch Dog Timer The Watch Dog Timer increases server availability by resetting the server powering down the server or cycling the server power within a specified time after a system hang or period of inactivity This functionality requires operating system support from a third party IPMI product To configure the Watch Dog Timer 1 In the BIOS Setup Utility press to navigate to the Advanced menu 2...

Page 81: ...and unsuccessful login attempts To use the System Event Log 1 In the BIOS Setup Utility press to navigate to the Advanced menu 2 Press to scroll to the Event Log Control menu Press the Enter key 3 Do one of the following Press or to toggle the settings Press the Enter key The Options box appears Press or to select the appropriate setting Press the Enter key to select the appropriate option 4 Press...

Page 82: ...vides system inventory and configuration information The new system management tool uses industry standards WBEM and WMI management protocols to provide this essential functionality You can download the HP Systems Insight Manager software as well as the HP Systems Insight Manager Installation and User Guide at http www hp com go hpsim IPMI System Management The ProLiant DL145 server is IPMI v1 5 c...

Page 83: ...talled in a business or commercial environment Class B devices are those that may reasonably be expected to be installed in a residential environment for example personal computers The FCC requires devices in both classes to bear a label indicating the interference potential of the device as well as additional operating instructions for the user The FCC rating label on the device shows the classif...

Page 84: ...a Increase the separation between the equipment and receiver Connect the equipment into an outlet on a circuit that is different from that to which the receiver is connected Consult the dealer or an experienced radio or television technician for help Declaration of Conformity for Products Marked with the FCC Logo United States Only This device complies with Part 15 of the FCC Rules Operation is su...

Page 85: ...meets all requirements of the Canadian Interference Causing Equipment Regulations Cet appareil numérique de la classe A respecte toutes les exigences du Règlement sur le matériel brouilleur du Canada Class B Equipment This Class B digital apparatus meets all requirements of the Canadian Interference Causing Equipment Regulations Cet appareil numérique de la classe B respecte toutes les exigences d...

Page 86: ...ission of the European Community Compliance with these directives implies conformity to the following European Norms the equivalent international standards are in parenthesis EN55022 CISPR 22 Electromagnetic Interference EN55024 IEC61000 4 2 3 4 5 6 8 11 Electromagnetic Immunity EN61000 3 2 IEC61000 3 2 Power Line Harmonics EN61000 3 3 IEC61000 3 3 Power Line Flicker EN60950 IEC950 Product Safety ...

Page 87: ... with an internal lithium battery or battery pack There is a danger of explosion and risk of personal injury if the battery is incorrectly replaced or mistreated Unless specific replacement instructions are provided as part of this guide replacement is to be done by an authorized service provider using the HP spare designated for this product For more information about battery replacement or prope...

Page 88: ...s until they arrive at static free workstations Place parts on a grounded surface before removing them from their containers Avoid touching pins leads or circuitry Always be properly grounded when touching a static sensitive component or assembly Grounding Methods There are several methods for grounding Use one or more of the following methods when handling or installing electrostatic sensitive pa...

Page 89: ...rtable field service kit with a folding static dissipating work mat If you do not have any of the suggested equipment for proper grounding have an authorized reseller install the part NOTE For more information on static electricity or for assistance with product installation contact your authorized reseller ...

Page 90: ...normal use battery life is usually about 5 to 10 years To install a new battery 1 Power down the server Refer to Powering Down the Server in Chapter 2 Server Operations 2 Extend the server from the rack Refer to Extending the Server from the Rack in Chapter 2 Server Operations 3 Remove the access panel Refer to Removing the Access Panel in Chapter 2 Server Operations 4 Locate the battery To locate...

Page 91: ...ery 7 Install the access panel 8 Restore the server to its operating position in the rack 9 Reconfigure the server using the BIOS Setup Utility if the settings were lost Refer to Chapter 5 Operating System Installation and Software for more information on the BIOS Setup Utility ...

Page 92: ... Use POST error messages to assist in troubleshooting and performing basic diagnostic functions in the server For a complete listing of error messages and other troubleshooting information refer to the HP Servers Troubleshooting Guide provided at www hp com support ...

Page 93: ... cm 17 0 in Weight 13 6 kg 30 lb International input requirements Rated input voltage 180 V to 264 V Rated input frequency 47 Hz to 63 Hz Rated input current 1 AMP 240 VAC U S input requirements Rated input voltage 90 V to 132 V Rate input frequency 47 Hz to 63 Hz Rated input current 2 5 A 100VAC Power supply output power Rated steady state power 500 W Maximum peak power 500 W Temperature range Op...

Page 94: ...ions E 2 HP ProLiant DL145 Server User Guide Table E 1 Server Specifications continued Feature Units Relative humidity non condensing Operating 20 to 80 Non operating 5 to 90 Maximum wet bulb temperature 38 7 C 101 7 F ...

Page 95: ...ations If the server completes POST and attempts to load the operating system go to Problems After Initial Startup in this appendix WARNING There is a risk of personal injury from hazardous energy levels The installation of options and the routine maintenance and service of this product must be performed by individuals who are knowledgeable about the procedures precautions and hazards associated w...

Page 96: ...ded another table in this appendix will be referenced which will outline possible reasons for the problem options available to assist in diagnosis possible solutions and list references to other sources of information Table F 1 Diagnosis Steps Question The Next Step Question 1 Is the front panel power LED on If no go to Table F 2 Question 2 Is the front panel system health LED on If no go to Table...

Page 97: ...ble F 3 Server Does Not Have Video Possible Reasons The Next Step Video cable may not be properly connected Switches may not be correctly set on the system board If an optional video board was installed the monitor cable may not be correctly connected The monitor may be connected to the wrong video connector Expansion boards or DIMMs may not be properly connected or seated 1 Be sure that the monit...

Page 98: ...at a time until the problem happens again This will reveal the malfunctioning add in card 8 If the system video adapter is an add in card replace or reseat the video adapter If the video adapter is an integrated part of the system board the board may be faulty Problems After Initial Startup After the server has passed POST errors may still be encountered such as an inability to load the operating ...

Page 99: ...ct this problem Hard drives and other devices may not be set to proper boot order in Boot Device Priority settings in BIOS Setup Run BIOS Setup by pressing the F10 key and correct this problem New hardware was added to the system Refer to the documentation provided with the hardware Remove the new hardware Hardware was added to a system with a factory installed operating system The factory install...

Page 100: ...s resource provides a complete list of all replacement parts available along with step by step instructions on installation and replacement Find this guide at www hp com support or www docs hp com Follow the link for maintenance and service guides and download the guide provided for the server Information on warranties and service and support upgrades HP Services Care Pack can be found by visiting...

Page 101: ...y 5 23 BIOS upgrading 5 3 boot process monitoring remotely 5 23 Boot screen Setup Utility 5 11 C cables FCC compliance statement A 3 CDs ProLiant DL145 Support 5 2 Rack Products Documentation 3 2 changing passwords 5 21 clearing CMOS 1 5 closing the expansion slot latch 4 18 CMOS jumper J9 1 4 CMOS clearing 1 5 COM1 Management Processor connector 1 2 3 10 commands basic 5 20 IPMI 5 23 network setu...

Page 102: ... A 2 device modifications A 3 mouse A 3 features expansion slot 4 16 Management Processor 5 18 memory 4 4 PCI X technology 4 16 Federal Communications Commission notices See FCC notices firmware Management Processor 5 4 server 5 3 flashing Management Processor firmware 5 4 ROM 5 3 front panel components 1 1 LEDs 1 1 front panel LEDs troubleshooting F 3 G grounding methods B 1 requirements 3 4 guid...

Page 103: ...he server 5 13 media bay 1 2 Media Bay Blank or a DVD Drive Removing 4 6 media bay blank removing 4 8 memory features 4 4 population guidelines 4 4 memory banks 1 4 monitoring boot process remotely 5 23 mouse compliance statement A 3 mouse connector 1 2 3 10 N navigating BIOS Setup Utility screens 5 6 network configuring access to the Management Processor 5 17 configuring settings 5 22 displaying ...

Page 104: ...over 4 17 hard drive tray 4 11 media bay blank 4 8 processor air baffle 4 2 processor blank 4 2 server from rack 2 2 system battery C 1 requirements airflow 3 2 battery replacement C 1 grounding 3 4 optimum environment 3 2 power 3 4 space 3 2 temperature 3 3 resetting the server 5 21 resources rack planning 3 1 ROM flashing 5 3 ROMPaq Utility 5 3 routine maintenance 3 11 S SCSI Cable Routing 4 23 ...

Page 105: ... C 1 warning C 1 system board components 1 4 system events log 5 26 system health LED 1 1 T technical support ix telco rack warning 3 6 telephone numbers ix Telnet session setting up 5 17 temperature requirements 3 3 terminal emulation session setting up 5 14 thumbscrews rack 3 9 troubleshooting error messages D 1 front panel LEDs F 3 POST messages D 1 problems after initial startup F 4 video F 3 ...

Reviews: