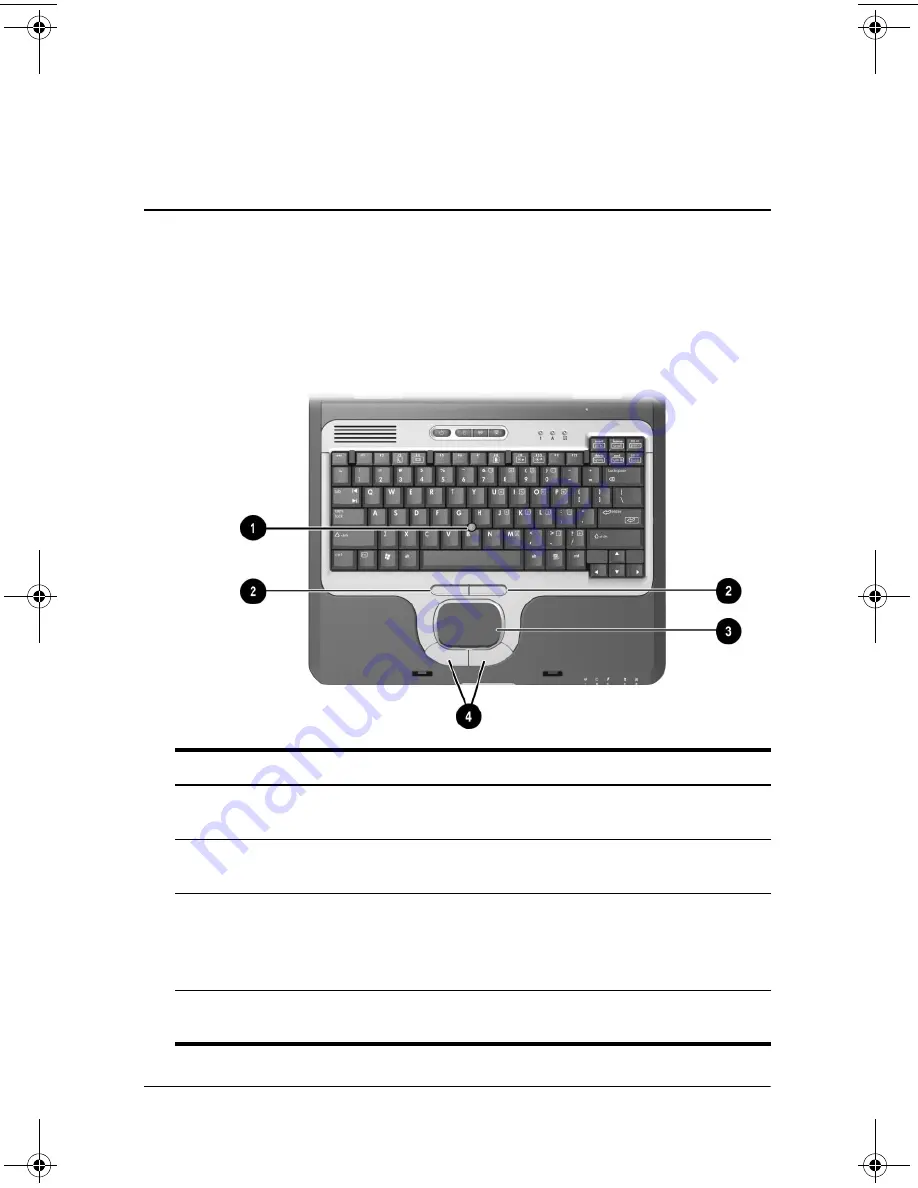
background image

Hardware Guide

1–1

1

Notebook Features

Pointing Device Components

Component

Description

1

Pointing stick

Moves the pointer and selects or 
activates items on the screen.

2

Left and right pointing stick 
buttons

Function like the left and right buttons 
on an external mouse.

3

TouchPad

Moves the pointer and selects or 
activates items on the screen. Can be 
set to perform other mouse functions, 
such as scrolling and double-clicking.

4

Left and right TouchPad 
buttons

Function like the left and right buttons 
on an external mouse.

333955-001.book  Page 1  Monday, July 14, 2003  11:27 AM

Summary of Contents for Compaq nc8000

Page 1: ...t Number 333955 001 August 2003 This guide explains how to identify and use notebook hardware features including connectors for external devices It also includes power and environmental specifications which may be helpful when traveling with the notebook ...

Page 2: ...ined herein is subject to change without notice The only warranties for HP products and services are set forth in the express warranty statements accompanying such products and services Nothing herein should be construed as constituting an additional warranty HP shall not be liable for technical or editorial errors or omissions contained herein Hardware Guide HP Compaq Notebook Series First Editio...

Page 3: ... 1 16 2 Pointing Devices and Keyboard Using a Pointing Device 2 1 Using the Pointing Stick 2 3 Using the TouchPad 2 3 Using an External Mouse 2 4 Setting Pointing Device Preferences 2 4 Using Hotkeys and Shortcut Keys 2 5 Identifying fn and Function Keys 2 5 Hotkey and Shortcut Key Quick Reference 2 6 Initiating Standby fn f3 2 7 Switching Displays fn f4 2 7 Viewing Battery Charge Information fn f...

Page 4: ...rging a New Battery Pack 3 8 Charging an In Use Battery Pack 3 8 Charging a Primary and MultiBay Battery Pack 3 8 Monitoring the Charge in a Battery Pack 3 9 Obtaining Accurate Charge Information 3 9 Displaying Charge Information on the Screen 3 9 Displaying Charge Information on a MultiBay Battery Pack 3 11 Managing Low Battery Conditions 3 12 Identifying Low Battery Conditions 3 12 Resolving Low...

Page 5: ...ng Optical Disc Software 4 12 Initiating Standby or Hibernation 4 12 MultiBay Drive 4 13 Identifying the MultiBay Activity Light 4 13 Using a MultiBay Hard Drive Adapter 4 14 Inserting a Drive into the MultiBay 4 17 Removing a Drive from the MultiBay 4 18 5 Audio and Video Using Audio Features 5 1 Using the Audio Line Out Jack 5 2 Using the Microphone Jack 5 3 Adjusting Volume 5 3 Using Video Feat...

Page 6: ... USB Legacy Support 7 3 Connecting an Optional External MultiBay 7 4 Connecting an Optional Cable Lock 7 5 8 Hardware Upgrades Using PC Cards 8 1 Inserting a PC Card 8 2 Removing a PC Card 8 3 Using SD Cards 8 4 Inserting an SD Card 8 4 Removing an SD Card 8 5 Adding and Upgrading Memory Modules 8 6 Effects of Increasing Memory 8 12 9 Specifications Notebook Dimensions 9 1 Operating Environment 9 ...

Page 7: ... screen 2 Left and right pointing stick buttons Function like the left and right buttons on an external mouse 3 TouchPad Moves the pointer and selects or activates items on the screen Can be set to perform other mouse functions such as scrolling and double clicking 4 Left and right TouchPad buttons Function like the left and right buttons on an external mouse ...

Page 8: ... Quick Launch Buttons in Chapter 2 of this guide 2 Power button When the notebook is Off press and release to turn on the notebook In Standby press and release to exit Standby In Hibernation press and release to exit Hibernation If the system has stopped responding and Windows shutdown procedures cannot be used press and hold for 5 seconds to turn off the notebook Continued ...

Page 9: ...ts section 6 Function keys Execute indicated system functions when pressed in combination with the fn key Refer to Using Hotkeys and Shortcut Keys in Chapter 2 of this guide 7 MiniPCI compartment Holds an optional wireless LAN WLAN or ISDN device Ä The FCC does not allow unauthorized MiniPCI devices to be used in this notebook Installing an unsupported MiniPCI device can prevent your notebook from...

Page 10: ...Features 9 Display latch recess Secures the display when the notebook is closed Memory compartment not shown located under the keyboard Contains one primary memory module slot populated and one expansion slot Component Description ...

Page 11: ...lock On Scroll lock is on 4 Wireless On Off On An integrated wireless device has been enabled 5 Power Standby On Power is turned on Blinking Notebook is in Standby The power standby light also blinks when a battery pack that is the only available power source reaches a critical low battery condition The light turns off when the system enters Hibernation or shuts down Continued ...

Page 12: ...le power source has reached a low battery condition When the battery reaches a critical low battery condition the battery light begins blinking more quickly 7 Drive On One of the following integrated drives is being accessed Hard drive Optical drive 8 MultiBay On A drive in the MultiBay is being accessed Component Description ...

Page 13: ...olutions is to act as a deterrent These solutions do not prevent the product from being mishandled or stolen 2 Exhaust vent Enables airflow to cool internal components Ä To prevent overheating do not obstruct vents Using the notebook on a soft surface such as a pillow blanket rug or thick clothing may block airflow 3 Optical disc drive Reads and records CD and DVD media Continued ...

Page 14: ...are Guide Notebook Features 4 Optical disc drive eject button Opens the optical disc drive when pressed 5 Battery bay Holds the primary battery pack Battery pack ships outside the notebook Component Description ...

Page 15: ... the top or bottom PC Card slot 2 PC Card slots 2 Support optional Type I Type II or Type III 32 bit CardBus or 16 bit PC Cards In select notebooks one PC Card slot may be replaced with a factory installed Smart Card Reader 3 Secure Digital SD slot Accepts SD memory card 4 Infrared port Provides wireless communication between the notebook and an optional IrDA compliant device Continued ...

Page 16: ...powered stereo speakers headphones headset or television audio 7 Microphone jack Connects an optional monaural microphone 8 MultiBay Supports an optional MultiBay device such as a drive or battery pack 9 Bluetooth compartment Holds a Bluetooth device Bluetooth is not available in all countries Component Description ...

Page 17: ...olume down button on left to decrease sound 5 Wireless antennae 2 Transmit wireless data Å Exposure to Radio Frequency Radiation The radiated output power of this device is below the FCC radio frequency exposure limits Nevertheless the device should be used in such a manner that the potential for human contact during normal operation is minimized To avoid the possibility of exceeding the FCC radio...

Page 18: ... connects an optional External MultiBay to the notebook using the External MultiBay powered USB cable 3 1394 connector Connects a device that requires high bandwidth such as a digital camera or other video or audio device 4 Power connector Connects an AC adapter or an optional Automobile Power Adapter Charger or Aircraft Power Adapter 5 Serial connector Connects an optional serial device 6 Paralle...

Page 19: ...ure card 8 External monitor connector Connects an optional external monitor or overhead projector 9 RJ 45 jack Connects a network cable Intake vent Enables airflow to cool internal components Ä To prevent overheating do not obstruct vents Using the notebook on a soft surface such as a pillow blanket rug or thick clothing may block airflow Component Description ...

Page 20: ...ook on a soft surface such as a pillow blanket rug or thick clothing may block airflow 2 Docking connector Connects the notebook to an optional Port Replicator 3 Keyboard access screw Allow you to remove the keyboard in order to access system memory 4 Battery bay release latch Releases the primary battery pack from the battery bay 5 Business card holder Holds a standard size business card Continue...

Page 21: ...s Hardware Guide 1 15 6 Hard drive cover latch Releases the cover on the hard drive bay 7 Hard drive bay Holds the primary hard drive 8 MultiBay release latch Allows removal of the MultiBay drive Component Description ...

Page 22: ...e while traveling internationally Bluetooth is not available in all countries 2 COA Certificate of Authenticity label Contains your Product Key number which will be needed to update or troubleshoot your operating system 3 WLAN label Provides regulatory information about the wireless LAN WLAN device s that are available on some notebook models You will need this information to use the WLAN device w...

Page 23: ...ay need this number if you call customer support 5 System label Provides regulatory information about the notebook 6 Modem label Lists the countries in which the modem has been approved for use You will need this information to use the modem while traveling internationally Label Description ...

Page 24: ... the pointing stick and TouchPad components can be used interchangeably I Component Description 1 Pointing stick Moves the pointer and selects or activates items on the screen 2 Left and right pointing stick buttons Function like the left and right buttons on an external mouse Continued ...

Page 25: ...Moves the pointer and selects or activates items on the screen Can be set to perform other mouse functions such as scrolling and double clicking 4 Left and right TouchPad buttons Function like the left and right buttons on an external mouse Component Description ...

Page 26: ...ttons on an external mouse To change the pointing stick cap 1 Turn off the notebook 2 Gently pull off the used pointing stick cap 3 Push a replacement cap into place Replacement caps are not included with the notebook Using the TouchPad To move the pointer slide your finger across the TouchPad surface in the direction you want the pointer to go Use the left and right TouchPad buttons as you would ...

Page 27: ...apping which enables you to tap the TouchPad once to select an object or twice to double click an object disabled by default Edge motion which enables you to continue to scroll even though your finger has reached the edge of the TouchPad disabled by default Palm Check which helps prevent moving the pointer unintentionally if your palms contact the TouchPad as you type disabled by default Other fea...

Page 28: ...d another key execute specific system functions Identifying fn and Function Keys A hotkey is a combination of the fn key and one of the function keys The icons on the function keys represent the hotkey functions available on your notebook A shortcut key is a combination of the fn key and a key other than a function key Component 1 Function keys 2 fn key ...

Page 29: ...ivate Function Key Combination to Deactivate Function Initiate Standby fn f3 Press power button Switch between notebook display and external display fn f4 fn f4 View battery information fn f8 fn f8 Decrease the screen brightness fn f9 N A Increase the screen brightness fn f10 N A Display system information fn esc fn esc ...

Page 30: ...f3 hotkey refer on the Documentation Library CD to the Software Guide Power chapter Switching Displays fn f4 The fn f4 hotkey switches the image among display devices connected to the external monitor connector or the S Video jack on the notebook For example if an external monitor is connected to the notebook pressing the fn f4 hotkey multiple times will toggle the image between the notebook displ...

Page 31: ...rge Information fn f8 Press the fn f8 hotkey to display charge information for all installed battery packs The display indicates which battery packs are charging and reports the amount of charge remaining in each battery pack Battery pack locations are indicated by number Location 1 is the primary battery pack Location 2 is the MultiBay battery pack Decreasing Screen Brightness fn f9 Press fn f9 t...

Page 32: ...ystem information from the screen The system BIOS date is the version number of the system ROM The BIOS date may display in a decimal format such as 10 19 2002 F 07 Using Hotkeys and Shortcut Keys with External Keyboards The following table describes how certain hotkeys and shortcut keys can be used on external keyboards Notebook keys External keyboard keys fn esc scroll lock scroll lock esc fn f8...

Page 33: ...ons with a single keystroke Quick Launch button descriptions Component Description 1 QuickLock button Disables the keyboard and pointing device and clears the display Before you can use QuickLock you must set a password and select preferences For more information refer on the Documentation Library CD to the Software Guide Security chapter Continued ...

Page 34: ...software utilities 3 Presentation Mode button Sets the notebook to presentation mode which opens a user defined application folder file or Web site The image simultaneously displays on the notebook screen and an external device connected to the external monitor connector or S Video out jack on the rear panel or to connectors on an optional Port Replicator Component Description ...

Page 35: ...that includes a numeric keypad Using the Embedded Numeric Keypad The 15 keys of the embedded numeric keypad can be used like the keys on an external keypad When the embedded numeric keypad is turned on each key on the keypad performs the functions indicated by the icon in the upper right corner of the key Component 1 fn key 2 Num lock light 3 Num lock key 4 Embedded numeric keypad ...

Page 36: ...ional Port Replicator Switching Key Functions on the Embedded Numeric Keypad You can temporarily switch the functions of keys on the embedded numeric keypad between their standard keyboard functions and their keypad functions by using the fn key or the fn shift key combination To change the function of a keypad key to keypad functions while the keypad is off press and hold the fn key while pressin...

Page 37: ...on Enabling or Disabling Num Lock Mode As You Work To turn num lock on or off on an external keypad as you work press the num lk key on the external keypad not on the notebook Enabling or Disabling Num Lock Mode at Startup To configure the notebook to start up with a connected external keypad in num lock mode you must set this preference in Computer Setup For more information about using Computer ...

Page 38: ... external keypad select the field To disable num lock mode on an external keypad clear the field 5 Press f10 6 To save your preference and exit Computer Setup select File Save Changes and Exit then follow the instructions on the screen Your preferences are set when you exit Computer Setup and take effect when the notebook restarts ...

Page 39: ...ry pack and is running on external power supplied through the AC adapter the notebook will switch to battery power if the AC adapter is disconnected from the notebook You can leave a battery pack in the notebook or in storage depending on how you work Keeping a battery pack in the notebook allows the battery pack to charge whenever the notebook is connected to external power and also protects your...

Page 40: ...P Web site at http www hp com or use the Worldwide Telephone Numbers booklet included with your notebook to contact an HP authorized dealer Identifying Battery Packs The notebook supports up to 2 battery packs The primary battery pack 1 is an 8 cell lithium ion battery pack that can be used only in the battery bay One primary battery pack is packed separately with the notebook The MultiBay battery...

Page 41: ...ttery Pack ÄCAUTION To prevent loss of work when removing a battery pack that is the sole power source initiate Hibernation or turn off the notebook before removing the battery pack To insert a battery pack slide the battery pack into the battery bay until it is seated ...

Page 42: ...3 4 Hardware Guide Battery Packs To remove a battery pack turn the notebook upside down Slide and hold the battery release latch 1 as you pull the battery pack 2 from the battery bay ...

Page 43: ...TION To prevent loss of work when removing a battery pack that is the sole power source initiate Hibernation or turn off the notebook before removing the battery pack To insert a battery pack turn the notebook upside down and slide the battery pack into the MultiBay until it is seated ...

Page 44: ...he MultiBay release latch 1 as you pull the battery pack 2 from the MultiBay ÄCAUTION To prevent damage to the MultiBay when no device is in the MultiBay insert the weight saver to protect the bay opening The weight saver can be inserted or removed while the notebook is on off in Standby or in Hibernation ...

Page 45: ...be used to run the notebook but it cannot be used to charge a battery pack A Battery pack can charge whether the notebook is off or in use but it will charge faster when the notebook is off Charging may be delayed if a battery pack is new has not been used for 2 weeks or more or is much warmer or cooler than room temperature When a battery pack is charging the battery light on the notebook is on T...

Page 46: ...Charging an In Use Battery Pack To prolong battery life and increase the accuracy of battery charge indicators Allow a battery pack to discharge to 10 percent of a full charge through normal use before charging it When you charge a battery pack charge it fully Charging a Primary and MultiBay Battery Pack If a primary battery pack is in the battery bay and a MultiBay battery pack is in the MultiBay...

Page 47: ...th or more calibrate the battery pack instead of simply charging it For calibration instructions refer to Calibrating a Battery Pack later in this chapter Displaying Charge Information on the Screen This section explains how to access and interpret battery charge displays Accessing Charge Displays To access information about the status of any battery pack in the notebook Select the Power Meter ico...

Page 48: ... remaining on the battery pack if the battery pack continues to provide power at the current level For example the time remaining will decrease when you start playing a DVD and will increase when you stop playing a DVD Most charge displays identify battery packs by location Location 1 is the primary battery bay Location 2 is the MultiBay On some displays a lightening bolt icon may be displayed bes...

Page 49: ...Check Primary battery packs do not To display the percent of a full charge remaining in a MultiBay battery pack press the Quick Check button 1 on the MultiBay battery pack The Quick Check lights 2 indicate the amount of charge remaining in the battery pack The greater the charge the more lights that turn on when you press the Quick Check button When all of the lights are on the battery pack has a ...

Page 50: ...w battery condition the battery light blinks Critical Low Battery Condition If a low battery condition is not resolved the notebook enters a critical low battery condition In a critical low battery condition If Hibernation is enabled and the notebook is on or in Standby the notebook initiates Hibernation If Hibernation is disabled and the notebook is on or in Standby the notebook remains briefly i...

Page 51: ...wer supply available on some commercial aircraft An optional Aircraft Power Adapter can run the notebook but cannot charge a battery pack When a Charged Battery Pack Is Available To resolve a low battery condition when a charged battery pack is available turn off the notebook or initiate Hibernation insert a charged battery pack then turn on the notebook When No Power Source Is Available To resolv...

Page 52: ...attery run time When the battery pack has not been used for one month or more How to Calibrate To calibrate a battery pack you must fully charge fully discharge then fully recharge the battery pack Charging the Battery Pack Battery packs can charge whether or not the notebook is in use but charge faster when the notebook is off To charge the battery pack 1 Insert the battery pack into the notebook...

Page 53: ...the battery pack is being discharged A battery pack can discharge whether the notebook is off or in use but it will discharge faster while the notebook is in use If you plan to leave the notebook unattended during the discharge save your work before beginning the discharge procedure If you use the notebook occasionally during the discharge procedure and have set energy saving timeouts expect the f...

Page 54: ...ugged In column and the 2 settings in the Running on Batteries column so that you can reset them after the calibration 3 Use the drop down lists to set the 4 options 2 in each column to Never 4 Select the OK button 5 Disconnect the notebook from the external power source but do not turn off the notebook 6 Run the notebook on battery power until the battery pack is fully discharged The battery ligh...

Page 55: ...mes tab In Windows 2000 select Start Settings Control Panel Power Management icon Power Schemes tab In Windows XP select Start Control Panel Performance and Maintenance Power Options icon Power Schemes tab 4 Refer to the settings recorded earlier Reenter the settings that you recorded for the items in the Plugged In column and the Running on Batteries column 5 Select the OK button ÄCAUTION After c...

Page 56: ...s when you are not using them Disconnect external devices you are not using that are not connected to an external power source Stop or remove a PC Card you are not using Remove a CD or DVD you are not using Use the fn f9 and fn f10 hotkeys to adjust screen brightness Use optional powered speakers instead of the internal speakers or use the volume buttons to raise and lower system volume Turn off a...

Page 57: ...ect Start Settings Control Panel Display Screen Saver tab In Windows XP select Start Control Panel Appearance and Themes Display icon Screen Saver tab Select a Power Scheme with low power use settings through the operating system Refer on the Documentation Library CD to the Software Guide Power chapter Select Battery Optimized or Maximum Battery Mode in Intel SpeedStep Windows 2000 only Refer on t...

Page 58: ...ge of a stored battery pack place it in a cool dry place Use the following table to estimate how long you can safely store a battery pack The storage times provided are based on a battery pack that contains 50 percent of a full charge A fully charged battery pack can be safely stored for longer times a battery pack containing a lower charge can be safely stored for less time Calibrate a battery pa...

Page 59: ...the telephone number listed for your location in the Worldwide Telephone Numbers booklet included with the notebook In Europe dispose of or recycle battery packs by using the public collection system or by returning them to HP your authorized HP partners or their agents In other regions refer to the Worldwide Telephone Numbers booklet included with the notebook to contact an HP authorized dealer r...

Page 60: ...4 1 4 Drives Caring for Drives Drives are fragile notebook components that must be handled with care The following cautions apply to all drives Additional cautions are included with the procedures to which they apply ...

Page 61: ...uching a grounded metal object and Avoid touching the connectors on a drive For more information about preventing electrostatic damage refer to the Regulatory and Safety Notices guide on the Documentation Library CD Avoid exposing a drive or a diskette to devices with magnetic fields Security devices with magnetic fields include airport walk through devices and security wands The airport security ...

Page 62: ...ives to USB connectors on the notebook or optional Port Replicator For information about connecting a USB drive refer to the External Devices chapter in this book The notebook has 2 drive bays The hard drive bay supports only a hard drive The hard drive in the hard drive bay is the primary hard drive The MultiBay supports any MultiBay device including the following Hard drive inserted into a Multi...

Page 63: ...Hard Drive This section discusses the primary hard drive of the notebook Identifying the Hard Drive Activity Light The hard drive activity light turns on when the primary hard drive or integrated optical drive is being accessed ...

Page 64: ...ing the hard drive from the hard drive bay Do not remove the hard drive while the notebook is on in Standby or in Hibernation If you are not sure whether the notebook is off or in Hibernation turn the notebook on by pressing the power button Then shut down the notebook through the operating system To remove the primary hard drive 1 Save your work 2 Shut down the notebook and close the display 3 Tu...

Page 65: ...4 6 Hardware Guide Drives 5 Slide the hard drive latch 1 forward to open the hard drive compartment and remove the hard drive cover 2 6 Lift the hard drive and remove it from the compartment ...

Page 66: ...Drives Hardware Guide 4 7 To replace the primary hard drive 1 Slide the hard drive into the hard drive compartment 2 Replace the hard drive cover and push down until the cover is latched into place ...

Page 67: ...4 8 Hardware Guide Drives 3 Replace the hard drive cover retaining screw ...

Page 68: ...ray 2 out until it is fully extended Position a CD or DVD over the tray with the label side up 4 Gently press the disc 3 onto the tray spindle until the disc snaps into place Handle the disc by the edges not the flat surfaces If the media tray is not fully extended tilt the disc to position it over the tray spindle then press it into position 5 Close the media tray After you insert a DVD a short p...

Page 69: ...to release the media tray then pull the tray 2 out until it is fully extended 3 Remove the disc 3 from the tray by gently pushing down on the spindle while lifting the outer edges of the disc Handle the disc by the edges not the flat surfaces If the media tray is not fully extended tilt the disc as you remove it 4 Close the media tray and place the disc in a protective case ...

Page 70: ...ly on the paper clip until the media tray is released then pull out the tray 2 until it is fully extended 3 Remove the disc 3 from the tray by gently pushing down on the spindle while lifting the outer edges of the disc Handle the disc by the edges not the flat surfaces If the media tray is not fully extended tilt the disc as you remove it To protect the disc place it in a protective case 4 Close ...

Page 71: ...otebook You will need to install the software before you can use it For more information refer on the Documentation Library CD to the Software Guide Optical Drive Software chapter To create and copy CDs or DVDs you will need additional software such as Roxio Easy CD and DVD Creator 6 which is included with select notebook models Initiating Standby or Hibernation If Standby or Hibernation is accide...

Page 72: ...UTION To prevent possible video degradation and loss of audio or video playback functionality do not initiate Standby or Hibernation while playing any media MultiBay Drive This section explains how to use drives in the MultiBay on the notebook Identifying the MultiBay Activity Light The MultiBay light turns on when any type of drive in the MultiBay is active ...

Page 73: ...can be used in the MultiBay The hard drive assembly the hard drive inserted into the MultiBay adapter is then inserted into and removed from the MultiBay the same way as any other MultiBay device Inserting a Hard Drive into the Adapter To insert a hard drive into a MultiBay hard drive adapter 1 Slide the 2 adapter selection switches into position 1 ...

Page 74: ...Drives Hardware Guide 4 15 2 Lower the drive into the adapter then slide the connectors on the drive toward the connectors in the adapter until the connectors engage and the drive is seated ...

Page 75: ... Hard Drive from the Adapter To remove a hard drive from a MultiBay hard drive adapter 1 Slide the adapter release latches to the left 2 Gently disengage the drive by sliding it away from the connectors on the adapter then remove the drive ...

Page 76: ...rd drive into the MultiBay insert the drive into a MultiBay hard drive adapter as described earlier in this chapter Turn the notebook upside down With the connector on the drive or drive assembly facing the MultiBay slide the drive or drive assembly into the MultiBay until it is seated ...

Page 77: ...ove Hardware icon on the taskbar then select the drive you want to remove When it is safe to remove the drive a message is displayed To display taskbar icons select Show Hidden Icons in the system tray ÄCAUTION To protect the MultiBay when no device is inside insert the weight saver in the bay The weight saver can be inserted or removed while the notebook is on off in Standby or in Hibernation 1 I...

Page 78: ...Drives Hardware Guide 4 19 4 Slide the MultiBay release latch 1 toward the side of the notebook 5 Pull the drive or drive assembly 2 out of the MultiBay ...

Page 79: ...cribed in the following table Audio Component Function 1 Speakers 2 Produce system sound 2 Mute button Mutes the system volume 3 Volume control buttons Increase and decrease system volume Press the volume up button on right to increase sound Press the volume down button on left to decrease sound Continued ...

Page 80: ...s also used to connect the audio function of an audio video device such as a television or VCR When connecting a device to the audio line out jack Use only a 3 5 mm stereo plug For best sound quality use 24 ohm to 32 ohm headphones The internal speakers are disabled 4 Audio line out jack Connects powered stereo speakers headphones a headset or an audio visual device such as a television or VCR Int...

Page 81: ... microphone is disabled Adjusting Volume To adjust volume use any of the following controls Notebook volume buttons To increase volume press the volume up button To decrease volume press the volume down button To mute or restore volume press the mute button The mute button light turns on when the volume is muted Windows Volume Control In Windows 2000 the Windows Volume Control icon is displayed on...

Page 82: ...lly provides a higher quality image than a composite video connection If you are combining audio and video functions such as playing a movie from a DVD to a television you will need a standard audio cable available from most electronics retailers The notebook can support one S Video device connected to the S Video out jack while simultaneously supporting an image on the notebook display and on any...

Page 83: ...t a video device to the S Video out jack 1 Plug either end of the S Video cable 1 into the S Video out jack on the notebook 2 Connect the other end of the cable 2 to the video device as instructed in the device documentation If the S Video out jack on the notebook is not accessible because the notebook is docked you can connect the device to the S Video out jack on the optional Port Replicator ...

Page 84: ... Jacks for digital PBX systems may resemble analog telephone jacks but are not compatible with the modem ÅWARNING Connecting the notebook to a digital line can permanently damage the modem Immediately disconnect your modem cable if accidentally connected to a digital line If the modem cable contains noise suppression circuitry which prevents interference from TV and radio reception orient the circ...

Page 85: ...ctrical shock fire or damage to the equipment do not plug a telephone cable into the RJ 45 network jack 2 Plug the modem cable 2 into the RJ 11 telephone jack For more information about using the modem or about using AT commands and dial modifiers refer on the Documentation Library CD to the Modem and Networking guide or the Modem Command Guidelines Advanced Users Only provided in English ...

Page 86: ...m and Networking guide for more details about using your notebook internationally To connect the modem to an analog telephone line that does not have an RJ 11 telephone jack 1 Plug the modem cable 1 into the RJ 11 jack on the notebook ÅWARNING To reduce the risk of electrical shock fire or damage to the equipment do not plug a telephone cable into the RJ 45 network jack 2 Plug the modem cable 2 in...

Page 87: ...ains noise suppression circuitry which prevents interference from TV and radio reception orient the circuitry end of the cable toward the notebook To connect the network cable 1 Plug the network cable 1 into the RJ 45 jack on the notebook 2 Plug the other end of the cable 2 into a network jack 3 Start or restart the notebook 4 Connect to the network ...

Page 88: ...nt The infrared port supports both low speed connections of up to 115 kilobits per second Kbps and high speed connections of up to 4 Mbps Infrared performance may vary depending on the performance of infrared peripherals distance between infrared devices and applications used Infrared signals are sent through an invisible beam of infrared light and require an unobstructed line of sight path Linkin...

Page 89: ...e sure that no signals from remote control or other wireless devices such as headphones or audio devices aim at a port During the transmission do not move either device and do not allow objects or movement to disrupt the beam Using Standby with Infrared Standby is not compatible with infrared transmission If the notebook is in Standby an infrared transmission cannot be initiated If Standby is init...

Page 90: ...s drivers refer to the documentation included with the device To connect a standard external device to the notebook 1 Turn off the notebook 2 If you are connecting a powered device turn off the device 3 Connect the device to a connector on the notebook 4 If you are connecting a powered device plug the device power cord into a grounded electrical outlet 5 Turn on the device 6 Turn on the notebook T...

Page 91: ...projector does not display an image try pressing the fn f4 hotkey to switch the image to the monitor Using a USB Device Universal serial bus USB is a hardware interface that can be used to connect external devices such as a USB keyboard mouse drive printer scanner or hub to the notebook The notebook has a standard USB connector 1 and a self powered USB connector 2 that connects an optional externa...

Page 92: ...ces may require additional support software which is usually included with the device For more information and software installation instructions refer to the documentation included with the device Enabling USB Legacy Support You must enable USB legacy support to use a USB keyboard mouse or hub connected to a USB connector on the notebook during startup or in a non Windows application or utility T...

Page 93: ...nal External MultiBay An external MultiBay connects to the notebook by way of the self powered USB connector and enables you to use MultiBay drives For more information about the external MultiBay refer to the documentation that is included with the device ...

Page 94: ...s a deterrent These solutions do not prevent the product from being mishandled or stolen To install a security cable 1 Loop the security cable around a secured object 2 Insert the cable lock key 1 into the security cable lock 3 Insert the cable lock 2 into the security cable slot 3 4 Lock it with the cable lock key ...

Page 95: ...Software Guide Software Updates and Restorations chapter Using PC Cards A PC Card is a credit card sized accessory designed to conform to the standard specifications of the Personal Computer Memory Card International Association PCMCIA The notebook supports 32 bit CardBus and 16 bit PC Cards If your notebook is equipped with two PC Card slots the notebook supports two Type I cards two Type II card...

Page 96: ...re such as card services socket services or enablers that may also be supplied by the PC Card manufacturer Inserting a PC Card ÄCAUTION To prevent damage to the connectors Use minimal pressure when inserting a PC Card into a PC Card slot Do not move or transport the notebook while a PC Card is inserted To insert a PC Card 1 Hold the PC Card label side up with the connector facing the notebook 2 Ge...

Page 97: ...n Windows XP select the Safely Remove Hardware icon in the taskbar then select the PC Card To display the Safely Remove Hardware icon select Show Hidden Icons in the taskbar 2 Press the PC Card eject button 1 adjacent to the PC Card you are removing This extends the button into position for releasing the PC Card 3 Release the PC Card by pressing the extended PC Card eject button 1 4 Gently pull ou...

Page 98: ...g it with other devices such as PDAs cameras and other SD equipped PCs Inserting an SD Card ÄCAUTION To prevent damage to the connectors Use minimal pressure when inserting an SD Card into an SD Card slot Do not move or transport the notebook while an SD Card is inserted To insert an SD Card 1 Insert the SD Card into the SD Card slot 2 Push the card firmly into the slot until it clicks into place ...

Page 99: ...e SD Card In Windows 2000 select the Unplug or Eject icon in the task bar then stop the card you plan to remove When the card can be safely removed a message is displayed In Windows XP select the Safely Remove Hardware icon in the taskbar then select the SD Card To display the Safely Remove Hardware icon select Show Hidden Icons in the taskbar 3 Gently press in on the SD Card 1 to unlock it 4 Pull...

Page 100: ...ectricity by touching a grounded metal object For more information refer on the Documentation Library CD to the Regulatory and Safety Notices guide The notebook has 2 memory slots located under the keyboard One memory slot is populated at the factory The other slot can be used for memory expansion The notebook supports DDR 266 and 334 memory SIMS cards The memory capacity of the notebook can be up...

Page 101: ...WARNING To reduce the risk of electrical shock fire or damage to the equipment do not turn on the notebook or reconnect any external cables during this procedure 5 Turn the notebook upside down and remove the keyboard access screw 6 Turn the notebook top side up and open the display ...

Page 102: ...8 8 Hardware Guide Hardware Upgrades 7 Unlatch the 4 keyboard release latches 1 to release the keyboard then tilt the keyboard 2 and remove it from the notebook ...

Page 103: ...not needed proceed to step 9 a Pull the retention clips away from the memory module 1 b Lift the edge of the memory module 2 and slide it gently out of the memory expansion slot at a 45 degree angle To protect a module after it has been removed place it in a static safe container ...

Page 104: ...hed edge of the module 1 with the keyed area in the expansion slot b Insert the memory module 1 into the empty memory expansion slot at a 45 degree angle Then slide it gently into place until it is seated while tilted 10 Push the memory module 2 down until the retention clips snap into place ...

Page 105: ...11 11 Replace the keyboard and snap the 4 keyboard release latches back into place 12 Replace the keyboard access screw on the bottom of the notebook 13 Replace any battery packs 14 Reconnect any external cables and turn on the notebook ...

Page 106: ...ontrol Panel System General tab In Windows XP select Start Control Panel Performance and Maintenance System General tab In Windows 2000 or Windows XP press fn esc To display the amount of free space on your hard drive double click the My Computer icon on the desktop then select your hard drive Information about the space on the drive is displayed in a status bar at the bottom of the window To disp...

Page 107: ...ents Only compatible AC adapters and battery packs should be used with the notebook For additional information visit the HP Web site at http www hp com or use the Worldwide Telephone Numbers booklet included with your notebook to contact an HP authorized dealer Notebook Dimensions Dimension Metric U S Height 4 15 cm 1 6 in Width 32 6 cm 12 8 in Depth 27 5 cm 10 8 in ...

Page 108: ...g 10 to 90 10 to 90 Nonoperating 5 to 95 5 to 95 Maximum altitude unpressurized Operating 3 048 m 10 000 ft Nonoperating 9 144 m 30 000 ft Input Power Rating Operating voltage 100 120 220 240 VAC RMS Operating current 1 6 0 8 A RMS Operating frequency range 50 60 Hz AC When powered by a DC source 18 5V MAX This product is designed for IT power systems in Norway with phase to phase voltage not exce...

Page 109: ...cy information refer on the Documentation Library CD to the Regulatory and Safety Notices guide Factor Specification Temperature Operating 0 to 75 C 32 to 167 F Storage 40 to 75 C 40 to 167 F Relative humidity noncondensing Operating 10 to 90 Nonoperating 5 to 95 39 C 5 to 95 102 F Interfaces Communications connector Standard RJ 11 connector Power Requirements 3 3 volts 5 5 volts 5 ...

Page 110: ...5 1 audio line out jack 1 10 Automobile Power Adapter Charger 1 12 connecting 3 13 tasks supported by 3 7 B battery bay device supported 3 2 inserting battery pack into 3 3 removing battery pack 3 3 battery bay primary 1 8 battery charge information displays hotkey 2 6 2 8 in Windows 3 9 increasing accuracy of 3 9 interpreting 3 10 battery light 1 6 battery packs calibrating 3 14 charging 3 7 disc...

Page 111: ...1 11 5 3 Wireless On Off 2 11 C cable lock connecting 7 5 cable s modem 6 1 6 2 network 6 4 security 7 5 calibration battery 3 14 camcorder 5 4 cap replacing pointing stick 2 3 caps lock light 1 5 CD displaying contents of 4 12 inserting 4 9 removing 4 10 4 11 CD drive inserting CD into 4 9 inserting into MultiBay 4 17 locations supported 4 3 removing CD 4 10 4 11 See also drives charge sequence 3...

Page 112: ...ring for 4 1 MultiBay 1 10 optical disc 1 7 primary hard drive 1 15 replacing with weight saver 4 18 shipping 4 2 DVD displaying contents of 4 12 inserting 4 9 removing 4 10 4 11 DVD drive inserting DVD 4 9 inserting into MultiBay 4 17 locations supported 4 3 removing DVD 4 10 4 11 See also drives E electrostatic discharge ESD 4 2 embedded numeric keypad 2 13 enabling internal keypad 2 13 num lock...

Page 113: ...nd critical low battery condition 3 12 and removing a hard drive 4 5 exiting 1 2 3 13 file space requirements for 8 12 initiating 2 7 hotkeys defined 2 5 shortcut reference to commands 2 6 with external keyboards 2 9 hub USB 7 3 I increasing RAM 8 12 infrared linking to a device 6 5 port 1 9 transmissions 6 6 using Standby with 6 6 J jack s microphone 1 10 5 1 5 2 RJ 11 1 10 6 1 RJ 45 1 13 stereo ...

Page 114: ...e jack 1 10 5 1 5 2 microphone external connecting 5 3 microphone jack 5 1 microphone internal 5 1 Microsoft logo key 1 3 modem cable 6 1 6 2 country specific adapter 6 3 jack 1 10 Modem and Networking guide 6 2 Modem Command Guidelines Advanced Users Only 6 2 monitor external connecting 7 1 using with other video devices 5 4 mouse external 2 4 MultiBay 1 10 devices supported 3 2 4 3 inserting bat...

Page 115: ... and disconnecting 7 1 pointing device preferences 2 4 pointing stick buttons 2 1 cap replacing 2 3 location 2 1 using 2 3 Port Replicator 2 4 port infrared 1 9 6 5 power switching between AC and battery 3 1 See also battery power power button 1 2 power connector 1 12 Power Meter Windows 3 9 power Standby light 1 5 powered USB 1 12 presentation mode button 2 11 primary battery pack defined 3 2 See...

Page 116: ...Step Windows 2000 3 19 speakers 1 11 speakers external connecting 5 2 stereo speaker headphone line out jack 5 1 speakers internal stereo 5 1 specifications notebook 9 1 Standby and critical low battery condition 3 12 and removing a hard drive 4 5 exiting 1 2 2 7 initiating with hotkey 2 6 2 7 using with infrared 6 6 stereo speaker headphone line out jack 5 1 S Video devices 5 4 S Video out jack 1...

Page 117: ...nnectors 1 12 7 3 devices 7 3 hubs 7 3 legacy support 7 3 with power connector 1 12 utilities See software V VCR defined 5 4 switching image to or from 2 6 7 2 vent s exhaust 1 7 intake 1 13 VGA display connector 1 13 video capture card 5 4 video devices switching image to or from 7 2 video devices switching image to or from 2 6 volume adjusting 5 2 buttons 1 11 W weight saver 4 18 Windows applica...

Reviews: