background image

2-3

Troubleshooting

T

rou
bl

esh

o

ot

in

g

Most problems with the hub can be diagnosed using the LEDs on its front 
panel. The following section describes the normal LED pattern during self-
test, and LED patterns that indicate error conditions on the hub.

Interpreting LED Status

Two types of LEDs exist on the hub.  They are:

Hub Status LEDs.  These LEDs reflect certain conditions that exist on the 
hub at large and are not explicitly referring to a given port.

Port Status LEDs.  These LEDs reflect basic conditions (for example, Link 
Beat being enabled) that exist on a specific port.

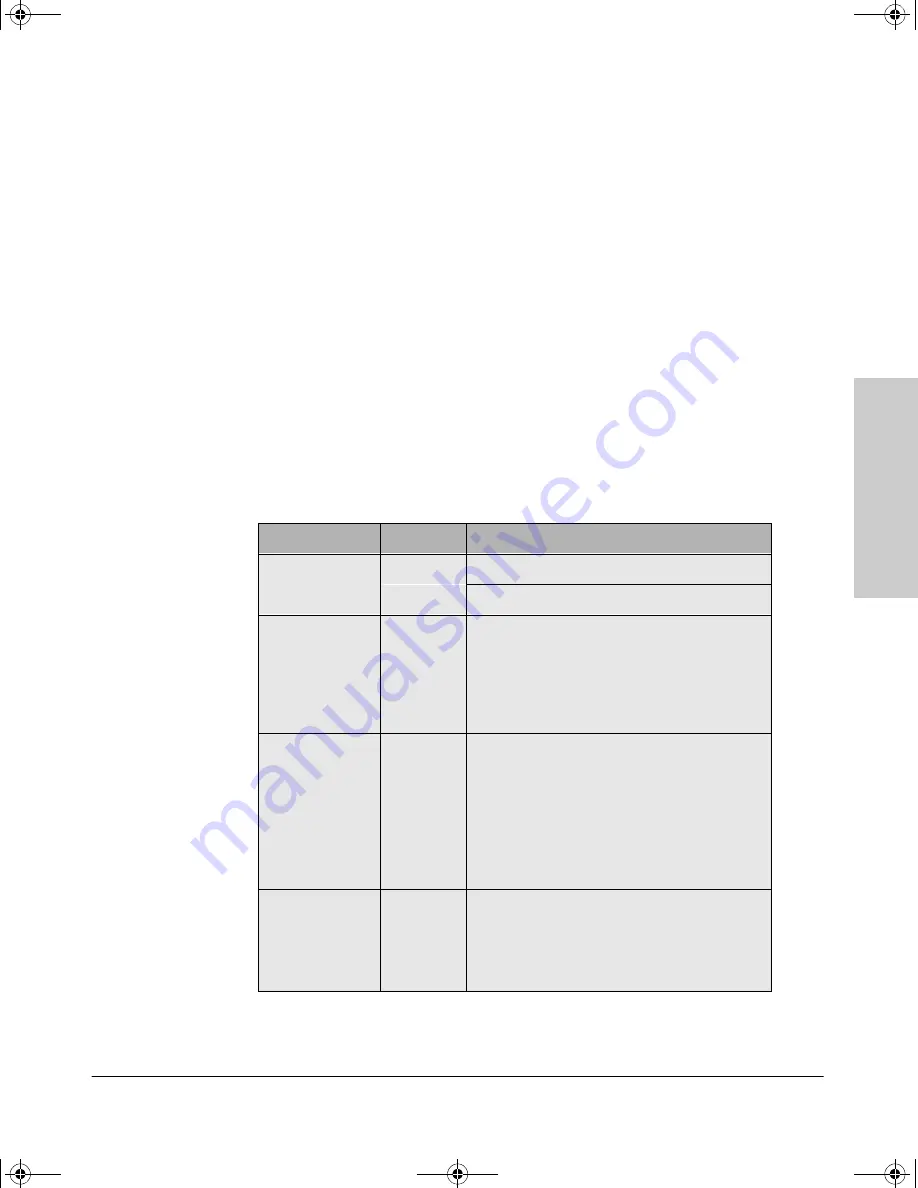
Status information for both are described in the following tables.

Interpreting Hub Status LEDs

The hub status LEDs indicate whether the hub is functioning properly.

LED

LED Color

Meaning of LED

Power


Green

On

 indicates the hub is receiving power.

Off 

indicates the hub is not receiving power.

Activity

Green

Flickering

 (rapid flashing) indicates a packet is 

being transmitted to or from a port. Normally, the 
LED appears to flicker. In heavy traffic, it may 
appear on all the time.

Off

 indicates no packet is being transmitted to or 

from a port.

Fault

Orange

On

 indicates an error has been detected on the 

hub.

Off

 indicates no error has been detected on the 

hub.

Port LED Flash 

on for.75 seconds and turn off 

for.75 seconds, indicating the port is partitioned.  
The Fault LED does NOT illuminate when ports are 
partitioned.

Collision

Orange

On

 indicates a collision is detected.  If it appears 

on continuously (with no flicker), it is a possible 
indicator of a network fault or an improperly 
terminated cable.

Off

 indicates no collision has been detected.

,QVWDOOEN3DJH0RQGD\2FWREHU30

Summary of Contents for 10Base-T 24

Page 1: ...g HP ProCurve 10Base T Hubs Installation Guide HP 10Base T Hub 12 HP 10Base T Hub 12M HP 10Base T Hub 24 HP 10Base T Hub 24M For world wide support on all HP Network Connectivity Products visit our web site at http www hp com go procurve ...

Page 2: ... QVWDOO EN 3DJH 0RQGD 2FWREHU 30 ...

Page 3: ...HP ProCurve 10Base T Hubs Installation Guide QVWDOO EN 3DJH L 0RQGD 2FWREHU 30 ...

Page 4: ...ument is subject to change without notice HEWLETT PACKARD COMPANY MAKES NO WARRANTY OF ANY KIND WITH REGARD TO THIS MATERIAL INCLUDING BUT NOT LIMITED TO THE IMPLIED WARRANTIES OF MERCHANTABILITY AND FITNESS FOR A PARTICULAR PURPOSE Hewlett Packard shall not be liable for errors contained herein or for incidental or consequential damages in connection with the furnishing performance or use of this...

Page 5: ... arrive at the destination device collision detection A sample hub from the family is shown here to indicate common features Figure 1 The HP ProCurve 10Base T Hub 24M J3303A Front and Rear Views Twisted Pair port LEDs Twisted pair ports MDI MDI Xswitch for port 1 Activity LED Collision LED Fault LED Power LED AUI Xcvr LED AUI Xcvr Slot Clear Button Reset Button Console Port Front View AUI Xcvr Slo...

Page 6: ... Port 1 Only 1 7X 2X 8X 3X 9X 4X 10X 5X 11X 6X 12X 1 Xcvr Reset Console Fault Power Clear 7 2 8 3 9 4 10 5 11 6 12 Act Col ProCurve 10Base T Hub 12M HP J3301A AUI Xcvr Slot 10 Mbps Xcvr Port MDI X out In MDI Port 1 Only 1 13X 7X 19X 2X 14X 8X 20X 3X 15X 9X 21X 4X 16X 10X 22X 5X 17X 11X 23X 6X 18X 12X 24X 1 Xcvr Reset Fault Power 7 2 8 3 9 4 10 5 11 6 12 13 19 14 20 Act 15 21 16 22 Col 17 23 18 24 ...

Page 7: ...cable An AUI Xcvr slot for installing one of the HP Transceiver modules HP Fiber Optic Transceiver Module HP J2606A for 10Base FL Allows you to connect your hub to a fiber optic backbone HP Twisted Pair Transceiver Module HP J2607A for 10Base T Adds another RJ 45 port for a total of 13 twisted pair ports on the J3300A and the J3301A hubs HP ThinLAN Transceiver Module HP J2608A for 10Base2 HPAUIPor...

Page 8: ... station or by pressing the Reset button Other Features Password setting capability on both the HP J3301A and HP J3303A enabling you to add and remove passwords as needed for selective entry into the hub management environment Passwordscan be setfromaWorldWideWebbrowser a network management station through an ASCII Console session If you forgetyourpassword andarelockedoutofthehub smanagement envir...

Page 9: ...ll Mounting Capability á á World Wide Web management interface á HP EASE á SNMP á RMON 9 Groups á ASCII Console Management á Telnet Console Management á Modem Support á Out of Band Management for remote console connection á Eavesdrop Prevention á Intruder Prevention á Backup Links á IP Configuration á Community Name Management á Alarms á MIB II á MAU Connectivity á á Link Test á Ping Test á ThinLA...

Page 10: ...Table 3 Factory Default Settings on HP ProCurve 10Base T Hubs Feature J3300A J3302A J3301A J3303A Port Status Enabled Enabled MDI MDI X Port Status MDI X Button not depressed MDI X Button not depressed Power when power cord is connected On On Port Counters All 0 Link Beat detection Enabled Enabled QVWDOO EN 3DJH YLLL 0RQGD 2FWREHU 30 ...

Page 11: ...9 Twisted Pair Cascade Connections 1 9 ThinLAN Connections 1 11 ConnectingtheHPProCurve10Base THubstoaFiber OpticBackbone 1 12 2 Troubleshooting Troubleshooting Approaches 2 1 Diagnosing with the LEDs 2 2 Interpreting LED Status 2 3 Interpreting Hub Status LEDs 2 3 Interpreting Port Status LEDs 2 4 LED Operation 2 5 Hub Maintenance Tasks 2 6 Testing the Hub Only 2 6 Clearing a Password for the ASC...

Page 12: ...nd Cable Pin Outs B 3 Minimum Cable Pinout for ASCII Console Connection B 4 C Safety and Regulatory Statements Mounting Precautions C 1 Power Precautions C 2 Safety Information C 3 Informations concernant la sécurité C 4 Hinweise zur Sicherheit C 5 Considerazioni sulla sicurezza C 6 Consideraciones sobre seguridad C 7 Safety Information Japanese C 8 Regulatory Statements C 9 Index QVWDOO EN 3DJH 0...

Page 13: ...ibes how to install the hub Topics in this chapter include verifying included parts installing the transceiver module verifying the hub operates correctly mounting the hub connecting the hub to your network connecting hubs together QVWDOO EN 3DJH 0RQGD 2FWREHU 30 ...

Page 14: ...uide 5967 6862 A power cord one of the following accessory kit 5183 7210 bumper feet 4 bracket to rack screws 12 24 7 16 4 bracket to hub screws M4 5 16 4 mounting brackets for 44 55mm 1 75 height hub 5183 1381 2 Install the transceiver module You may want to install the transceiver module and any external transceiver you may want to attach to it before installing the hub Transceiver modules may r...

Page 15: ...ivers Installation Guide p n 5962 0066 for specific instructions Your transceiver modules can be one of the following HP J2606A Fiber Optic Transceiver Module HP J2607A Twisted Pair Transceiver Module HP J2608A ThinLAN Transceiver Module HP J2609A AUI Port Module 3 Verify the hub operates correctly Before mounting the hub connect it to a power source and verify that the hub will operate correctly ...

Page 16: ...ble If the LEDs behave in a different way the hub may failed self test See the LED operation table in chapter 2 Troubleshooting for a complete description of the LED behavior Table 1 1 Self Test times for LEDs LED HP J3300A HP J3302A HP J3301A HP J3303A Port LEDs Fault 5 seconds 10 seconds Activity Collision 5 seconds 3 seconds Xcvr Stays on if module installed Off if no module installed Stays on ...

Page 17: ...iated with it If the self test time range elapses and the Fault LED continues to stay on instead of turning off the hub may have an error condition If repeating the self test does not correct the problem and the Fault LED still stays continuously on contact your HP authorized reseller for replacement information After the hub has passed its self test you are ready to mount the hub Unplug the hub a...

Page 18: ...osition the hub in the rack or cabinet and slide it up or down until the rack holes line up with the bracket holes 3 Then attach the bracket to the rack with the No 12 24 7 16 screws and black nylon washers included in the accessory kit with a Phillips Cross head No 2 screwdriver A flatblade screwdriver will also work in assem bling the hub to the rack Make sure you have screws that fit your cabin...

Page 19: ...e hub should be flush with the wall The brackets should be positioned at the front of the hub The face of the hub should be pointing up Notethatthewoodscrewsarenotincludedintheaccessorykit Woodscrewshave apointedandforboringintothewood unlikerackscrewswhichareflatontheend Table Mounting To place the hub on a table or other horizontal surface no special tools are necessary Apply the four feet inclu...

Page 20: ... you can connect your hub to your network To connect a device to the hub using unshielded twisted pair UTP cable push the RJ 45 plug at one end of the cable into the RJ 45 jack on the hub until the tab on the plug clicks into place Figure 1 4 The RJ 45 Connector unshielded twisted pair cable Category 3 4 or 5 Cat 3 4 maximum distance 100 meters Cat 5 maximum distance 150 meters RJ 45 Connector AUI...

Page 21: ...0 meters Category 5 cable length can be up to 150 meters Be sure that only one of the two hubs is using an MDI port the hub to device connection must always have MDI at one end usually a trans ceiver and MDI X at the other end usually a hub or switch when connecting the two with a straight through cable In the MDI X position use Port 1 to connect your hub to a PC or similar device using straight t...

Page 22: ...r Reset Console Fault Power Clear 7 2 8 3 9 4 10 5 11 6 12 13 19 14 20 Act 15 21 16 22 Col 17 23 18 24 AUI Xcvr Slot 10 Mbps Xcvr Port MDI X out In MDI Port 1 Only 1 13X 7X 19X 2X 14X 8X 20X 3X 15X 9X 21X 4X 16X 10X 22X 5X 17X 11X 23X 6X 18X 12X 24X 1 Xcvr Reset Console Fault Power Clear 7 2 8 3 9 4 10 5 11 6 12 13 19 14 20 Act 15 21 16 22 Col 17 23 18 24 ProCurve 10Base T Hub 24M ProCurve 10Base ...

Page 23: ...e entire segment is only two The following illustration shows you how to connect three hubs together from one ThinLAN port to another Figure 1 7 10Base T Hub Stack Using ThinLAN Coax Connection ThinLAN 10 Mbps Xcvr Port MDI X out In MDI Port 1 Only 1 13X 7X 19X 2X 14X 8X 20X 3X 9X 4X 10X 5X 11X 6X 12X 1 Xcvr Reset Console Fault Power Clear 7 2 8 3 9 4 10 5 11 6 12 13 19 14 20 Act 15 21 16 22 Col 1...

Page 24: ...igure 1 8 Fiber Optic Backbone Connection For more information about cabling configuration see the documentation accompanying the optional recessed transceivers Also see the Designing HP ProCurve Networks Part Number 5965 6578E guide for information on valid network topologies 10 Mbps Xcvr Port MDI X out In MDI Port 1 Only 1 13X 7X 19X 2X 14X 8X 20X 3X 15X 9X 21X 4X 16X 10X 22X 5X 17X 11X 23X 6X 1...

Page 25: ...in this chapter Note that information in this chapter is also covered in chapter 7 of the HP ProCurve 10Base T Hubs Management and Configu ration guide Youcan diagnosehubsontheHPJ3301Aand HPJ3303A the managedhubs by By using the Browser Interface a Web based interface that provides a full management environment By using the ASCII console s diagnostic functions as described in the HP ProCurve 10Bas...

Page 26: ...unplugging and plugging the hub back in If the Power LED is still not on verify that the AC source works by plugging another device into the outlet Ortry plugging the hub into a different outlet or try a different power cord If this condition persists call your HP authorizedLANdealerorHPrepresentativefor assistance I lost the password Press the Clear button for 10 seconds See page 2 4 for more det...

Page 27: ...unctioning properly LED LED Color Meaning of LED Power Green On indicates the hub is receiving power Off indicates the hub is not receiving power Activity Green Flickering rapid flashing indicates a packet is being transmitted to or from a port Normally the LED appears to flicker In heavy traffic it may appear on all the time Off indicates no packet is being transmitted to or from a port Fault Ora...

Page 28: ...is enabled a transceiver module is installed Off indicates the Xcvr port is disabled Slow Flash indicates the port has been auto partitioned Theslowflash isapproximatelyonceevery1 5seconds 75secondsonand 75secondsoff LED Color Meaning of LED Twisted pair Ports Green On indicates Link Beat is detected from the attached node Off indicates the port is not receiving the link beat signal from the attac...

Page 29: ...See the figure in chapter 1 that details the MDI MDI X switch ON ON Very frequent collisions are occurring which could indicate a network fault or improperly terminated cable ON Slow Flash Slow Flash The port has been auto partitioned because of an excessive collision condition Check cable connections and status of attached network devicesforcausesofthe excess collisions The hubwillautomaticallyre...

Page 30: ... test If any error conditions exist in the hub the LEDs should display the condition Clearing a Password for the ASCII Console On the HP J3301A and HP J3303A you can use the Clear button to clear a forgotten console password that was previously configured on the hub The password is configured from the ASCII console Note that the HP J3300A and HPJ3302A hubsdo nothave aClear button because they dono...

Page 31: ...ce and the Browser Interface you can run the following hub to node connectivity tests Link Test A test of the link layer MAC Address connection between a local device and a designated remote device Ping Test Atestofthe networklayer IPAddress pathbetweenthe managed device and another device on an IP network that responds to IP packets Figure 2 2 Running a Connectivity Test See your LAN adapter s ma...

Page 32: ...HP ProCurve 10Base T Hubs Management and Configuration guide You can determine the current firmware version on the hub from the ASCII console Look for the SNMP Agent EEPROM version number to determine the revision When you access the console the version number appears It is also on the General System Information Screen under the Status and Counters Menu and the Identity Window in the Browser Inter...

Page 33: ... the hub Environmental Width 42 5 cm 16 7 in Depth 23 8 cm 9 4 in Height 4 36 cm 1 7 in Weight 8 lbs 13 oz 8 8 lbs AC voltage 100 127 volts 200 240 volts Maximum current 5A max 0 3A max Frequency range 50 60 Hz 50 60 Hz Operating Non Operating Temperature 0 C to 55 C 32 F to 131 F 40 C to 70 C 40 F to 158 F Relative humidity non condensing 10 to 95 at 40 C 104 F 10 to 90 at 65 C 149 F Maximum alti...

Page 34: ...Class A EN 55022 Class B CISPR 22 Class A VCCI Level I Complies with Canadian EMC Class A requirements Complies with Australia New Zealand EMC Class A requirements Immunity SeetheDeclarationofConformityfordetailsattheendofAppendix C Safety and Regulatory Statements in this guide Safety IEC950 1991 A1 A2 EN60950 I 1992 A1 A2 CSA950 NOM 019 SCFI 1993 UL1950 QVWDOO EN 3DJH 0RQGD 2FWREHU 30 ...

Page 35: ... installation are correctly wired Note that each pin out does not necessarily match the pin out for the corresponding HP cable but cables manufactured to follow the minimum pin out will function correctly Straight Through Twisted Pair Cable for Hub to Computer Network Connection To connect PCs or other network devices to the hub use a straight through 10Base T cable The twisted pair wires must be ...

Page 36: ...t be a twisted pair Pins 4 5 7 and 8 are not used in this application although they may be wired in the cable N ot e Incorrectly wired cabling is the most common cause of problems for LAN communications HP recommends that you work with a qualified LAN cable installer for assistance with your cabling requirements QVWDOO EN 3DJH 0RQGD 2FWREHU 30 ...

Page 37: ...connect a PC to be used as the console To make this connection you must use a null modem cable or you can use the minimum cable pin out described below Hub End MDI X Computer or Transceiver End MDI Signal Pins Pins Signal receive receive transmit transmit 1 2 3 6 1 2 3 6 transmit transmit receive receive Hub End MDI X Computer or Transceiver End MDI Signal Pins Pins Signal receive receive transmit...

Page 38: ...on so if you wish to use an unlisted cable you can verify that the cables used in your installation are correctly wired Note that each pin out does not neces sarily match the pin out for the corresponding HP cable but cables manufac tured to follow the minimum pin out will function correctly Minimum Cable Pinout for ASCII Console Connection PC end 9 pin male Hub end 9 pin male 2 2 Rx 3 3 Tx 5 5 GN...

Page 39: ...he ports that will be used Verify that there is room for the grouped cables to trail out from the side of the hub Allow at least 2 54 cm 1 inch in the front of the hub In the back of the hub allow at least 3 8 cm 1 1 2 inches of space for the power cord Ensure that the HP ProCurve 10Base T Hub does not overload the power circuits wiring and over current protection To determine the possibility ofov...

Page 40: ...erating ambient temper ature might exceed 45 C 113 F Power Precautions Follow these precautions when unplugging and plugging in power to the hub as well as adding or removing transceiver modules N ot e The hub does not have a power switch it is powered on when the power cord is plugged in The hub s power supply automatically adjusts to any AC power source between 100 127 volts and 200 240 volts Th...

Page 41: ... transient volt ages such aslightning or disturbancesin the electrical utilities power grid Handle exposed metal components ofthe networkwith caution Servicing There are no user serviceable parts inside these products Any servicing adjustment maintenance or repair mustbe performed only by service trained personnel These products do not have a power switch they are powered on when the power cord is...

Page 42: ...tensions transitoires dangereuses telles que la foudre ou des perturba tions dans le réseau d alimentation public Manipulez les composants métalliques du réseau avec précautions Aucune pièce contenue à l intérieur de ce produit ne peut être réparée par l utilisateur Tout dépannage réglage entretien ou réparation devra être confié exclusivement à un personnel qualifié Cet appareil ne comporte pas d...

Page 43: ...tswerks Bei der Handhabung exponierter Metallbestandteile des Netzwerkes Vorsicht walten lassen Dieses Gerät enthält innen keine durch den Benutzer zu wartenden Teile Wartungs Anpassungs Instandhaltungs oder Reparaturarbeiten dürfen nur von geschultem Bedienungspersonal durchgeführt werden Dieses Gerät hat keinen Netzschalter es wird beim Anschließen des Netzkabels eingeschaltet Symbol für Dokumen...

Page 44: ...N possono occasionalmente andare soggetti a pericolose tensioni transitorie ad esempio provocate da lampi o disturbi nella griglia d alimen tazione della società elettrica siate cauti nel toccare parti esposte in metallo della rete Nessun componente di questo prodotto può essere riparato dall utente Qualsiasi lavoro di riparazione messa a punto manutenzione o assistenza va effettuato esclusi vamen...

Page 45: ...ble que los cables de la LAN se vean sometidos de vez en cuando a voltajes momentáneos que entrañen peligro rayos o alteraciones en la red de energía eléctrica Manejar con precaución los componentes de metal de la LAN que estén al descubierto Este aparato no contiene pieza alguna susceptible de reparación por parte del usuario Todas las reparaciones ajustes o servicio de mantenimiento debe realiza...

Page 46: ...C 8 Safety and Regulatory Statements Safety Information Japanese Safety and Regulatory Statements Safety Information Japanese QVWDOO EN 3DJH 0RQGD 2FWREHU 30 ...

Page 47: ...equipment does cause interference to radio or television reception which can be determined by turning the equipment off and on the user is encouraged to try to correct the interference by one or more of the following measures Reorient or relocate the receiving antenna Increase the separation between the equipment and receiver Connect the equipment into an outlet on a circuit different from that to...

Page 48: ... This equipment complies with ISO IEC Guide 22 and EN55022 Class A with unshielded cables and EN55022 NoteWith unshielded cables this is a Class A product In a domestic environment this product may cause radio interfe ence in which case the user may be required to take adequate measures QVWDOO EN 3DJH 0RQGD 2FWREHU 30 ...

Page 49: ...C 11 Safety and Regulatory Statements Regulatory Statements Safety and Regulatory Statements QVWDOO EN 3DJH 0RQGD 2FWREHU 30 ...

Page 50: ... QVWDOO EN 3DJH 0RQGD 2FWREHU 30 ...

Page 51: ...ckbone 1 12 firmware enhancements 2 8 front of the hub status LEDs 2 3 H HP AdvanceStack SNMP Module LED pattern during self test 2 5 hub at a glance iii connecting to fiber optic backbone 1 12 description iii features v mounting 1 5 reference 2 3 troubleshooting 2 1 hub operation verifying 1 3 hub to hub network connections with the MDI switch 1 9 I IEEE 802 3 Type 10Base T standard iii included ...

Page 52: ... network connections to the hub 1 8 R rack mounting 1 5 instructions for 1 5 resetting the hub troubleshooting procedure 2 6 RJ 45 jack 1 8 S Security LED 1 4 Self Test 2 5 Self test LED pattern during 1 4 specifications A 1 connectors A 2 electrical A 1 electromagnetic A 2 environmental A 1 physical A 1 status LEDs description 2 3 T table mounting 1 6 terminator for a thin LAN segment 1 12 ThinLA...

Page 53: ... QVWDOO EN 3DJH 0RQGD 2FWREHU 30 ...

Page 54: ...Technical information in this document is subject to change without notice Copyright Hewlett Packard Company 1997 1998 All rights reserved Reproduction adaptation or translation without prior written permission is prohibited except as allowed under the copyright laws ...

Reviews: