


EN
Model Assembly
Continued
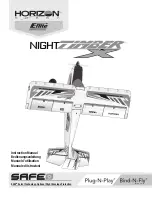
Horizontal Tail Installation
1. Slide the horizontal stabilizer joiner (
A
) into the hole in the rear of the fuselage.
2. Install the two piece (left and right) horizontal stabilizer as shown. Ensure the
control horn faces down.
3. Connect the internal LED light connector (two pin connector) to the ports where
the horizontal stabilizer meets the fuselage.
4. Secure the horizontal stabilizer pieces in place using the two included 3 x 12 mm
self tapping screws (
B
).
5. Attach the pushrod keeper to the elevator control horn.
Tip:
For maximum 3D performance, attach the elevator pushrod to the inner hole of
the elevator control horn.
Pushrod Keeper Installation
1. Insert the end of the pushrod with the 90˚ bend into the control horn and Insert
the pushrod into the hole in the pushrod keeper.
2. Rotate the pushrod keeper and press into place on the pushrod until it clicks
into position.
B
A
A
1
2
3 x 12mm
self-tapping
button head
6
Night Timber X 1.2m
Lightweight and Heavy Stabilizer Joiners
The Night Timber X includes two stabilizer joiners; a lightweight composite joiner, and a heavier steel joiner. For tame fl ying and maximum
stability in general fl ight, use the lightweight joiner to keep the CG at the front of the recommended CG range. For maximum performance
and stability in high alpha maneuvers, use the steel joiner to shift the CG to the rear of the recommended CG range.


