background image


2/6              


S-8109.1-TAD-FTT-ENG           Rev. A.2          01/2018 

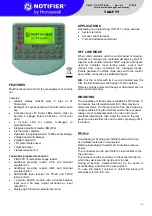
Terminal with back light and display. 


TAD-FTT 

INSTALLATION                              

TAD-M is designed to be installed covered sites, not 
directly exposed to atmospheric conditions; direct 
exposal to sunlight can damage the display 


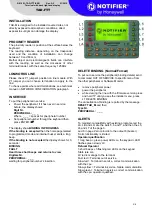
PROXIMITY READER 

The proximity reader is position at the surface below the 
keyboard 
The  reading  distance,  depending  on  the  trasponder 
used  and  the  condition  of  installation,  can  change 
between 10 and 60 mm. 
Methal  object  and  electromagnetic  fields  can  interfere 
with  the  reading,  as  well  as  the  closeness  of  other 
terminals/reader  with the same frequency 125KHz 
   

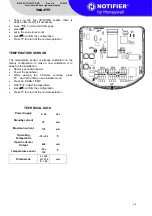
LONWORKS LINE 

Please check P1 jumper’s position on line module. With 
P1  jumper  you  can  choose  termination  to  apply  to  the 
line 
To choose points where add terminations, see technical 
manual in NETWORK CONFIGURATION paragraph. 
 

IN SERVICE 

To put the peripheral in service: 

  Power the peripheral; if it has never in service 

before, the display shows: 

Digit Nr. 
PERIPHERAL : _ _ _


Where  

_ _ _

 = spaces for pheripheral number 

  Set peripheral number througt the keyboard then 

press ENTER  


The display show 

BINDING IN PROGRESS


If the binding is accepted 

then the homepage related 

to programmed mode and internal buzzer emits a long 
beep. 

If the binding is not accepted 

the dipslay


shows for 3 

seconds

BINDING 
FAULT 
Hear three short beeps and returns to view 
Digitare Nr. 
PERIPHERAL : _ _ _


waiting for peripheral number’s insertion. 


DELETE BINDING (Normal/Forced) 

To put out o service the peripheral (binding delete) send 
to command OUT OF SERVICE to specific menu from 
the other peripheral or Software Monitor. 
 

  remove peripheral power 

  power the peripheral 

  while viewing the line with the firmware version press 

and hold 

 until you see the installer menu, press 

L1 DELETE BINDING 

The cancellation of binding is reported by the message: 

RESET TAD_M

 and then 

Type Nr. 
PERIPHERAL : _ _ _ 
 

ALERTS 

To maintain compatibility with existing programs, led the 
LA, LB and LD, are the exits 5, 6 and 7, and then the L5, 
L6 and L7 of the page 0. 
Led 8 in page Zero coincide to the output 8 (buzzer) 
So its functionality is limited. 

Operator qualification 

1 long beep + green power LEDs on the LED 
flashes green slowly LC.


Refusal Operator 

3 short beeps +3 flashing red LEDs on the keypad 
Stato rete Lon 
LC led is manage to the terminal 
Fast red = Terminal out of service 
Slow red = Terminal in service, correct communication 
with the cpu 
Slow yellow = Terminal in service, failure communication 
Slow green = Terminal in service, correct communication 
with the cpu, operator qualified. 


Summary of Contents for Notifier TAD-FTT

Page 1: ...nel is missing terminal can manage the controlled passage by itself or together with another terminal MGP outputs and inputs used for actuator local forcing alarm sensor and manual door open command are managed locally Events generated in offline mode are sent to the control panel when connection is established again N B For the central with fw 6 xx are handled only the PIN the first trasponder an...

Page 2: ...ed to programmed mode and internal buzzer emits a long beep If the binding is not accepted the dipslay shows for 3 seconds BINDING FAULT Hear three short beeps and returns to view Digitare Nr PERIPHERAL _ _ _ waiting for peripheral number s insertion DELETE BINDING Normal Forced To put out o service the peripheral binding delete send to command OUT OF SERVICE to specific menu from the other periph...

Page 3: ... recognized are highlighted by a S Press to confirm the configuration Press to return at the normal operation RECEPTION TRANSMISSION FIRMWARE Remove peripheral power Power the peripheral While viewing the Firmware versione press and hold untill you see installer menù Press L3 RECEPTION FIRMWARE if you want to receive the firmware from another peripheral Press L4 TRASMISSION FIRMWARE If you want se...

Page 4: ...ady calibrated on the factory configuration to make a new calibration or to adapt on the installation Remove peripheral power Power the peripheral While viewing the Firmware versione press and hold untill you see installer menù Press L6 SENS TEMP With adjust the teperature press to confirm the configuration Press to return at the normal operation TECHNICAL DATA Power Supply 9 30 Vcc Standby curren...

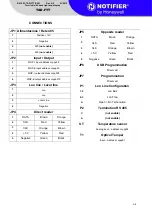
Page 5: ...al line 1 Lon 2 Lon 3 Local Line 4 Negative JP4 Direct reader 1 DATA Brown Orange 2 CLS Red Yellow 3 CLK Orange Brown 4 5 V Yellow Red 5 Negative Green Black JP5 Opposite reader 1 DATA Brown Orange 2 CLS Red Yellow 3 CLK Orange Brown 4 5 V Yellow Red 5 Negative Green Black JP6 USB Programmation Riserved JP7 Programmation Riserved P1 Lon Line Configuration 1 2 Lon Bus 2 3 Lon Free A Open No Termina...

Page 6: ...l B n 85 Centergross Tel 051 864855 Fax 051 6647638 E mail notifier bologna notifier it 50136 Firenze Via B Telesio 15 Tel 055 69706 Fax 055 556529294 00118 Roma Via Del Casale Santarelli 51 Tel 06 7988021 Fax 06 79880250 E mail notifier roma notifier it 80143 Napoli Palazzo Prof Studi Centro Direzionale Isola E2 Scala B Piano 5 Tel 081 7879398 Fax 081 7879159 E mail notifier napoli notifier it 70...

Reviews: