background image

30

www.honeywell.com

Page 30

MI Modem

Modem Configuration Program V1.10

Tue Sep 24 07:55:50  1996

Modem Firmware......: V2.10
Modem ID............: 00000000
Call-In Phone Number: 0-000-000-0000

  Dialing Setup

Type (Pulse or Tone): Tone

(P,T)

Dialing Speed.......: 95

milliseconds (50 - 255)

Auto Answer After...: 1

Rings (1 - 255 or 0=NO ANSWER)

Number of Retries...: 0

(0 - 254)

  Modem Timing

Wait for Dial Tone..: 2

seconds  (2 - 255)

Wait for Carrier....: 30

seconds  (1 - 255)

Comma Delay.........: 2

seconds  (1 - 255)

No Activity Time-out.: 10

minutes   (1 - 30 or 0=DISABLE)

  Alarms Setup

Battery Low Enable..: Y

(Y, N)

Alarm Call-In Enable: Y

(Y, N)

<F1-Load Setup>     <F3-Read Modem>

<F5-Print Setup>

<F2-Save Setup>     <F4-Setup Modem> <F6-Factory Defaults> <F10-EXIT>

Main Screen after Pressing the F3 Key

Figure 13

Modem Configuration Program (DOS)

At  this  point  you  can  accept  the  factory  defaults  or  change  the

parameters.

Modem ID: A Modem ID number must be entered or the software

will display a message "Not All Required Fields are Filled".  The

number entered must contain 8 digits.  For example: if the modem ID

number is to be "1", place 7 zero's in the field prior to entering the "1",

as shown, 00000001.  Each Modem ID must be unique and cannot

contain alpha characters.

Call-In Phone Number:   The call in phone number is the number the

modem is to dial in the event of an alarm condition.  Up to 37 characters

may be entered into this field to accommodate long distance or pager

dialing.

Summary of Contents for Mercury

Page 1: ...Honeywell Process Solutions Mercury Modem User Manual October 2010 V 1 02 Honeywell ...

Page 2: ...the Network Telecom will accept no responsibility should difficulties arise in such circumstances Thetransmitlevelfromthisdeviceissetatafixedlevelandbecauseofthistheremay be circumstances where the device does not give its optimum performance Before reporting such occurrences as faults please check the line with a standard Telepermittedtelephone anddonotreportafaultunlessthetelephoneperformance is...

Page 3: ...onal State special requirements 3 The telco has the right to make changes to their network which may affect the operation of your equipment provided you are given adequate advance written notice to permit correct operation 4 In case of operational problems disconnect your unit by removing the modular plug from the telco jack If your regular phone or other device or system still works properly your...

Page 4: ...ve desig nated by the supplier Any repairs or alterations made by the user to this equipment or equipment malfunctions may give the telecommunications company cause to request the user to disconnect the equipment Users should ensure for their own protection that the electrical ground connections of the power utility telephone lines and internal metallic water pipe system if present are connected t...

Page 5: ...0 MercuryModemBarrierBox 21 WiringDiagramforMercuryModem 22 ModemExpansionBoard 23 AddingaModemExpansionBoard 24 ModemExpansionBoardLayout 25 ConfiguringtheModem 26 ModemConfiguration DOS 27 ModemConfiguration Windows 34 InstallationinDivision2HazardousLocations UL 46 InstallationinDivision2HazardousLocations CSA 48 NeedHelp 50 TechnicalSupport 53 ListofFigures 54 Index 55 Table of Contents ...

Page 6: ...reliableoperation Circuitboardjumperspermit settingthelocalbaudratefortheconnectedinstrumenttobedifferentthan the modulated baud rate This feature permits leaving the instrument s baud rate set at 9600 baud for direct connections with a laptop even though the modem operates at 2400 baud The modem comes standard with either anAlkaline Disposable Pack or Alkaline Receptacle Pack but an optional Lith...

Page 7: ... Battery Connector 1 U20 Modem Firmware 2 Thumbscrew Hole 5 J4 Battery Connector 7 TB1 Serial Port Hookup 8 J5 RJ11 Phone Jack 10 JP4 JP5 Baud Rate Jumper 6 LED Status Indicators Modem Layout Figure 1 9 TB2 Protective Ground Lug 11 J1 Expansion Board Connector ...

Page 8: ... connector is used to configure the Modem 4 J3 Battery Connector ThisBatteryConnectorcanbe usedwhen the integral modem is installed into a Mercury Electronic Recorder or Mercor ECAT 5 J4 Battery Connector ThisBatteryConnectorcanbe usedwhen the integral modem is installed into a Mercor ECAT or Mercury Electronic Recorder 6 LED Status Indicators 1 Power 5 N A 2 OFF HOOK 6 Alarm 3 Carrier 7 Port A Se...

Page 9: ...re not set and will change during power up Standby LED 4 then LED 3 will light up momentary and then go off LED 1 and 7 will light up and stay lit for about six seconds then go off Power Down All LEDs are off 7 TB1 Modem Hookup Modem TB1 ECAT PULSE BRD SCIB TB1 Modem TB1 ER Mainboard TB1 1 5 2 6 3 7 4 8 1 5 2 6 3 7 4 8 A A RX TX GND A A RX TX GND A A RX TX GND A A C T R ...

Page 10: ... in a safe area as opposed to hazardous area in accordance with Mercury Instruments guide lines for modem installation 9 TB2 Grounding Lug This terminal provides a direct connection to the telephone line surge suppression components on the modem board It should be connected via a short length of wire to an enclosure ground terminal located nearby Note The best protection against lightning surges i...

Page 11: ... and JP5 the appropriate position Insure that the Instrument Baud Rate Item 126 in the Mercor ECAT and Mini or Item 588 in the Electronic Recorder is set the baud rate corresponding with the modem jumper settings 11 Expansion Board Connector Attach the expansion board cable to the modem by plugging the keyed connector without the vinyl pull tab into this connector red stripe down For more informat...

Page 12: ... package and under Instrument on the main menu line select Shutdown All data is stored in memory and the instrument is not obtaining data 2 When Shutdown is complete reach inside the instrument and unplug the main battery plug 3 Remove any battery or power supply mounted in the right hand position 4 Removethe 2 hexnutsholdingthedoorlatchtothecase Do not remove the latch or chassis bumper assembly ...

Page 13: ...the chassis latch post 6 If a battery or power supply is installed in the left hand position remove the upper right mounting screw 7 Install 1 60 1237 6 32x3 4BindingHeadScrew provided in kit in this hole from the outside of the case 8 Install 1 20 8673 Mounting Post provided in kit on the 60 1237 screw with the slotted end facing out The post is slotted for screwdriver use in tightening or loosen...

Page 14: ...he wiring 14 Verify that the hinged Modem Board Carrier Plate swings without interference with cables or plugs on the Output Pulse Board stack Reposition any that come in contact with the Carrier Plate If necessary the position of the hinges on the hinge mounting bracket can be adjusted to eliminate interference 15 Connect the GND TX and RX from the modem to the SCIB as shown on page 9 TB1 Modem H...

Page 15: ...e package and select Instrument then select Shutdown After the link is disconnected escape to clear the dialog box and select Disconnect Link 2 When Shutdown is complete reach inside the instrument and unplug the main battery plug 3 Removethebatterymountingplatebylooseningthe 4 screws and lift the battery plate up and out 4 Removethescrewsfromthe 4 cornersoftheERmainboard ...

Page 16: ... to the outside of the case on the hinge side 9 Attachthe20 8723StatusIndicatorLabelinavisiblelocation inside the ER Suitable locations would be on the inside of the door or the back or bottom surfaces inside the case 10 Insert the phone hookup wire through the Hubbell connector or conduit connector located on the right side of the ER 11 Install the RJ11 connector on the phone wire and plug it int...

Page 17: ...it matches the port on the computer Next move to the Transfer selection on the main menu line and press Enter Select Modem Link from the sub menu options and press Enter Enter the Site Phone Number and press Enter If the modem was installed correctly the NOT LINKED message located in the lower left hand corner of the computer screen will change to MODEM LINK Verification Windows To verify that the...

Page 18: ...hen click on Start Modem Link The message at the bottom right hand side of the screen should read DialingXXXXXXX X phonenumber Oncethemodemsconnect the message will change to Linking to Instrument If the modems were properly installed the message will change to green and read Linked Modem BoththeDOSandWindowsverificationwillactivatetheLEDsonthe Mercury Modem The LEDs provide visual feedback for th...

Page 19: ... may require different configurations If the Modem ExpansionBoardistobeusedforadditionalcommunicationportsand there is a requirement for barriers the 1200 Series Case or the Hennessy Aluminium Case may be the only options available Next the type of power supply must be considered Included in the basic modem is either the Alkaline Sealed Pack or the Alkaline Receptacle Power Pack Other power option...

Page 20: ... honeywell com Page 20 Basic External Mercury Modem Battery Plate Modem Board Underneath 40 1595 Alkaline Sealed Power Pack or 40 1865 Alkaline Receptacle Power Pack Hubbell Fitting Optional Quantity Figure 5 ...

Page 21: ...ry Plate AC Outlet Transformer 40 1847 Stahl Pulse Barrier 40 1837 MTL Serial Barrier 40 1836 P F Power Barrier 10 Pin Phoenix Connector Conduit Hubbell Fitting Mercury Modem Barrier Box Optional Items Modem Board Underneath Figure 6 ...

Page 22: ...22 www honeywell com Page 22 Wiring Diagram for the Mercury Modem Box with Field Wiring Connector Figure 7 ...

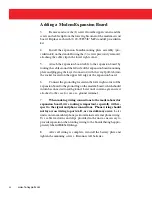
Page 23: ...host computer via the Mercury Modem Any device connected to the expansion ports must be able to provide a momentary dry contact closure Consideration must be made that the contact closer source be protected to buffer the contact closer and avoid any voltage spikes during transition To order the Modem Expansion Board Retrofit kit use the Mercury Instruments part number 40 2236 Adding a Modem Expans...

Page 24: ...ft edge of the expansion board 6 Connectthegroundluglocatedinthelowerrightcornerofthe expansion board to the ground lug on the modem board which should inturnbeconnectedtoearthground Laterunitscontainagreenscrew attached to the case for use as a ground terminal 7 When making wiring connections to the modem board or expansion board wire routing is important especially with re spect to the signal an...

Page 25: ...25 Page 25 Modem Ribbon Cable Connector Expansion Port B Expansion Port C Expansion Port D LED Status Indicators TB4 Ground Lug Modem Expansion Board Layout Figure 8 ...

Page 26: ... Mercury Modem The modem is no longer in Sleep Mode when the cable is plugged in LED indicators 1 7 are On and the modem cannot be used for communications while the configuration cable is plugged in Laptop Computer Mercury Modem Female D Connector Receptacle Serial Port i e COM1 COM2 Male D Connector Receptacle I O Cable P N 40 2200 J2 DE 9S Socket Connector ...

Page 27: ...e Mercury directory Then the following files are copied from the diskette in the A drive CFGMODEM EXE CFGMODEM PIF M1 BAT M2 BAT M3 BAT M4 BAT Before running the program you must determine which serial port the configuration cable is attached to for example COM1 COM2 etc Oncethatisdetermined attheC MERCURY MIMODEM prompt type the following M1 Press Enter if connected to COM1 M2 Press Enter if conn...

Page 28: ...om Page 28 Figure 10 Modem Configuration Program DOS Either way will work however if you wish to shell from Windows to run the program you must use the CFGMODEM PIF file Set up the Program Item Properties using Figure 11 ...

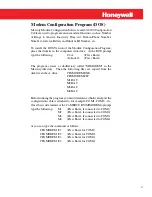
Page 29: ...connected to Modem Configuration Program DOS Modem Configuration Program V1 10 Tue Sep 24 07 55 50 1996 Modem Firmware V2 10 Modem ID Call In Phone Number Dialing Setup Type Pulse or Tone Pulse P T Dialing Speed milliseconds 50 255 Auto Answer After Rings 1 255 or 0 NO ANSWER Number of Retries 0 254 Modem Timing Wait for Dial Tone seconds 2 255 Wait for Carrier seconds 1 255 Comma Delay seconds 1 ...

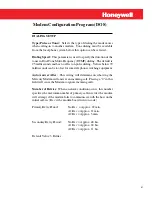
Page 30: ... Modem F5 Print Setup F2 Save Setup F4 Setup Modem F6 Factory Defaults F10 EXIT Main Screen after Pressing the F3 Key Figure 13 Modem Configuration Program DOS At this point you can accept the factory defaults or change the parameters Modem ID A Modem ID number must be entered or the software will display a message Not All Required Fields are Filled The number entered must contain 8 digits For exa...

Page 31: ...too fast for some telephone switching equipment Auto Answer After This setting will determine on what ring the Mercury Modem will answer an incoming call Placing a 0 in this field will cause the Modem to ignore incoming calls Number of Retries When an alarm condition occurs this number specifies the maximum number of primary call in retries the modem will attempt if the modem fails to communicate ...

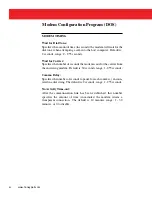
Page 32: ...he number of seconds the modem waits for the carrier from the answering modem Default is 30 seconds range 1 255 seconds Comma Delay Specifies the number of seconds to pause for each comma encoun tered in a dial string The default is 2 seconds range 1 255 seconds No Activity Time out After the communication link has been established this number specifies the amount of time in minutes the modem reta...

Page 33: ...ure The alarm call in must also be enabled Alarm Call In Enable Select Y forYes toenablethemodemtocallintothehostcomputer usingtheCall InPhoneNumber whenanalarmsignalisreceived The alarm signal can either be the Low Battery Alarm or Alarm Pulse received at the alarm channel input Select N for No if the alarm call in feature is to be disabled Modem Configuration Program DOS ...

Page 34: ...Run Type A SETUP then click the OK button After the setup initalization the following screen will appear Select Continue toacceptthedefaultdriveorenterthepathifdifferentthan the default During the installation process the last screen to appear is the Default CommunicationPortSelectiondialogbox SelecttheCommunication Port that is to be used for this particular computer Figure 14 Figure 15 Figure 16...

Page 35: ...rcuryModemConfigurationsoftwareisusedtochangetheparam eters in a Mercury Modem if selections other than the default are required TheMercuryModemmustcontainfirmwareversion2 00or greaterinordertobecompatableforparameterchanges Helpscreens may be viewed by clicking on Contents under Help located on the menu bar or by pressing F1 for each field Figure 18 Figure 17 ...

Page 36: ...ll be zero filled on the left Call In Phone Number Call In Phone Number is the phone number for the host modem computer running the alarm collection system The modem will dial thenumberifanalarmconditionoccurs Thenumbermaycontainany of the standard calling parameters allowed by a standard Hayes compatible modem Up to 37 characters may be entered into this field to accommodate long distance or page...

Page 37: ...w battery condition occurs at 5 2 Volts The default value is Enabled Note the Alarm Call In function described below must be enabled for Battery Low Call In to operate Alarm Call In Enabled Alarm Call In Enabled determines whether or not the modem is setup for Alarm Call In processing If unselected alarms generated by an instrument or by the Mercury Modem will not call in to report The default val...

Page 38: ...e Mercury Modem does not receive an alarm acknowledgment from a host computer all of the primary retries will be attempted before switching to the secondary strategy Primary Retry Period No Rev Approx 22 min A1 Rev Approx 11 min A2 Rev Approx 5 min Secondary Retry Period No Rev Approx 48 hrs A1 Rev Approx 24 hrs A2 Rev Approx 11 hrs Default Value 3 Retries Figure 23 ...

Page 39: ...aling must be available from the local phone system before this option can be selected Dialing Speed DialingSpeed isusedtospecifythedurationofthetonesinDualTone Multi Frequency DTMF dialing Thedefaultis95millisecondsand hasnoeffectonpulsedialing Valuesbelow70millisecondscanbetoo fast for some telephone switching equipment Figure 25 Figure 24 ...

Page 40: ...r on the indicated number of rings To disable Auto Answerselectthecheckboxlabeled NoAnswer thedefaultvalueis 1 Ring No Answer This option allows the user to set up a modem in a way that does not answerincomingcalls Thedefaultvalueis Unselected andselecting this option will make it impossible to call this modem If the No Answer option is selected the Call In on an alarm can still be implemented Fig...

Page 41: ...shed in the allotted time the modem will return to an inactive state The default value for Wait For Dial Tone is 2 seconds Wait For Carrier A carrier is a signal that is established by both modems allowing them tocommunicateproperly TheWaitForCarrierisusedbythemodem to determine the amount of time in seconds that it will wait from the timeitdialstomakeaconnectiontoamodembeingcalled Thedefault valu...

Page 42: ...ticularlyhelpful when your telephone line is part of a PBX system The default value is 2 seconds No Activity Time out The No Activity Time out is the amount of time the modem will wait in minutes with no communication activity occurring before it will disconnectthelink Thedefaultvalueis10Minutes Thisfunctioncan be turned off by selecting the Disable check box Figure 30 Figure 31 ...

Page 43: ...t feature The default value is Unselected and selecting this feature willmeanthatnomatterhowlongthismodemiswithoutcommunica tion activity during a link it will never automatically disconnect Baud Rate Selects the baud rate that the Mercury Modem will communicate at Choose either 1200 baud for most cellular applications otherwise select 2400 baud ...

Page 44: ... that it im poses more controlled access to the instrument It requires the user to configure Mercury host software to access a specific port even if that port is Port A Mercury MSDOS software cannot use this mo dem option Selecting No causes the Mercury Modem to immediately estab lish a transparent connection with Port A This option will allow establishing connections with 3rd party DOS or Windows...

Page 45: ...r selected configuration into the modem Print The Print function generates a report of the current modem configuration This report contains the information on the screen by groups Modem Identification Dialing Speed Modem Timing and Alarm Setup Defaults The Default function restores the modem settings to the factory defaults After the default command is sent a read command isautomaticallyusedtodisp...

Page 46: ...46 www honeywell com Page 46 UL Mercury Instruments Drawing 40 2139 A Figure 35 Installation in Division 2 Hazardous Locations ...

Page 47: ...ptionalbackup from either internal AA cell battery pack or separate alkaline battery pack 40 1595 or 40 1865 ORremoteDCpowersource class2only ninevoltsnominal with optional backup from an alkaline battery pack 40 1595 or 40 1865 3 J3 J4 are interchangeable DC input power connectors Connectprimaryandoptionalbackupplugtoeitherconnector 4 Circuits are non incendive when remote instruments are Mercury...

Page 48: ...48 www honeywell com Page 48 CSA Mercury Instruments Drawing 40 2122 Figure 38 Installation in Division 2 Hazardous Locations ...

Page 49: ...lkaline battery pack 40 1595 or 40 1865 ORremoteDCpowersource class2only ninevoltsnominal with optional backup from an alkaline battery pack 40 1595 or 40 1865 3 J3 J4 are interchangeable DC input power connectors Connectprimaryandoptionalbackupplugtoeitherconnector 4 Circuits are non incendive when remote instruments are Mercury Instrument models a Mercor ECAT or b Mercor Mini or c Electronic Rec...

Page 50: ...ct them are working properly 2 Makesureyou renotrunningsoftwarethatmayconflictwithusing the communication ports 3 In the Link package for the instrument you are calling go into Setup on the main menu line Select Communications and insure that the Modem Connection section is correct Baud Rate 2400 Connector Comm port host modem is using Modem Init String Blank DialType Tone or Pulse DialPrefix If r...

Page 51: ...tthemodemtoitsfactorydefaultprofileby typing AT F and pressenter Exittheprogramandtrythephonecallagain 5 TocommunicatewiththeMercuryModem youmustdisable datacompression flowcontrolanderrorcorrection These commands will vary depending on your host modem manufacturer IntheLinkpackagefortheinstrumentyouare calling go into Setup on the main menu line Select CommunicationsandintheModemConnectionsection...

Page 52: ...ER refer to page 8 2 Ensure that the modems jumpers are in the correct baud rate position refer to page 10 3 Check that the instruments baud rate is set correctly and matches the jumper configuration on the modem 4 Unplugthemodem smainpower wait30secondsandplugthe mainpowerbackin ThemodemshouldcyclethroughitsLED test refer to page 8 Wait for all the LEDs to go out before attempting to call the ins...

Page 53: ...S 4 The type of modem s you re using 5 The COM port and BAUD RATE settings 6 The phone number of the remote location Also be prepared to answer the following questions Haveyouranmodemconfigurationsuccessfullybefore Ifso have you changed any of your system s hardware or software sincethen Haveyousuccessfullylinkedtothemodembefore Ifso have you changed any of your system s hardware or software since...

Page 54: ... 14 Run Dialog Box 34 Fig 15 Installation Setup Dialog Box 34 Fig 16 Communication Port Selection Dialog Box 34 Fig 17 Mercury Group with Modem Configuration Icon 35 Fig 18 Mercury Modem Configuration for Windows Main Screen 35 Fig 19 Modem ID 36 Fig 20 Call In Phone Number 36 Fig 21 Battery Low Enable 37 Fig 22 Alarm Call In Enable 37 Fig 23 Retries 38 Fig 24 Dial Type 39 Fig 25 DialingSpeed 39 F...

Page 55: ...omputer Communication 16 Configuration cable 40 2200 25 Configuring the Modem 25 CS 03 3 CSA 45 D DC Power Supply 5 Defaults 43 Dial Type 38 Dialing Speed 30 38 Disable 42 E ER Link 16 Exit 43 Expansion board 5 External Mercury Modem 18 F FCC PART 68 2 G Grounding Lug 9 H Harsh environment 5 Host Computer 46 I Industry Canada 3 Installation Division 2 Locations 44 Instrument Access Code 17 Instrum...

Page 56: ...meout 31 41 P PIF EDITOR 27 Power Down 8 Power Up and Self Test 8 Primary Retry 30 Print 43 R Read 43 Remote Location 47 Retries 30 37 Ringer Equivalence Number 2 3 RJ11 Phone Jack 9 S Save 42 Secondary Retry 30 Setup 16 Shutdown 11 Single Channel I S Barrier 18 Site ID 17 Site ID 2 17 Site List 16 Site Location 17 Site Name 17 Site Phone 17 Solar Panel 18 Stahl Pulse Channel Barrier 18 Standby 8 ...

Page 57: ...57 ...

Page 58: ...ut Mercury Instruments products contact your Honeywell Process Solutions representative visit www mercuryinstruments com or call 513 272 1111 Automation and Control Solutions Honeywell Process Solutions 3940 Virginia Ave Cincinnati OH 45227 513 272 1111 www honeywell com ...

Reviews: