background image

 14 

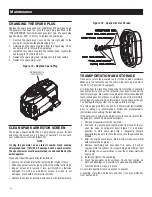
CHANGING THE SPARK PLUG

Replace the spark plug each year, regardless of how many hours 

the generator has been run. Use the spark plug identified in the 

"SPECIFICATIONS" section for each generator size. The spark plug 

gap should be .030” (.76mm). To replace the spark plug:

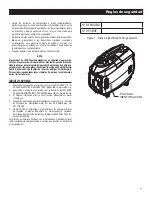
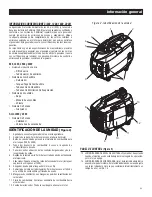
1.  Remove the spark plug cover on the top right side of the 

generator, just below the handle (Figure 15).

2.  Carefully pull the spark plug lead from the spark plug. Use a 

socket wrench to remove the spark plug. 

3.  Install the new spark plug into the cylinder head. Tighten the 

spark plug to 15 ft/lb, 20.4 Nm.

4.  Replace the spark plug lead, making sure it is fully seated.
5.  Replace the spark plug cover.

Figure 15 - Replace Spark Plug

SPARK PLUG

LOCATION

CLEAN SPARK ARRESTOR SCREEN

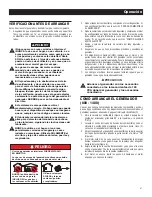
The engine exhaust muffler has a spark arrestor screen. Inspect 

and clean the screen every 50 hours of operation or once each 

year, whichever comes first (Figure 16).

NOTE:

If using the generator on any forest covered, brush covered 

unimproved land, it MUST BE equipped with a spark arrestor. 

The spark arrestor must be maintained in cood condition by the 

owner/operator.

Clean and ispect the spark arrestor as follows:
•  Remove the screen retainer by removing the retainer clamp.
•  Slide the spark arrestor screen out from the muffler outlet tube.
• Inspect screen and replace if torn, perforated or otherwise 

damaged. Do NOT use a defective screen. If screen is not 
damaged, clean with a commercial solvent.

•  Replace the screen and retainer and secure with retainer clamp.

Figure 16 - Spark Arrestor Screen

TRANSPORTATION AND STORAGE

Transport or store the generator only if it has cooled completely.  

Make sure the fuel valve and the vent on the fuel cap are both in 

the OFF (“O”) position (if equipped).
It is important to prevent gum deposits from forming in essential 

fuel system parts such as the carburetor, fuel hose or tank during 

long-term storage. Also, experience indicates that alcohol-blended 

fuels (called gasohol, ethanol or methanol) can attract moisture, 

which leads to separation and formation of acids; these acids gas 

can damage the fuel system of an engine while in storage.
To avoid engine problems, the use of a commercial fuel stabilizer 

prior to storage is recommended. Follow the manufacturer’s 

instructions when adding the fuel stabilizer.
If the generator is going to be stored for more than six (6) months, 

the generator should be prepared as follows:

1.  Remove all gasoline from the fuel tank.
2.  Start and run engine until engine stops from lack of fuel or 

open the valve on carburetor bowl (Figure 17), and allow 

gasoline to drain down tube into a receptacle. Discard 

appropriately. Be sure to close the valve once the gasoline has 

drained.

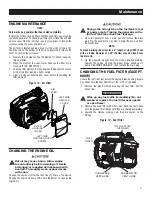
3.  After the engine cools down, drain oil from crankcase. Refill 

with recommended grade.

4.  Remove spark plug and pour about 1/2 ounce (15 ml) of 

engine oil into the cylinder. Cover spark plug hole with rag. Pull 

the starting rope several times to coat the cylinder wall with 

engine oil.

5.  Install and tighten the spark plug.
6.  Clean the generator outer surfaces. Check that cooling air 

slots and openings on generator are open and unobstructed.

7.  Store the unit in a clean, dry place.

Do not store gasoline from one season to another.
If possible, store the unit indoors and cover it to give protection 

from dust and dirt. 

Maintenance

Summary of Contents for G0060651

Page 1: ...1600 2000 Watt Inverter Generator Operator s Manual DEADLY EXHAUST FUMES ONLY use OUTSIDE far away from windows doors and vents NOT INTENDED FOR USE IN CRITICAL LIFE SUPPORT APPLICATIONS SAVE this Manual Provide this manual to any operator of the generator ...

Page 2: ...Engine Maintenance 13 Changing the Engine Oil 13 Changing the Fuel Filter Except 800W 13 Changing the Spark Plug 14 Clean Spark Arrestor Screen 14 Transportation and Storage 14 Troubleshooting 16 Troubleshooting Guide 16 Notes 17 800 1400 1600 2000 Vatios Manual del usuario del generador inversor 19 800 1400 1600 2000 Watts Manuel d utilisation de la Génératrice onduloeurs 39 ACCESSORY BOX Check a...

Page 3: ...are as follows Indicates a hazardous situation or action which if not avoided will result in death or serious injury Indicates a hazardous situation or action which if not avoided could result in death or serious injury Indicates a hazardous situation or action which if not avoided could result in minor or moderate injury NOTE Notes contain additional information important to a procedure and will ...

Page 4: ...The National Electric Code NEC requires the frame and external electrically conductive parts of the generator be properly connected to an approved earth ground Local electrical codes may also require proper grounding of the generator Consult with a local electrician for grounding requirements in the area Use a ground fault circuit interrupter in any damp or highly conductive area such as metal dec...

Page 5: ...ction Association NFPA 70 The NATIONAL ELECTRIC CODE NEC available from www nfpa org 2 National Fire Protection Association NFPA 5000 BUILDING CONSTRUCTION AND SAFETY CODE available from www nfpa org 3 International Building Code available from www iccsafe org 4 Agricultural Wiring Handbook available from www rerc org Rural Electricity Resource Council P O Box 309 Wilmington OH 45177 0309 5 ASAE E...

Page 6: ...4 Stroke Engine Size 99cc Starter Type Recoil Fuel Capacity Type 0 69 Gal 2 6L Unleaded Oil Capacity 0 63 Qt 0 6L Run time at 25 Rated Load 5 7 Hours Spark Plug Type NGK BPR7HS Spark Plug Gap 030 Dimensions L x W x H in 21 x 11 x 17 Weight Lb kg 45 2 20 5 Maximum AC Output 1600W Surge AC Output 1650W AC Volts 120 VAC Rated AC Current 13 3 A Frequency 60 Hz THD 3 0 Insulation Class Class B Outlets ...

Page 7: ...el Tank Cap Fuel Lines Evaporative Vent Lines Ignition System Spark Plug Ignition Module Flywheel Exhaust System Muffler 1600 and 2000 Only Exhaust System Catalyst Secondary Air Valve UNIT IDENTIFICATION Figure 2 1 Carrying Handle Lift the generator by this handle only 2 Spark Plug Cover Allows access to the engine spark plug 3 Primer Bulb Used to prime the fuel system for starting 1600 2000 4 Fue...

Page 8: ...inverter has exceeded 212 F 3 Flashes Overload The unit has been overloaded to the point that the output power required has exceeded 110 of rated power 4 Flashes Short Circuit This indicates the unit s output has been short circuited by the load connected to it 16 12 VDC Plug Connection for re charging 12VDC automotive style batteries while generator is in operation 1400 1600 and 2000 only 17 EcoM...

Page 9: ...emove the left side service cover and check the oil level by removing the oil filler cap The oil level should be to the bottom of the threads on the oil fill pipe If oil is needed see the section ADDING ENGINE OIL 4 Replace and secure the left side service cover 5 Make sure there are no electrical devices connected to the generator 6 The National Electric Code NEC requires the frame and external e...

Page 10: ... 7 located below the starter rope pull by turning to the valve 90 counter clockwise to the ON I position 2 Locate the primer bulb See Figure 8 Slowly fully depress the primer bulb and release Allow the primer bulb to return to its original state Repeat this six 6 more times 3 If the engine is cold or has not been run for some time engage the choke by pushing the choke lever to the right Figure 9 4...

Page 11: ...3 times the listed running watts for starting theses devices NOTE When an electric motor is started the OVERLOAD LED may light up for up to five 5 seconds this is normal If it stays on a fault has occured Unplug all devices and shut down generator to reset the alarm Restart the generator If the OVERLOAD LED remains lit contact a Generac Dealer for assistance USING THE ECOMODE SWITCH When the elect...

Page 12: ...the Left Side Service Cover and check the oil level of the engine Add or drain oil as necessary refer to see the section ADDING ENGINE OIL FUELING THE GENERATOR Use care when fueling the generator Only fill the fuel tank when the generator has cooled entirely Use fresh unleaded gasoline with a minimum Research Octane Number RON of 87 NOTE Do not use any gasoline containing more than 10 Ethanol NEV...

Page 13: ...0 Synthetic 5W 30 Synthetic 5W 30 TO ADD ENGINE OIL TO THE CRANKCASE 1 Place the unit on a firm level surface not to exceed 15 in any direction 2 Remove the Left Side Service Cover 3 Remove the oil fill cap located on the bottom of the engine crankcase 4 Add the recommended engine oil slowly stopping frequently to check the level The full level is the base of the threads in the filler neck DO NOT ...

Page 14: ... hose to clean the generator Water can enter the engine fuel system and cause problems In addition if water enters the generator through cooling air slots some water will be retained in voids and crevices of the rotor and stator winding insulation Water and dirt buildup on the generator internal windings will eventually decrease the insulation resistance of these windings GENERATOR MAINTENANCE SCH...

Page 15: ... the engine oil after the first five 5 hours of operation Change the engine oil every 100 hours thereafter To change the engine oil Change the oil only when the fuel tank is low or nearly empty Tipping the generator with a full fuel tank may cause fuel leakage 1 Place the generator over a drain pan and remove the drain plug Tip the generator on its side to drain the used oil from the crankcase NOT...

Page 16: ... STORAGE Transport or store the generator only if it has cooled completely Make sure the fuel valve and the vent on the fuel cap are both in the OFF O position if equipped It is important to prevent gum deposits from forming in essential fuel system parts such as the carburetor fuel hose or tank during long term storage Also experience indicates that alcohol blended fuels called gasohol ethanol or...

Page 17: ...15 Maintenance Figure 17 Carburetor Drain Valve CARBUREATOR DRAIN VALVE LOCATED BEHIND AIR INTAKE TURN VALVE COUNTER CLOCKWISE TO DRAIN FUEL CLOCKWISE TO CLOSE ...

Page 18: ... on and READY LED is flashing See control Panel Identification section 2 AC voltage is low OVERLOAD LED is on and READY LED is flashing See control Panel Identification section 3 Inverter module is overheated OVERLOAD LED is on and READY LED is flashing See control Panel Identification section 4 Short circuit in electrical device OVERLOAD LED is on and READY LED is flashing See control Panel Ident...

Page 19: ...17 Notes ...

Page 20: ...Manual Part No 0J9692 Revision B 02 25 13 ...

Page 21: ...suario del Generador Inversor PELIGRO HUMOS DE ESCAPE MORTALES Utilícelo SOLAMENTE al AIRE LIBRE y lejos de ventanas puertas y respiraderos NO DISEÑADO PARA SER USADO EN APLICACIONES DE SOPORTE DE VIDA CRÍTICA GUARDE este Manual Proporcione este manual a cualquier operador del generador ...

Page 22: ...rama de mantenimiento del generador 32 Limpieza del generador 32 Mantenimiento del motor 33 Cambio del aceite de motor 33 Cambio del filtro de combustible con exceptión de 800W 33 Cambio de la bujía 34 Limpieza del tamiz del supresor de chispas 34 Transporte y almacenamiento 35 Localización y corrección de fallas 36 Guía de localización y corrección de fallas 36 Notas 37 CAJA DE ACCESORIOS Comprue...

Page 23: ...odría ocasionar la muerte o una lesión grave PRECAUCIÓN Indica una situación o acción peligrosa que si no se evita podría ocasionar una lesión menor o moderada NOTA Las Notas contienen información adicional importante para un procedimiento y se incluyen dentro del cuerpo del texto de este manual Estas advertencias de seguridad no pueden eliminar los peligros que indican El sentido común y el estri...

Page 24: ... esté parado en agua mientras esté descalzo o mientras tenga las manos o los pies mojados PUEDE SUFRIR UNA DESCARGA ELÉCTRICA PELIGROSA El Código Eléctrico Nacional NEC requiere que el marco y las partes conductoras del exterior del generador estén conectadas correctamente a una tierra aprobada Los códigos eléctricos locales pueden también requerir que el generador se ponga a tierra adecuadamente ...

Page 25: ...2 del California Public Resources Code Código de recursos públicos de California Otros estados pueden tener leyes similares Se aplican leyes federales en las tierras federales ÍNDICE DE NORMAS 1 Asociación nacional de protección contra incendios NFPA 70 El CÓDIGO ELÉCTRICO NACIONAL NEC disponible en www nfpa org 2 Asociación nacional de protección contra incendios NFPA 5000 CÓDIGO DE EDIFICACIÓN Y...

Page 26: ...dad Tipo de combustible 0 69 galones 2 6L sin plomo Capacidad de aceite 0 63 Cuartos de galón 0 6L Tiempo de funcionamiento con 25 de la carga nominal 5 7 horas Tipo de bujía NGK BPR7HS Separación entre electrodos 030 Dimensiones Largo x Ancho x Alto pulg 21 x 11 x 17 Peso Lb kg 45 2 20 5 Salida Máxima de CA 1600 W Salida de sobretensión de CA 1650 W Voltios de CA 120 VCA Corriente nominal de CA 1...

Page 27: ... Agarradera Levante el generador sólo por esta agarradera 2 Cubierta de la bujía Permite tener acceso a la bujía del motor 3 Bulbo de cebado Usado para cebar el sistema de combustible para el arranque 1600 y 2000 4 Tapón del depósito de combustible Acceso al depósito de combustible para llenarlo 5 Panel de control ubicación de los controles del generador y de los receptáculos de salida 6 Rejillas ...

Page 28: ...destellos Corto circuito Esto indica que la salida de la unidad ha sido cortocircuitada por la carga conectada a la unidad 16 Clavija de 12 VCD Conexión para recargar las baterías tipo automotriz de 12VCD mientras el generador está en operación 17 Interruptor FlexPower Este interruptor reduce la velocidad del motor cuando la carga se reduce para ahorrar combustible y desgaste del motor 18 Disyunto...

Page 29: ...esita combustible vea la sección CARGAR COMBUSTIBLE AL GENERADOR 3 Quite la cubierta de servicio del lado izquierdo y compruebe el nivel de aceite quitando el tapón de llenado de aceite El nivel de aceite debe estar en la parte inferior de la rosca en el tubo de llenado de aceite Si se necesita aceite vea la sección CÓMO RELLENAR ACEITE AL MOTOR 4 Vuelva a colocar la cubierta de servicio del lado ...

Page 30: ...lenado del combustible y cebe el sistema de combustible presionando el émbolo hasta seis 6 veces con el respiradero cerrado Figura 8 en la página siguiente 3 Abra el respiradero del depósito de combustible en la parte superior del tapón de combustible girando la parte central a la marca ON Figura 9 en la página siguiente 4 Si el motor está frío o no se ha puesto en funcionamiento por algún tiempo ...

Page 31: ...000 BTU 225 Calentador de espacios de aceite 30 000 BTU 150 Pistola pulverizadora sin aire 1 3 HP 600 Pistola pulverizadora sin aire portátil 150 Radio 50 a 200 Refrigerador 700 Olla eléctrica de cocción lenta 200 Bomba sumergible 1 2 HP 1500 Bomba de sumidero 800 a 1050 Considere tres 3 veces los vatios de operación mencionados para arrancar encender estos dispositivos NOTA Cuando se arranca un m...

Page 32: ...or cae debajo de un nivel predeterminado el motor se detendrá automáticamente y la luz indicadora BAJO NIVEL DE ACEITE se encenderá Quite la Cubierta de Servicio del Lado Izquierdo y compruebe el nivel de aceite del motor Agregue o drene aceite según sea necesario Consulte la sección CÓMO AGREGAR ACEITE DEL MOTOR CÓMO CARGAR COMBUSTIBLE AL GENERADOR Tenga cuidado al cargar combustible al generador...

Page 33: ...A AÑADIR ACEITE DE MOTOR AL CÁRTER DEL MOTOR 1 Coloque la unidad sobre una superficie plana y firme no exceda los 15 en ninguna dirección 2 Quite la Cubierta de Servicio del Lado Izquierdo 3 Quite el tapón de llenado del aceite situado en la parte inferior del cárter del motor 4 Añada el aceite de motor recomendado lentamente parando con frecuencia para comprobar el nivel El nivel máximo de llenad...

Page 34: ...sistema de combustible del motor y ocasionar problemas Además si el agua entra en el generador a través de las ranuras del aire de enfriamiento un poco de agua permanecerá en huecos y hendiduras del aislamiento del devanado del rotor y del estator La acumulación de agua y suciedad en los devanados internos del generador disminuirá eventualmente la resistencia del aislamiento de estos devanados PRO...

Page 35: ...s expuestas con jabón Cambie el aceite del motor después de las primeras cinco 5 horas de operación Después cambie el aceite del motor cada 100 horas Para cambiar el aceite del motor PRECAUCIÓN Cambie el aceite solamente cuando el nivel de combustible en el depósito esté bajo o casi vacío Inclinar el generador con un depósito de combustible lleno puede ocasionar una fuga de combustible 1 Coloque e...

Page 36: ...BUJÍA LIMPIEZA DEL TAMIZ DEL SUPRESOR DE CHISPAS El silenciador del escape del motor tiene un tamiz supresor de chispas Inspeccione y limpie el tamiz cada 50 horas de funcionamiento o una vez por año lo que ocurra primero Figura 16 NOTA Si usa el generador en tierra no mejorada cubierta de bosque o maleza DEBE tener un supresor de chispas El propietario operador debe mantener el supresor de chispa...

Page 37: ...oda la gasolina del depósito de combustible 2 Arranque y haga funcionar el motor hasta que se pare por falta de combustible o abra la válvula en la cuba del carburador Figura 17 y permita que la gasolina escurra por el tubo hasta un receptáculo Deseche apropiadamente Asegúrese de cerrar la válvula una vez que la gasolina se haya drenado Figura 17 Válvula de drenado del carburador VÁLVULA DE DRENAD...

Page 38: ...uptor EcoMode No hay salida de CA 1 Generador sobrecargado la luz indicadora SOBRECARGA está encendida 2 Voltaje de CA bajo la luz indicadora SOBRECARGA está encendida 3 Módulo del inversor recalentado la luz indicadora SOBRECARGA está encendida 4 Cortocircuito en dispositivo eléctrico la luz indicadora SOBRECARGA está encendida 5 Montaje defectuoso del inversor 1 Apague el generador para reajusta...

Page 39: ...37 Notas ...

Page 40: ...N º de parte del Manual 0J9692 Revisión B 02 25 13 ...

Page 41: ...utilisation de la Génératrice onduleurs GAZ D ÉCHAPPEMENT MORTEL Utiliser UNIQUEMENT à L EXTÉRIEUR loin des fenêtres portes et évents L UTILISATION N EST PAS PRÉVUE POUR LES MOYENS D ENTRETIEN ARTIFICIEL DE LA VIE CONSERVER ce manuel Fournir ce manuel aux opérateurs de la génératrice ...

Page 42: ...en de la génératrice 52 Nettoyage de la génératrice 52 Entretien du moteur 53 Changement de l huile à moteur 53 Changement du filtre à carburant sauf 800W 53 Changement de la bougie d allumage 54 Nettoyer l écran pare étincelles 54 Transport et entreposage 54 Dépannage 56 Guide de Dépannage 56 Remarques 57 BOÎTE D ACCESSOIRES Vérifier le contenu de la boîte Si des pièces sont absentes ou endommagé...

Page 43: ...lle n est pas évitée entraînera la mort ou des blessures graves AVERTISSEMENT Indique un situation ou une action dangereuse qui si elle n est pas évitée pourrait entraîner la mort ou des blessures graves ATTENTION Indique un situation ou une action dangereuse qui si elle n est pas évitée entraînera des blessures légères ou modérées REMARQUE Les remarques contiennent des informations supplémentaire...

Page 44: ...ositifs de protection et les barrières sont en place avant de faire fonctionner la génératrice Ne jamais manipuler tout type de cordon ou de dispositif électrique qui est dans l eau alors que vous êtes pieds nus ou que vos mains ou vos pieds sont mouillés CELA ENTRAÎNERA UN RISQUE D ÉLECTROCUTION Le National Electric Code Code électrique national exige que le bâti et que les pièces externes électr...

Page 45: ...mblables pourraient être en vigueur dans d autres États Les lois fédérales s appliquent sur les terrains sous juridiction fédérale INDEX DES NORMES 1 National Fire Protection Association Association nationale pour la protection contre les incendies 70 Le NATIONAL ELECTRIC CODE Code électrique national disponible auprès de www nfpa org 2 National Fire Protection Association Association nationale po...

Page 46: ...cul Type capacité de carburant 0 69 Gallon 2 6 L sans plomb Capacité d huile 0 63 Pinte 0 6 L Durée de fonctionnement à 25 de charge nominale 5 7 heures Type de bougie d allumage NGK BPR7HS Écartement de bougie d allumage 0 030 po Dimensions L x P x H pouces 21 x 11 x 17 Poids Lb kg 45 2 20 5 Puissance de sortie CA maximum 1600W Puissance de sortie CA transitoire 1650W Volts en CA 120 VCA Courant ...

Page 47: ...L UNITÉ Figure 2 1 Poignée de transport Soulevez la génératrice par sa poignée seulement 2 Couverture de bougie d allumage permet l accès à la bougie d allumage du moteur 3 Poire d amorçage utilisée pour l amorçage du circuit de carburant pour le démarrage 1600 et 2000 4 Bouchon de réservoir de carburant accède au réservoir de carburant pour le remplir 5 Tableau de commande emplacement des command...

Page 48: ...ssance de l unité est en court circuit par la charge connectée à elle 16 Bougiede12VCC connexionpourrechargerlesbatteriesautomobiles de 12 VCC tandis que la génératrice est en fonctionnement 17 Commutateur FlexPower ce commutateur ralentit la vitesse du moteur quand la charge est réduite pour économiser de l essence et l usure du moteur 18 Disjoncteur de 12 VCC protection contre les surcharge pour...

Page 49: ...in des fenêtres portes et évents 2 Enlevez le bouchon de carburant et vérifiez le niveau de carburant Si du carburant est nécessaire voir la section REMPLIR DE COMBUSTIBLE LA GÉNÉRATRICE 3 Enlevez la couverture de service de côté gauche et vérifiez le niveau d huile en enlevant le bouchon de remplissage d huile Le niveau d huile devrait être au dessous de ces fils sur le tuyau de remplissage d hui...

Page 50: ...s contraire des aiguilles d une montre à la position ON I 2 Tirez vers le haut au centre du bouchon de remplissage de carburant et amorcez le système de carburant en enfonçant le plongeur jusqu à six 6 fois avec l évent fermé Figure 8 à la page suivante 3 Ouvrez l évent du réservoir de carburant sur le bouchon de remplissage de carburant en tournant la partie centrale à la position ON Figure 9 à l...

Page 51: ...0 BTU 225 Chaufferette à mazout 30 000 BTU 150 Pistolet à peinture sans air 1 3 HP 600 Pistolet à peinture sans air portable 150 Radio 50 à 200 Réfrigérateur 700 Cocotte mijoteuse 200 Pompe immergée 1 2 HP 1500 Pompe de vidange 800 à 1050 Permettez trois 3 fois le wattage d exploitation énuméré pour mettre en marche ces dispositifs REMARQUE Quand un moteur électrique est démarré le voyant DEL de S...

Page 52: ... huile dans le carter du moteur descend sous le niveau prédéterminé le moteur s arrêtera automatiquement et le voyant DEL niveau BAS D HUILE s allumera Enlevez la couverture de service de côté gauche et vérifiez le niveau d huile du moteur Ajoutez ou drainez de l huile si nécessaire voir la section AJOUTER L HUILE À MOTEUR REMPLISSAGE DE LA GÉNÉRATRICE Soyez prudent lorsque vous remplissez la géné...

Page 53: ...empératures de l utilisation prévue POUR AJOUTER L HUILE À MOTEUR AU CARTER DU MOTEUR 1 Installer l unité sur une surface ferme et plane ne pas dépasser 15 dans aucune direction 2 Enlevez la couverture de service de côté gauche 3 Enlevez le bouchon de remplissage d huile situé sur le fond du carter de moteur 4 Ajoutez l huile à moteur recommandée lentement en cessant fréquemment pour vérifier le n...

Page 54: ...s problèmes En outre si l eau entre dans la génératrice à partir les fentes d air de refroidissement une certaine quantité d eau restera dans les espaces vides et les interstices d isolation de l enroulement rotorique et statorique L accumulation de l eau et de saleté sur les enroulements internes de la génératrice diminuera éventuellement la résistance d isolation de ces enroulements PROGRAMME D ...

Page 55: ...ement Changez l huile à moteur toutes les 100 heures ensuite Pour changer l huile à moteur ATTENTION Changez l huile seulement quand le réservoir de carburant est inférieur ou presque vide La chute de la génératrice avec un réservoir de carburant complet peut causer des fuites d essence 1 Mettez la génératrice sur un bac de récupération et enlevez le bouchon de vidange Inclinez la génératrice sur ...

Page 56: ...fois qu elle a refroidi complètement S assurer que le robinet de carburant et l évent du bouchon de carburant sont tous deux à la position ARRÊT O le cas échéant Il est important d empêcher la formation des dépôts de gomme dans les pièces essentielles du circuit d alimentation comme le carburateur le tuyau de carburant ou le réservoir pendant l entreposage à long terme En outre l expérience indiqu...

Page 57: ...burateur LA VALVE DE PURGE DU CARBURATEUR EST SITUÉE DERRIÈRE L ENTRÉE D AIR TOURNEZ LA VALVE DANS LE SENS INVERSE DES AIGUILLES D UNE MONTRE POUR VIDANGER LE CARBURANT ET DANS LE SENS DES AIGUILLES D UNE MONTRE POUR LE FERMER Entretien ...

Page 58: ...ode Aucune prise CA 1 La génératrice est surchargée le voyant DEL de SURCHARGE est allumé 2 La tension CA est basse le voyant DEL de SURCHARGE est allumé 3 Le module de l inverseur est surchauffé le voyant DEL de SURCHARGE est allumé 4 Court circuit dans le dispositif électrique le voyant DEL de SURCHARGE est allumé 5 Assemblage du convertisseur défectueux 1 Arrêtez la génératrice pour réinitialis...

Page 59: ...57 Remarques ...

Page 60: ...N de pièce manuelle 0J9692 Révision B 25 02 13 ...

Reviews: