background image

5. OPERATION

30

E

SAFE MOWING PRACTICES

For your safety, keep all four wheels on the ground, and be careful to avoid 
losing your footing and your control of the mower. Keep a firm grip on the 
handlebar, and walk, never run, with the mower. Be very careful when mowing 
uneven or rough ground.

If stuck, do not kick or shove the mower with your foot. Use the handlebar to 
control the mower.

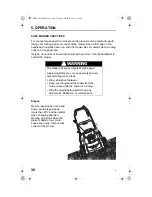
Slopes

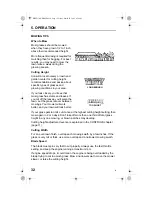
Mow across slopes, not up and 
down. Avoid steep slopes 
(more than 20°), and be careful 
when changing direction. 
Mowing on a slope when the 
grass is damp or wet could 
cause you to slip, fall, and lose 
control of the mower.

 WARNING

The blade is sharp and spins at high speed.

A spinning blade can cut you severely and can 
amputate fingers and toes.

Wear protective footwear.

Keep your hands and feet away from the 
mower deck while the engine is running.

Stop the engine before performing any 
adjustment, inspection, or maintenance.

HRX537HXE-HME.book  Page 30  Friday, March 18, 2005  9:54 AM

Summary of Contents for HRX537C

Page 1: ... MAINTENANCE 41 8 SET UP 60 9 TROUBLESHOOTING 63 10 SPECIFICATIONS 65 Explanation of models and types used in this manual Model Type Description HRX537C HXE Honda rotary mower grass bag 530 mm mower deck 4 8 KW clip director hydrostatic transmission blade brake clutch European market HME Electric start HRX537HXE HME book Page 2 Friday March 18 2005 9 54 AM ...

Page 2: ...uipment Mfg Inc reserves the right to make changes at any time without notice and without incurring any obligation No part of this publication may be reproduced without written permission SAFETY MESSAGES Pay special attention to statements preceded by the following words Each message tells you what the hazard is what can happen and what you can do to avoid or reduce injury DAMAGE PREVENTION MESSAG...

Page 3: ...sed and remove all objects which may be thrown by the machine Gasoline is highly flammable Store fuel in containers specifically designed for this purpose Refuel outdoors only and do not smoke while refuelling Add fuel before starting the engine Never remove the cap of the fuel tank or add gasoline while the engine is running or when the engine is hot If gasoline is spilled do not attempt to start...

Page 4: ...nging direction on slopes Do not mow excessively steep slopes Use extreme caution when reversing or pulling the lawn mower toward you Stop the blade s if the lawn mower has to be tilted for transporting when crossing surfaces other than grass and when transporting the lawn mower to and from the area to be mowed Never operate the lawn mower with defective guards or shields or without safety devices...

Page 5: ...er Before refuelling the lawn mower Before removing the grass catcher side discharge adapter or mulching plug Reduce the throttle setting during engine shut down and turn the fuel valve off at the conclusion of mowing Keep all nuts bolts and screws tight to be sure the equipment is in safe working condition Never store the equipment with gasoline in the tank inside a building where fumes may reach...

Page 6: ...n or pets are in the operating area Keep hands and feet away from the mower deck Pull off the spark plug cap before carrying out maintenance work 1 Permissible sound power level according to Directive EEC 84 538 2 Conformity mark according to the EEC 89 392 modified Directive 3 Nominal power in kilowatt 4 Recommended engine speed in rpm 5 Weight in kilograms 6 Year of manufacture 7 Serial number 8...

Page 7: ...ting height adjustment levers 4 10 Oil filler cap 11 Muffler 12 Mower deck 13 Shift lever 14 Throttle lever 15 Handlebar locking knob 16 Fuel valve 17 Air cleaner 18 Carburetor 19 Spark plug cap 20 Engine serial No 21 Clip director 22 Battery HME type 23 Key switch HME type 7 13 14 4 5 10 11 B LABEL 9 8 15 6 16 17 18 19 2 3 1 20 12 A LABEL 21 23 22 HRX537HXE HME book Page 7 Friday March 18 2005 9 ...

Page 8: ...e Lever The throttle lever 1 controls the following functions CHOKE For starting a cold engine FAST For restarting a warm engine and for mowing SLOW For idling the engine STOP For stopping the engine HME type Turn the key switch OFF to stop the engine OFF ON 1 1 HXE TYPE HME TYPE HRX537HXE HME book Page 8 Friday March 18 2005 9 54 AM ...

Page 9: ...tton 1 and blade control lever 2 start and stop blade rotation OFF Stops the engine ON Running position the key switch must be in the ON position to use the recoil starter START Operates the electric starter 1 2 1 HRX537HXE HME book Page 9 Friday March 18 2005 9 54 AM ...

Page 10: ...ower s drive speed With the shift lever 1 all the way back A and the drive clutch lever engaged the mower will move slowly or not at all Use a slow speed for mowing thick grass or maneuvering in small areas Use position B for maximum self pro pelled speed in large open areas and for transport 1 1 A B HRX537HXE HME book Page 10 Friday March 18 2005 9 54 AM ...

Page 11: ...ass will vary with lawn and soil conditions There is one adjustment lever 1 on each wheel Clip Director Knob The clip director knob 1 controls bagging mulching and rear discharge The knob has ten adjustment positions The knob has ten adjustment positions 20 mm 32 mm 46 mm 62 mm 75 mm 88 mm 100 mm 1 1 HRX537HXE HME book Page 11 Friday March 18 2005 9 54 AM ...

Page 12: ...People and animals near the mowing area can move into your path or into a position where they could be struck by thrown objects Clear the area of people and pets especially children Their safety is your responsibility Lawn Check the length and condition of the grass so you will know what cutting height and mowing speed to use Avoid mowing wet grass Not only will wet grass clog your mower deck and ...

Page 13: ...wear and damage A dull blade can be sharpened but a blade that is worn out bent cracked or otherwise damaged must be replaced A worn or damaged blade can break causing blade pieces to be thrown from the mower When a blade needs sharpening or replacement take the lawn mower to an authorized Honda dealer Or if you have a torque wrench you can remove and install the blades yourself pages 53 54 Check ...

Page 14: ...area is within the indicated range NOTICE Running the engine with a low oil level can cause engine damage Using nondetergent oil can shorten the engine s service life and using 2 stroke oil can damage the engine 1 Remove the oil filler cap dipstick 1 and wipe the dipstick clean 2 Insert the dipstick into the filler neck Do not screw it down Check the oil level on the dipstick 3 If the oil level is...

Page 15: ...he fuel level Refill the tank if the fuel level is low Refuel carefully to avoid spilling fuel Do not overfill there should be no fuel in the filler neck 2 After refueling tighten the fuel tank cap securely Fuel Recommendations Use gasoline with an octane rating of 86 or higher unleaded preferred This engine is designed to operate on unleaded gasoline Unleaded gasoline produces fewer engine and sp...

Page 16: ...ded and meets the minimum octane rating requirement Before using an oxygenated fuel try to confirm the fuel s contents Some areas require this information to be posted on the pump The following are the approved percentages of oxygenates If you notice any undesirable operating symptoms try another service station or switch to another brand of gasoline ETHANOL ethyl or grain alcohol 10 by volume You...

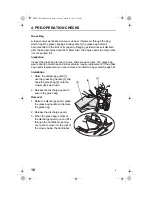
Page 17: ...air flow to the carburetor reducing engine performance Refer to page 46 for air cleaner service Handlebar Height Adjustment Handlebar 1 height can be adjusted to three positions high 2 middle 3 and low 4 1 Loosen the handlebar locking knobs 5 2 Spread the lower ends of the handlebar to release the locating pins 6 3 Move the handlebar up or down so the locating pins engage other holes on the handle...

Page 18: ...l use and will eventually require replacement If the grass bag needs replacement you can remove and install a bag yourself page 55 Installation 1 Raise the discharge guard 1 use the grass bag handle 3 and hook the grass bag 2 onto the mower deck as shown 2 Release the discharge guard to secure the grass bag Removal 1 Raise the discharge guard grasp the grass bag handle and remove the grass bag 2 R...

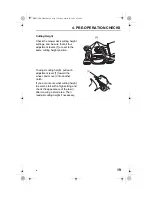
Page 19: ...ng height position To adjust cutting height pull each adjustment lever 1 toward the wheel and move it into another notch If you are not sure what cutting height to select start with a high setting and check the appearance of the lawn after mowing a small area Then readjust cutting height if necessary 1 1 HRX537HXE HME book Page 19 Friday March 18 2005 9 54 AM ...

Page 20: ...d MULCH position see the following page If a high resistance is noticed when moving the clip director knob from side to side excessive grass may have built up on top of the sliding door IMPORTANT SAFETY PRECAUTION Always turn the engine off and disconnect the spark plug cap before lifting the discharge guard to view or clean around the sliding door This will prevent contact with the rotating blade...

Page 21: ...ll the way to the BAG position Check the appearance of the lawn As the knob is moved towards the MULCH position more grass will be recycled back into the lawn Adjust the clip director knob until the desired result is achieved FULL BAGGING OR REAR DISCHARGE FULL MULCHING BAGGING OR REAR DISCHARGE AND SOME MULCHING 2 50 open 1 MULCH position 1 BAG position 1 2 fully open 2 fully closed HRX537HXE HME...

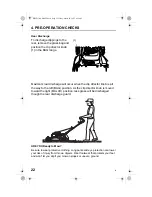
Page 22: ...left BAG position As the clip director knob is moved toward the right MULCH position less grass will be discharged though the rear discharge guard ARE YOU Ready to Mow Be sure to wear protective clothing Long pants and eye protection can lower your risk of injury from thrown objects Wear footwear that protects your feet and won t let you slip if you mow on slopes or uneven ground 1 HRX537HXE HME b...

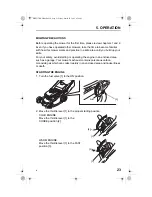
Page 23: ...ng the engine in an enclosed area such as a garage Your mower s exhaust contains poisonous carbon monoxide gas which can collect rapidly in an enclosed area and cause illness or death STARTING THE ENGINE 1 Turn the fuel valve 1 to the ON position 2 Move the throttle lever 1 to the proper starting position COLD ENGINE Move the throttle lever 1 to the CHOKE position 2 WARM ENGINE Move the throttle l...

Page 24: ...ectric start Turn the key switch to the START 1 position and hold it there until the engine starts When the engine starts allow the key switch to return to the ON 2 position NOTICE Do not use the starter for more than 5 seconds or starter motor damage may occur If the engine fails to start release the switch and wait 10 seconds before operating the starter again When the engine starts release the ...

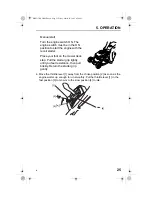
Page 25: ...ck step Pull the starter grip lightly until you feel resistance then pull briskly Return the starter grip gently 4 Move the throttle lever 1 away from the choke position 2 as soon as the engine warms up enough to run smoothly Put the throttle lever 1 in the fast position 3 to mow or to the slow position 4 to idle 1 3 2 4 HRX537HXE HME book Page 25 Friday March 18 2005 9 54 AM ...

Page 26: ... fuel consumption will increase A very rich mixture will also foul the spark plug and cause hard starting High altitude performance can be improved by specific modifications to the carburetor If you always operate your mower at altitudes above 1 800 meters have a Honda dealer perform this carburetor modification Even with carburetor modification engine power will decrease about 3 5 for each 300 me...

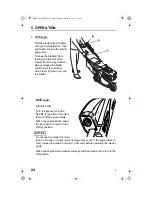
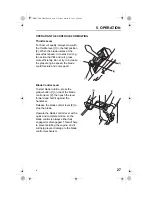
Page 27: ... and come apart Blade Control Lever To start blade rotation press the yellow button 1 on top of the blade control lever 2 then push the lever forward and hold it against the handlebar Release the blade control lever 2 to stop the blade Operate the blade control lever with a quick and complete motion so the blade control is always either fully engaged or disengaged This will help to prevent stallin...

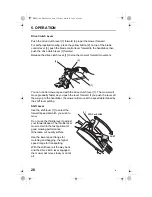
Page 28: ...forward If you push the lever all the way up to the handlebar the mower will move at the speed determined by the shift lever setting Shift Lever Use the shift lever 1 to select the forward speed at which you wish to mow Do not use the throttle lever to adjust your forward speed The throttle lever must remain in the fast position for good mowing performance Otherwise cut quality suffers Use the low...

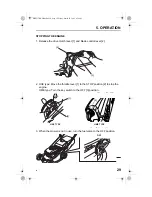
Page 29: ... 2 2 HXE type Move the throttle lever 1 to the STOP position 2 to stop the engine HME type Turn the key switch to the OFF 3 position 3 When the mower is not in use turn the fuel valve to the OFF position 1 2 1 2 STOP HXE TYPE HME TYPE 3 OFF HRX537HXE HME book Page 29 Friday March 18 2005 9 54 AM ...

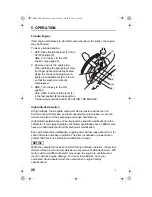
Page 30: ...r Slopes Mow across slopes not up and down Avoid steep slopes more than 20 and be careful when changing direction Mowing on a slope when the grass is damp or wet could cause you to slip fall and lose control of the mower WARNING The blade is sharp and spins at high speed A spinning blade can cut you severely and can amputate fingers and toes Wear protective footwear Keep your hands and feet away f...

Page 31: ...ower deck or other components Vibration usually indicates serious trouble The warranty does not cover parts damaged by accident or collision Gravel and Loose Objects Gravel loose stones and landscaping material can be picked up by the mower and thrown many feet with enough force to cause serious personal injury and or property damage The best way to prevent potential injury from thrown objects is ...

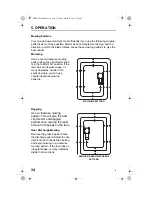
Page 32: ...ill look better If your grass gets too tall cut it once at the highest cutting height setting then mow again in 2 or 3 days Don t take off more than one third of total grass height in any one mowing or brown patches may develop Cutting height adjustment levers are explained in the CONTROLS chapter page 11 Cutting Width For an even lawn finish overlap each mowing swath by a few inches If the grass ...

Page 33: ...osition not quite full mulching This setting will allow the leaves to be recirculated and recut until the particles are small enough to pass though the sliding door opening and into the grass bag Depending on the size type and water content of the leaves it may be necessary to open the sliding door to allow for best bagging results Using the sliding door correctly will allow better grass bag filli...

Page 34: ...shape or many obstacles divide it into sections where you can use counterclockwise mowing patterns Bagging Use a clockwise mowing pattern This will give the best clip director and bagging performance leaving the least amount of clippings on the lawn Rear Discharge Mowing Remove the grass bag and close the discharge guard Adjust the clip director knob to the desired setting and begin mowing in a cl...

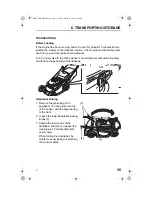
Page 35: ...on This will prevent carburetor flooding and reduce the possibility of fuel leakage Handlebar Folding 1 Remove the grass bag if so equipped You can place it on top of the engine with the bag opening to the front 2 Loosen the lower handlebar locking knobs 1 3 Spread the lower ends of the handlebar struts 2 to release the locating pins Fold handlebar 3 over mower When folding the handlebar be carefu...

Page 36: ... the mower is rolling backwards 1 Turn the fuel valve to the OFF position page 29 2 Use a suitable loading ramp Adjust the loading ramp so that it is inclined at an angle of less than 15 If a loading ramp is not available two people should lift the mower on and off the transport vehicle keeping the mower level STORAGE Proper storage is essential for keeping your lawn mower troublefree and looking ...

Page 37: ...o the carburetor side is up This will help to prevent fuel leakage and hard starting due to carburetor flooding Wear heavy gloves to protect your hands from the blade s Grass Bag Remove the bag from the mower and wash it with a garden hose or pressure washing equipment Allow the bag to dry completely before storage 2 After washing the lawn mower wipe dry all accessible surfaces 3 With the mower in...

Page 38: ...motes fuel deterioration Very warm storage temperatures accelerate fuel deterioration Fuel deterioration problems may occur within a few months or even less if the gasoline was not fresh when you filled the fuel tank The warranty does not cover fuel system damage or engine performance problems resulting from neglected storage preparation You can extend fuel storage life by adding a gasoline stabil...

Page 39: ...rk plug page 47 Pour 5 10 cc of clean engine oil into the cylinder 1 Pull the starter rope several times to distribute the oil in the cylinder Reinstall the spark plug Pull the starter rope slowly until resistance is felt then return the starter grip gently This will close the valves so moisture can not enter the engine cylinder WARNING Gasoline is highly flammable and explosive You can be burned ...

Page 40: ...an be folded for compact storage page 35 With the engine and exhaust system cool cover the mower to keep out dust A hot engine and exhaust system can ignite or melt some materials Do not use sheet plastic as a dust cover A nonporous cover will trap moisture around the mower promoting rust and corrosion REMOVING FROM STORAGE Check your mower as described in the PRE OPERATION CHECKS chapter of this ...

Page 41: ...s are best handled by professionals and are normally performed by a Honda technician or other qualified mechanic The maintenance schedule applies to normal operating conditions If you operate your mower under unusual conditions consult an authorized Honda dealer for recommendations applicable to your individual needs and use WARNING Improper maintenance or failure to correct a problem before opera...

Page 42: ...un the engine unless instructed to do so Read the instructions before you begin and make sure you have the tools and skills required To reduce the possibility of fire or explosion be careful when working around gasoline Use only a nonflammable solvent not gasoline to clean parts Keep cigarettes sparks and flames away from all fuel related parts Remember that your Honda dealer knows your mower best...

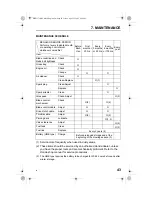
Page 43: ...month or 20 hrs Every 3 months or 50 hrs Every 6 months or 100 hrs Every year Item Blade condition and blade bolt tightness Check O Grass bag Check O Engine oil Check O Change O O Air cleaner Check O Clean Replace O 1 Spark plug Clean Adjust O Replace O Spark arrester Clean O Idle speed Check Adjust O 2 Blade control mechanism Check O 2 O 2 Blade control cable Adjust O O Drive clutch cable Adjust ...

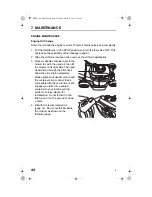
Page 44: ...o catch the used oil then tilt the mower on its right side The used oil will drain through the filler neck Allow the oil to drain completely Please dispose of used motor oil and the containers in a manner that is compatible with the environment We suggest you take it in a sealed container to your local recycling center or service station for reclamation Do not throw it in the trash pour it on the ...

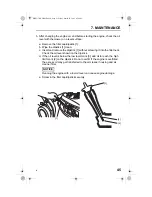
Page 45: ...filler neck Check the oil level shown on the dipstick d If the oil level is below the low level mark 3 add oil to reach the high limit mark 2 on the dipstick Do not overfill If the engine is overfilled the excess oil may get transferred to the air cleaner housing and air cleaner filter NOTICE Running the engine with a low oil level can cause engine damage e Screw in the filler cap dipstick securel...

Page 46: ...wn on the air cleaner cover 1 tabs then remove cover 2 Remove the filter 2 from the air cleaner housing 3 3 Inspect the filter and replace if damaged 4 Clean the filter by tapping the filter several times on a hard surface to remove dirt or blow compressed air not exceeding 207 kPa through the filter from the inside Never try to brush off dirt brushing will force dirt into the fibers 5 Wipe dirt f...

Page 47: ...rrect spark plugs can cause engine damage For good performance the spark plug 1 must be properly gapped and free of deposits 1 Disconnect the spark plug cap 2 and remove any dirt from around the spark plug area 2 Remove the spark plug 1 with a spark plug wrench 3 Recommended spark plugs NGK BPR6ES DENSO W20EPR U 1 2 3 HRX537HXE HME book Page 47 Friday March 18 2005 9 54 AM ...

Page 48: ...k plug carefully by hand to avoid cross threading 6 After the spark plug seats tighten with a spark plug wrench to compress the washer If reinstalling the old spark plug tighten 1 8 to 1 4 turn after the spark plug seats If installing a new spark plug tighten 1 2 turn after the spark plug seats to compress the washer 1 NOTICE A loose spark plug can overheat and damage the engine Overtightening the...

Page 49: ...ew 1 in or out to the setting that produces the highest idle rpm The correct setting will usually be approximately 2 turns out from the fully closed position 4 After the pilot screw is correctly adjusted and the blade control is disengaged turn throttle stop screw 2 to obtain the standard idle speed Standard idle speed 1 700 150 rpm 1 2 HRX537HXE HME book Page 49 Friday March 18 2005 9 54 AM ...

Page 50: ...ve the adjuster 3 up or down as required 2 Tighten the locknuts and recheck free play 3 Start the engine outdoors and operate the blade control lever Check that the blade starts when you push the lever forward and stops quickly when you release the lever If the blade does not start or stop as it should with correct cable adjustment take the mower to an authorized Honda dealer for repair 10 15 mm 1...

Page 51: ...ot self propel b Mower begins to self propel or creeps very slowly forward when the shift lever is moved one notch forward If the mower does not operate as outlined above go to step 5 If the mower does operate as outlined above adjustment is not required 5 Loosen the top 3 and bottom 4 drive clutch cable locknuts with a 10 mm wrench Move the adjuster 5 up or down as required until the mower operat...

Page 52: ...rm 3 and control lever 4 Clearance should be 0 1 mm If clearance is correct no adjustment is necessary If clearance is incorrect proceed to step 4 4 Loosen lock nuts 5 with a 10 mm wrench Move adjuster 6 up or down as required to achieve clearance in step 3 Retighten locknuts 5 S TO P ST O P 2 1 0 1 mm 3 4 5 6 HRX537HXE HME book Page 52 Friday March 18 2005 9 54 AM ...

Page 53: ...t Blade Removal 1 HXE Put the throttle lever in the STOP position HME Turn the key to the OFF position see page 29 2 Turn the fuel valve OFF Disconnect the spark plug cap then tilt the mower to the right side so the carburetor side is up This will help to prevent fuel leakage and hard starting due to carburetor flooding 3 Use a 14 mm socket wrench and remove the two blade bolts 1 and special washe...

Page 54: ...must not be replaced with other bolts 3 Tighten the blade bolts 2 with a torque wrench 4 Use a wooden block to prevent the blades 1 from turning Blade bolt torque 49 59 N m If you do not have a torque wrench have an authorized Honda dealer tighten the blade bolts before you use the mower If the blade bolts are overtightened they could break If the blade bolts are not tightened enough they could lo...

Page 55: ...eplacement Replace a worn or damaged bag with a Honda replacement bag or its equivalent Bag Removal 1 Unclip the plastic edges 1 of the bag 2 from the frame 3 2 Remove the bag 2 from the frame 3 Bag Installation 1 Insert the bag frame 3 into the bag 2 as shown above 2 Clip the plastic edges 1 of the bag 2 onto the frame 3 1 3 2 1 HRX537HXE HME book Page 55 Friday March 18 2005 9 54 AM ...

Page 56: ...Remove muffler shield 2 3 Remove two screws 4 4 Remove the spark arrester 3 from muffler 5 5 Check for carbon deposits on the spark arrester 3 and the exhaust port Brush carbon deposits away Be careful to avoid damaging the spark arrester screen 3 6 Install the spark arrester in the muffler 7 Install the muffler components on the engine and tighten the three bolts securely S 5 4 2 3 1 HRX537HXE HM...

Page 57: ...re is moderate Battery posts terminals and related accessories contain lead and lead compounds Wash hands after handling 1 Remove the battery cover 1 by depressing the tabs 2 located on the sides and releasing the tab on top of the battery cover 2 Disconnect the battery connector 3 by depressing the connector tab 4 and pulling the battery connector from the harness connector 5 which is located ins...

Page 58: ...r outlet and let the battery charge for 20 to 24 hours The charger may become slightly warm during charging This is normal NOTICE Do not charge the battery for more than 24 hours or the battery may be damaged Disconnect the battery charger from the battery before storing the lawn mower 5 After the battery has charged disconnect the charger and reconnect the battery connector to the harness connect...

Page 59: ...attery cover see page 57 2 Locate the fuse case 1 above the battery 3 Remove and inspect the fuse 2 If it is burned out 3 install the spare fuse 4 provided with the mower as shown NOTICE Never use a fuse with a rating other than 40 amperes Serious damage to the electrical system or a fire can result If a frequent fuse failure occurs it usually indicates a short circuit or an overload in the electr...

Page 60: ... position Select a desired handlebar height adjustment position and tighten the knobs securely BATTERY HME TYPE The mower is shipped with the battery disconnected The battery is shipped with a partial charge and should be charged for 20 to 24 hours before use Refer to page 57 for charging instructions Install the key in the switch 1 2 HRX537HXE HME book Page 60 Friday March 18 2005 9 54 AM ...

Page 61: ... BAG ASSEMBLY Slide the grass bag frame 2 into the grass bag 3 and install the plastic clips 4 as shown Lift the the discharge guard and install the grass bag 3 4 2 HRX537HXE HME book Page 61 Friday March 18 2005 9 54 AM ...

Page 62: ...engine is overfilled the excess oil may get transferred to the air cleaner housing and air filter FUEL Refer to page 15 BEFORE OPERATION Before using the lawn mower all mower operator s must read the following chapters SAFETY INSTRUCTIONS page 3 CONTROLS page 8 PRE OPERATION CHECKS page 12 OPERATION page 23 MAINTENANCE SCHEDULE page 41 FILLER CAP DIPSTICK do not screw in dipstick when checking oil...

Page 63: ...and reinstall spark plug Start engine with throttle lever in fast position p 26 4 Take mower to a Honda dealer or refer to shop manual Fuel filter clogged carburetor malfunction ignition malfunction valves stuck etc Replace or repair faulty components as necessary Loss of Power Possible Cause Correction 1 Check throttle position Throttle not set to fast position Move throttle to fast p 8 2 Check g...

Page 64: ...omponents Poor Cut Quality or Poor Moving Bagging Performance Possible Cause Correction 1 Check that the throttle lever is in the fast position Engine speed is too slow to cut well Move throttle lever to the fast position p 8 2 Reduce forward speed Mower is moving too fast for lawn conditions Shift to slow speed p 28 or push slower 3 Check cutting height adjustment levers Adjustment levers set at ...

Page 65: ...mm 441 mm folded cut height adj 32 mm Dry weight 42 1 kg 43 1 kg Width 585 mm Cut width 530 mm Cut height adjustments 20 mm 32 mm 46 mm 62 mm 75 mm 88 mm 100 mm Grass bag capacity 88 Sound power level According to EEC 84 538 EEC 87 252 Directives 98 dB A Vibration test According to project EN1033 1993 ENV25349 1993 ENV28041 1993 ISO5347 1987 ISO5348 1987 4 5 m s2 HRX537HXE HME book Page 65 Friday ...

Page 66: ...nsistorized magneto Spark plug NGK BPR6ES DENSO W20EPR U Spark plug gap 0 7 0 8 mm Air cleaner Dry element type Recommended fuel 86 octane rating or higher unleaded preferred Fuel tank capacity 1 1 Approximate fuel consumption 1 3 h average load Approximate full tank running time 0 73 h average load Recommended oil SAE 10W 30 API SH SJ or equivalent Engine oil capacity 0 55 DRIVE Type Hydrostatic ...

Page 67: ...RINTED IN U S A Printed on Recycled Paper Rotary Mower HRX537CHXE 2004 2005 American Honda Motor Co Inc All Rights Reserved OWNER S MANUAL MANUEL DE L UTILISATEUR BEDIENUNGSANLEITUNG MANUAL DE EXPLICACIONES GEBRUIKSAANWIJZING MANUALE DELL UTENT HRX537CHME ...

Reviews: