background image

5

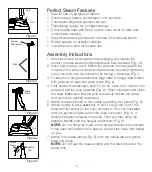
Perfect Steam Features

•  Safe for use on all types of fabrics

•  Quick heat-up feature emits steam in 45 seconds

•  Convenient integrated garment hanger

•  Telescoping design for compact storage

•  5 foot flexible hose with Safe Touch® hose cover for safe and

  comfortable handling

•  Easy-fill water tank provides 45 minutes of continuous steam

•  Rolling casters for excellent mobility

•  Low water auto shut-off for safe use

Assembly Instructions

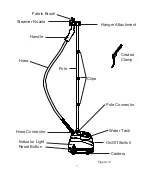
1  Carefully remove all contents from packaging and inspect the 

product to make sure all components have been received (Fig. 10).

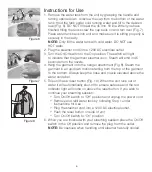
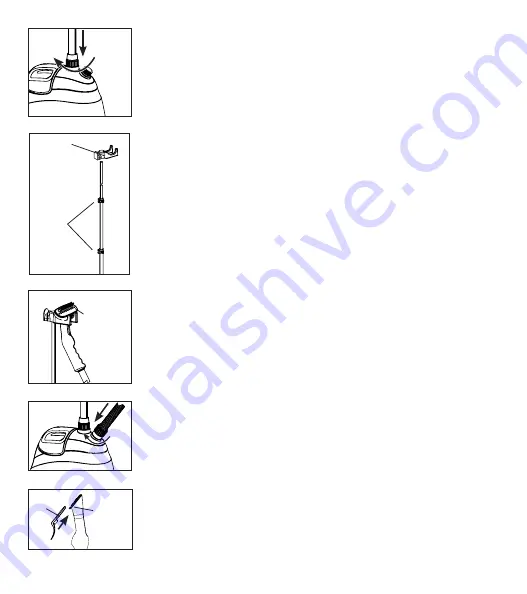
2.  Insert pole into top of unit. Match the grooves on the pole with the 

notches in the pole connector and push down. Securely tighten the 

nut on the pole over the connector by turning it clockwise (Fig 1).

3.  To attach the hanger attachment, align tabs in hanger attachment 

with grooves on pole and push down (Fig. 2).

4.  Fully extend the telescopic pole. To do so, open the 3 clips on the 

pole and pull the pole upwards (Fig. 2). When fully extended close 

the clips. Make sure that the pole is securely locked into place 

and cannot be pushed downward.

5.  Attach the fabric brush to the nozzle by setting into place (Fig. 3).

6.  Attach handle & hose assembly to unit. Line up the nut on the 

hose with the screw on the hose connector. Turn nut clockwise 

until it is securely tightened on the hose connector, (Fig 4). It 

should be tightly screwed into place. Then you may hang the 

steamer handle onto the hanger attachment (Fig. 3).


NOTE:

 Do not hang the hose on the hanger attachment until after

it has been connected to the base to prevent the hose from falling 

on you.

7.  Attach the crease clamp (Fig. 5) onto the nozzle tab and gently 

push into place.

  NOTE:

 Do not use the crease clamp and the fabric brush at the

same time

Pole

Turn

Turn

Nozzle 
Tab

Crease 
Clamp

Clips

Hanger 
Attachment

Fabric 
Brush

Figure 1

Figure 2

Figure 3

Figure 4

Figure 5

Summary of Contents for PerfectSteam PS-250-CA

Page 1: ...ble qui est hors du contrôle de HoMedics Cette garantie est valide uniquement si le produit a été acheté et utilisé au pays dans lequel le produit a été acheté La garantie ne couvre ni un produit nécessitant des modifications ou une adaptation afin qu il puisse fonctionner dans un pays autre que le pays pour lequel le produit a été conçu fabriqué approuvé ou autorisé ni la réparation d un produit ...

Page 2: ...Instruction Manual and Warranty Information PS 250 CA PerfectSteam commercial garment steamer ...

Page 3: ...liance when storing Always disconnect appliance from electrical outlet when filling with water or emptying and when not in use Do not operate appliance with a damaged cord or if the appliance has been dropped or damaged To reduce the risk of electric shock do not disassemble or attempt to repair the appliance Return to HoMedics Service Center for examination and repair Incorrect reassembly or repa...

Page 4: ...gh wattage appliance on the same circuit Do not use an extension cord to operate the appliance If an extension cord is absolutely necessary a 15 ampere rated cord should be used Cords rated for less amperage may overheat Care should be taken to arrange the cord so that the cord cannot be pulled or tripped over Never pour water directly into reservoir Pour water in water tank only When changing att...

Page 5: ...use an adapter such as the one shown in Figure B until you have a proper outlet such as the one shown in Figure C installed by a qualified electrician This product is for use on a nominal 120 volt circuit and has a grounding plug that looks like the plug illustrated in Figure A A temporary adapter that looks like the adapter illustrated in Figure B may be used to connect this plug to a 2 pole rece...

Page 6: ...rooves on pole and push down Fig 2 4 Fully extend the telescopic pole To do so open the 3 clips on the pole and pull the pole upwards Fig 2 When fully extended close the clips Make sure that the pole is securely locked into place and cannot be pushed downward 5 Attach the fabric brush to the nozzle by setting into place Fig 3 6 Attach handle hose assembly to unit Line up the nut on the hose with t...

Page 7: ...e 4 Hang the garment onto the hanger attachment Fig 8 Steam the garment in an up down motion starting from the top of the garment to the bottom Always keep the hose and nozzle elevated above the water container 5 This unit has a reset button Fig 10 When the unit runs out of water it will automatically shut off to ensure safe use and the red indicator light will come on above the reset button If yo...

Page 8: ...7 Handle Hose Hose Connector Steamer Nozzle Fabric Brush Hanger Attachment Crease Clamp Pole Clips Pole Connector Water Tank On Off Switch Casters Indicator Light Reset Button Figure 10 ...

Page 9: ...the crease clamp and steam nozzle Release the trigger Move the crease clamp in a downward motion from top to bottom to set a crease Cleaning and Maintenance 1 Be sure the steamer is turned off and unplugged 2 Allow the steamer to cool for at least 30 minutes 3 Empty any excess water from the water tank and allow it to air dry before replacing the cap and setting it back in the unit 4 Empty excess ...

Page 10: ...r and 50 water In most cases 1 cup of this mixture will be sufficient 6 Slowly pour the water vinegar mixture into the hose connector Fig 11 a If the internal piping is only partially blocked by mineral buildup the water vinegar mixture will soon start flowing out of the water intake hole If this happens proceed to step 8 b If the internal piping is completely blocked continue to pour the mixture ...

Page 11: ...ot empty If full press the reset button on side of unit If empty refill and push reset to begin No steam Water level is low Turn ON OFF switch OFF and refill water container Water drips from nozzle Condensation in hose Hold the hose vertically and allow water to drain back into tank Nozzle gurgles Condensation in hose Hold the hose vertically and allow water to drain back into tank Steam is interm...

Page 12: ...n of the steamer never store without cleaning and removing excess water from the reservoir and water container 2 If the reset light comes on with water in the tank you probably need to remove mineral build up 3 In areas where the voltage exceeds 120V it may be necessary to clean your unit more frequently ...

Page 13: ...ective only if the product is purchased and operated in the country in which the product is purchased A product that requires modifications or adoption to enable it to operate in any other country than the country for which it was designed manufactured approved and or authorized or repair of products damaged by these modifications is not covered under this warranty THE WARRANTY PROVIDED HEREIN SHA...

Page 14: ...13 Manuel d instructions et renseignements au sujet de la garantie PS 250 CA PerfectSteam Défroisseur commercial de vêtements ...

Page 15: ...errer lorsque vous le rangez Débranchez toujours l appareil lorsque vous remplissez ou videz le réservoir d eau ou lorsque l appareil n est pas utilisé N utilisez pas l appareil si un câble est endommagé si l appareil est tombé ou s il a été endommagé d une quelconque façon Pour réduire les risques de décharge électrique ne désassemblez pas l appareil et ne tentez pas de le réparer Retournez l app...

Page 16: ...ute tension sur le même circuit N utilisez pas de rallonge avec cet appareil Si l utilisation d une rallonge est absolument nécessaire celle ci doit avoir une capacité minimale de 15 ampères Les rallonges ayant une capacité inférieure peuvent surchauffer Le câble doit être utilisé avec précaution afin d éviter tout accident par exemple les risques de trébuchement Ne versez jamais de l eau directem...

Page 17: ...e que vous ayez une prise adéquate comme celle illustrée dans la Figure C laquelle doit être installée par un électricien qualifié Cet appareil est conçu pour être utilisé à partir d un circuit nominal de 120 volts Cet appareil est muni d un connecteur doté d une mise à la terre semblable au connecteur illustré dans la Figure A Un adaptateur temporaire similaire à l adaptateur illustré dans la Fig...

Page 18: ... et poussez vers le bas Fig 2 4 Allongez la tige télescopique à son maximum Pour ce faire ouvrez les trois agrafes de la tige et tirez la vers le haut Fig 2 Une fois la tige à sa pleine extension fermez les agrafes Assurez vous que la tige est bien mise en place et qu il est impossible de la rabaisser 5 Fixez la brosse à tissus à l embout Fig 3 6 Fixez la poignée et le flexible à l appareil Aligne...

Page 19: ...ectuant des mouvements de haut en bas en commençant par le haut du vêtement vers le bas Positionnez toujours le flexible et l embout à un niveau plus élevé que le réservoir d eau 5 Cet appareil possède un bouton de réinitialisation Fig 10 Pour vous garantir un appareil sécuritaire le défroisseur s arrête automatiquement lorsqu il n a plus suffisamment d eau dans le réservoir Un voyant s allumera a...

Page 20: ...ur pour le flexible Embout vaporisant Brosse à tissu Dispositif de cintre Pince à pli Tige Agrages Connecteur pour la tige Réservoir d eau Bouton On Off marche arrêt Roulettes Voyant indicateur Bouton de réinitialisation Figure 10 ...

Page 21: ...tement entre la pince et l embout vaporisant Relâchez le déclencheur Déplacez la pince d un mouvement vers le bas commençant au haut du vêtement afin d effectuer un pli Nettoyage et entretien 1 Assurez vous que le défroisseur est éteint et débranché 2 Attendez au minimum 30 minutes afin que l appareil refroidisse 3 Videz l excédent d eau du réservoir et laissez sécher avant de remettre le bouchon ...

Page 22: ...d eau Dans la plupart des cas une tasse de mélange suffit 6 Versez lentement le mélange dans le connecteur du flexible Fig 11 a Si l accumulation de minéraux ne bloque que partiellement la tuyauterie interne le mélange vinaigre eau coulera bientôt depuis l ouverture de prise d eau Si le mélange s écoule comme prévu passez à l étape 8 b Si l accumulation de minéraux bloque entièrement la tuyauterie...

Page 23: ...de remplissez le et appuyez sur le bouton Reset pour activer l appareil Aucune vapeur Le niveau d eau est bas Placez le bouton ON OFF en position OFF et remplissez le réservoir d eau L eau s écoule par les trous de l embout vaporisant Il y a de la condensation dans le flexible Tenez le flexible en position verticale pour permettre à l eau de retourner dans le réservoir L embout vaporisant fait du ...

Page 24: ...cédent d eau se trouvant dans la réserve d eau et le réservoir et nettoyez l appareil avant de le ranger 2 Si le voyant de réinitialisation s allume et que le réservoir contient de l eau c est que l appareil nécessite un traitement pour enlever l accumulation de minéraux 3 Dans les régions où la tension fournie est supérieure à 120 volts l appareil doit être nettoyé plus souvent ...

Reviews: