Set the Control Throws
The control throws are a measure of how far the flight controls
move up and down (or from side to side). If the controls move
too much, the plane will respond too quickly and be difficult to
control. Due to the great effect the control throws have on the
way a model flies, the control throws must be checked.
❏
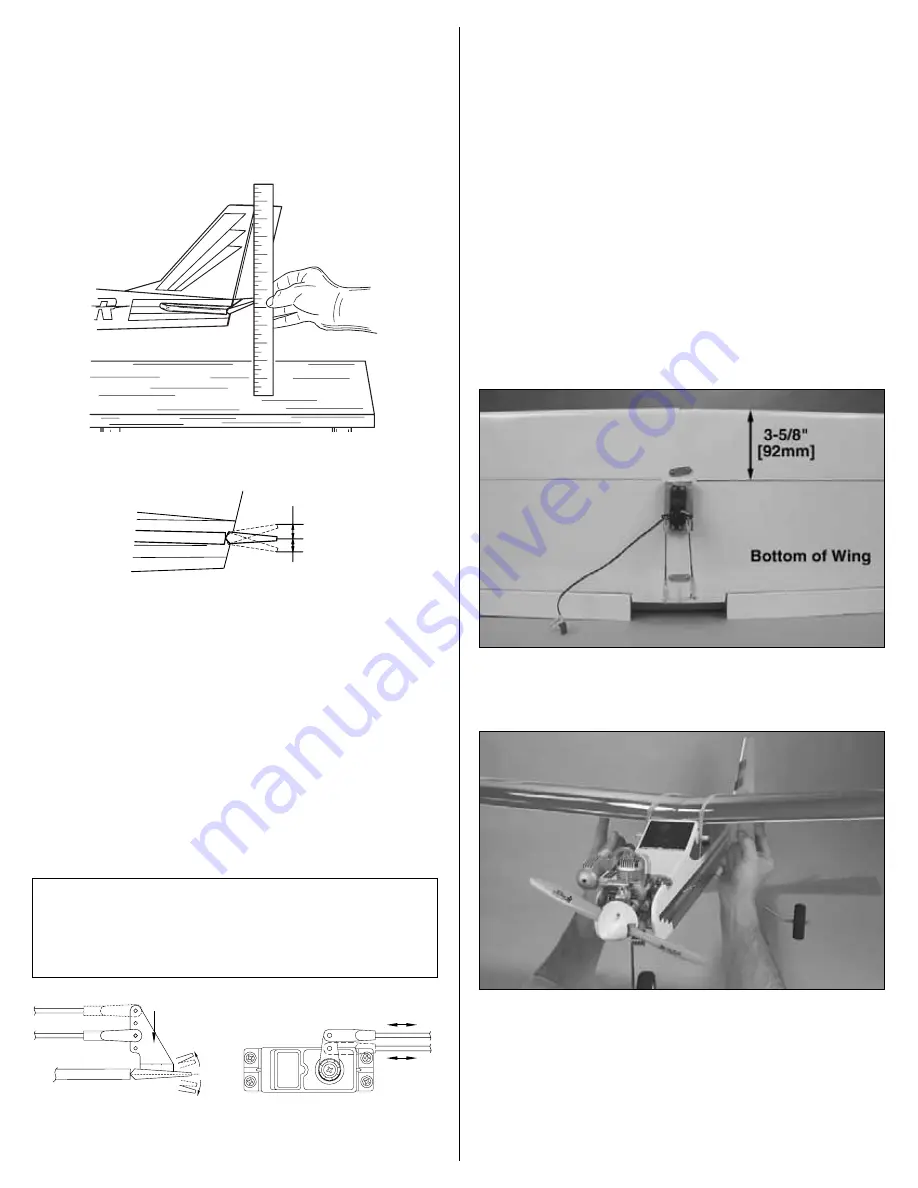
1. Start with the elevator. Turn on the transmitter and
receiver. Holding a ruler up to the trailing edge of the elevator,
move the elevator all the way up using the control stick on the
transmitter. Measure the distance the elevator moves up. Also
move the elevator down and measure the distance. As shown
in the chart that follows, the elevator should move 1/2" [13mm]
up and 1/2" [13mm] down. If the elevator moves up or down
more than 1/2" [13mm], the control throw must be decreased
by connecting the pushrod to a hole further out on the elevator
control horn, or by connecting the pushrod to a hole further in
on the elevator servo arm (as shown in the sketch below). If the
elevator doesn't move up and down enough, the control throw
may be increased by relocating the pushrods the opposite as
described above.
❏
2. Measure and if necessary, adjust the aileron and rudder
control throws the same way.
Identify Your Model
Whether you fly at an R/C club or somewhere on your own, you
should have your name, telephone number and address in or
on your model so it can be identified and returned in case it
lands somewhere away from the flying site. Fill out the I.D. tag
found in the back of the manual and use spray adhesive or tape
to stick it in the model.
Balance the Model
This important step may also be referred to as “checking the C.G.”
(center of gravity). Do not disregard this step. The C.G. can have
an even greater effect on how a model flies than the control throws.
If the model has too much weight in the nose (“nose-heavy”), it
could be difficult to takeoff and land and lose some of its self-
correcting tendencies. If the model has too much weight in the tail
(“tail-heavy”), the controls may be too sensitive, making the model
too difficult to control–especially for an inexperienced pilot!
❏
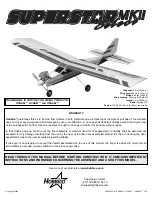
1. Take the wing off the fuselage. Use a felt-tip pen to mark a line
on the bottom of the wing to note the balance point located 3-5/8"
[92mm] back from the leading edge as shown in the photo.
❏
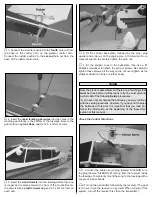
2. Mount the wing on the fuse with four rubber bands. Lift the
model on both sides of the fuselage with your fingertips on the
line on the bottom of the wing.
❏
3. With your fingers on the line, if the plane will rest level, the
C.G. is good. Proceed to the checklist in the following section.
If the tail drops, add weight to the nose until the plane balances.
If the nose drops the plane is nose heavy and will require
sticking weight on the tail to balance.
More
Movement
Less
Movement
Moving the pushrod outward on the servo
arm results in more pushrod movement.
More
Throw
More
Throw
Moving the pushrod inward on the
control horn results in more throw.
More
Throw
Control Throws
Elevator
1/2" [13mm] up
1/2" [13mm] down
Ailerons
5/16" [8mm] up
5/16" [8mm] down
Rudder
1" [25mm] right
1" [25mm] left
1/2" [13mm]
1/2" [13mm]
Elevator
7


