Premium Pr:o Passive 1.7
8
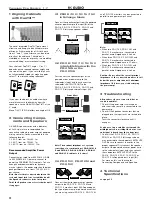
1 Aligning Cabinets
with DuoTilt™
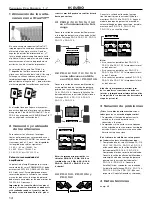
The novel integrated DuoTilt™ pole mount
allows sound energy to be utilized far more
efficiently. With two angles of tilt to choose
from, 3° and 7°, the enclosure can be aimed
directly at the audience. The cabinet is
stabilized at its center of gravity – no wobbling,
unwanted tilting, or unintentional turning.
Your choice of DuoTilt™ angle – 3° or 7° –
depends on the required speaker height and
the size of the room. If you set mid/high units
on fully extended tripods or mounting poles,
select 7° to minimize ceiling reflections.
If you want to address an audience where
more listeners are farther away from the
speakers, use the HK AUDIO DuoTilt™ at the
3° angle.
Mono Tilt 3™ (PR:O 8) offers one angle of tilt.
2 Connecting Compo-
nents and Speakers
HK AUDIO speaker cords with a diameter
of 2x2.5 sq. mm are recommended for
connecting cabinets, power amps or powered
mixing consoles. Cords are available in the
following lengths:
1. LSC 3, item no.: 193283, 3 m
2. LSC 7, item no.: 193263, 7 m
3. LSC 15, item no.: 193323, 15 m
Recommended Amplifier Power
Output
Connect amps rated from 600 W @ 4 Ω RMS
to 800 W RMS @ 4 Ω per amp channel to
power the PREMIUM PR:O cabinets. To have
enough headroom available for dynamic
musical signals, the power amp should deliver
peak performance of at least 1,200 W @ 4 Ω
per channel.
Note: An electrical connection between the
cord and input jack is not established until
the Speakon connector locks into place.
Twist the Speakon connector clock wise until
it engages.
2.1 PR:O 8 / 10 X / 12 / 15 / 15 X
in Fullrange Mode
Connect the speaker output from the powered
mixer or power amp to the input (IN) of the
PR:O 8, PR:O 10 X, PR:O 12, PR:O 15 and
PR:O 15 X full-range speaker cabinet.
Power Mixer
or
Poweramp
2.2 PR:O 8 / 10 X / 12 / 15 / 15 X
in Satellite Mode with the
PR:O 18 S or the
PR:O 210 S
First connect the speaker output of the
powered mixer or power amp to the
subwoofer’s input, and then connect the
subwoofer’s SATELLITE OUT to the
PR:O 8, PR:O 10 X, PR:O 12, PR:O 15 and
PR:O 15 X full-range cabinet’s input (IN).
Power Mixer
or
Poweramp
Poweramp
Note: The nominal impedance of systems
consisting of a combination of PR:O 18/210
S and PR:O 8, PR:O 10 X, PR:O 12, PR:O 15
and PR:O 15 X cabinets is 4 ohms!
2.3 PR:O 10 X, PR:O 12 M and
PR:O 15 X
Monitor Amp
Connect the monitor power amp’s speaker
output to the PR:O 10 X, PR:O 12 M und
PR:O 15 X monitor’s input (IN). Depending on
the type of power amp or powered mixer that
you are using, several PR:O 10 X, PR:O 12 M
und PR:O 15 X monitors can be connected in
parallel to one power amp channel.
Poweramp
Note:
• When two PR:O 10 X, PR:O 12 M and
PR:O 15 X monitors are -connected in
parallel, overall impedance is 4 ohms.
• When three PR:O 10 X, PR:O 12 M and
PR:O 15 X monitors are connected in
parallel, overall impedance is 2.7 ohms.
• When four PR:O 10 X, PR:O 12 M and
PR:O 15 X monitors are connected in
parallel, overall impedance is 2 ohms.
Caution: Do not allow the overall nominal
impedance of the connected monitors to fall
below the power amp channel’s minimum
impedance! If it does, you risk destroying
the power amp!
3 Troubleshooting
All speaker cords are connected, but no
sound is audible!
1 Check if the power amp is switched on
and the mixing console is connected to the
power amp.
2 Check if the Speakon connectors that are
plugged into the input jacks are locked into
place.
Twist the connector clockwise until it
engages.
You have set up a satellite system and the
mid/high units are working fine but no low-
end signal is heard from the subwoofers!
1 Check if the PR:O 8, PR:O 10 X, PR:O 12,
PR:O 15 or PR:O 15 X full-range cabinets
are connected to the subwoofer’s SATELLITE
OUT. Be sure to connect the cords in the
proper sequence! First connect the speaker
output of the powered mixer or power amp
to the subwoofer’s input, and then connect
the subwoofer’s SATELLITE OUT to the
PR:O 8, PR:O 10 X, PR:O 12, PR:O 15 or
PR:O 15 X fullrange cabinet’s input (IN).
For more on this, see the chapter,
Connecting Components and Speakers.
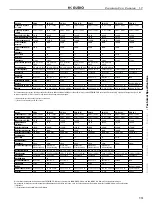
4 Technical
Specifications
>>> page 15


