background image

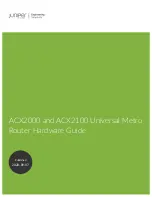
RZ 100 Parts Diagram

Caution: 

Befor

e and during installation of Router Raizer make sur

e power switch is in the off position and tool is

disconnected from power source to avoid accidental starting of t

he tool which may r

esult in personal injur

y.

© 

2000-2006 Router Technologies

             All Rights Reserved

#46

   Allan Scr

ew Locating Pin

#32 

Purple Nylon

           Bushing

#33 

Yellow Retainer

      two included       one r

equir

ed

        one extra

#34

 Orange Nylon

            Bushing

#35 

Plunge Lock Spring


Porter Cable Only

Note; Actual mainshaft length 12 1/4"

Parts Shown Full Size

Top V

iew

Side V

iew

Page 3

#1 

Mainshaft

#2

 Long Gr

een Drive Pin

#3 

Long Red Drive Pin

#4 

Gr

een Rollpins

#5

 Red Rollpins

#6 

Yellow Rollpins

#7

 Brass W

asher

#8 

White Nylon

Flanged Bushing

#9 

Red Nylon

    Bushing

#10 

Black Nylon

    Bushing

#11 

Blue Nylon

    Bushing

#12 

Gr

een Nylon

    Bushing

#13 

Hollow Spring Guide

  #14 

Steel

3/16" W

asher

#15 

Retainer

 six included thr

ee r

equir

ed

  thr

ee extra

#16 

Housing

  Bushing

#18 

Drive Nut

    W

asher

#19 

Short

Drive Nut

#20 

Long

Drive Nut

#21

 Lead Scr

ew

#22

 Rapid

   Collar

#23 

Rubber

    O-ring

#24 

Thumb

    Scr

ew

#25 

Optional Black

Set Scr

ew ( 10 / 32 )

#26 

Top Drive

#27 

Yellow

Set Scr

ew

 ( 10 / 32 )

#28 

Allen W

rench

#29 

Speed W

rench

Magnet

#30

 Dust Cover

    Insert

#31 

Dust Cover

    T

wo Included

#17 

housing

Bushing W

asher

#00 

SIilver Drive Pin

 #39 

Long


Housing Bushing

To avoid confusion during installation remove this page and router being installed pages, return others to box.

Summary of Contents for M 12V2

Page 1: ...r source Caution Always secure plunge lock before and during routing operations This warranty is your only remedy and parts are to be returned prepaid to our facility for inspection at Router Technologies 2729 Delaware Ave Des Moines IA 50317 This warranty gives you specific legal rights and you may have other rights which may vary from state to state Any legal actions must be brought in Polk Coun...

Page 2: ...l Plunge Routers Before beginning the installation please purchase a bottle of STP Apply a light film to the posts and inside the post bushings just before reassembling the router For maximum performance and smoothest plunging action all plunge posts require a light film of lubrication We only recommend using STP MOTOR OIL TREATMENT 1 Install the Router Raizer components into the base and motor ho...

Page 3: ...in 3 Long Red Drive Pin 4 Green Rollpins 5 Red Rollpins 6 Yellow Rollpins 7 Brass Washer 8 White Nylon Flanged Bushing 9 Red Nylon Bushing 10 Black Nylon Bushing 11 Blue Nylon Bushing 12 Green Nylon Bushing 13 Hollow Spring Guide 14 Steel 3 16 Washer 15 Retainer six included three required three extra 16 Housing Bushing 18 Drive Nut Washer 19 Short Drive Nut 20 Long Drive Nut 21 Lead Screw 22 Rapi...

Page 4: ...Red Bushing 8 White Flanged Bushing 11 Blue Bushing Height Knob Bolt Height Lock Lever Height Adjustment Rod Top and Bottom Washer Bottom Nut Lock Lever Housing 39 Long Housing Bushing Top of Height Rod Boss Hole Red Grease 39 Long Housing Bushing 17 Housing Bushing Washer 1 Cut 1 mainshaft to 11 3 4 overall length and debur cut end Set 1 main shaft aside to install later Plunge Lock Lever NOTE No...

Page 5: ... until flush 31 sets in 30 and is removed during adjustments with magnet on back edge of 29 speed handle These components keep dust from entering the Router Raizer hex drive Installing Final Retainers and Top Drive 15 retainer clip install teeth up B 1 Use 46 locating pin to locate the Router Raizer access hole on the original subbase or router table For detailed instructions see page 4 Drill orig...

Page 6: ...ill Grind but end of pin off and debur ground end Cool pin before removing from chuck jaws CUTAWAY ILLUSTRATION OF 3 4 POCKET SHOWN FROM BOTTOM SIDE BOTTOM SIDE OF INSERT PLATE TOP SIDE OF INSERT PLATE 30 Dust Cover Insert 31 Dust Cover 1 2 1 Use the 46 locating pin to mark the back of the insert plate or table top 2 Center 1 8 drill bit on locating pin center mark and drill completely through pla...

Page 7: ...late to accept the 30 dust cover insert shown bottom of page Some table tops and steel insert plates do not allow cutting the pocket from the back side An 8 X 8 black rubber spacer is provided to cut out and place between the router and the table top or insert plate 1 Place the rubber spacer onto base of your router with the pre punched 3 4 hole centered on the 1 mainshaft head 2 Use a utility kni...

Page 8: ... rotated so shortest post is under adjustable stop All plunge routers have a predetermined plunge stroke the Router Raizer will not increase this stroke With router fully compressed check amount of plunge post still visible 1 16 to 1 4 post should be visible If more than 1 16 to 1 4 of post is visible Call 1 866 266 1293 Addition of a collet extension is required to safely run some bits Router plu...

Page 9: ...thread 21 lead screw in or out of the drive nut compressing and un compressing the router 4 Rapid collar positioning The rapid collar is for hand held use only for router table use position collar against retainer clips and top drive fig 2 Secure with 24 thumb screw or optional 25 black set screw When used hand held the hex shaped 1 mainshaft provides a constant engagement of the Router Raizer mec...

Page 10: ...racy when copied Drill 500 hole through router table insert plate install 30 dust cover insert into 500 hole and press flush with top of insert plate Router Raizer Access Hole NOTE This hole must be drilled 1 2 or 500 for 30 dust cover insert to fit properly Note Cross lines for locating and drilling holes are accurate The illustration of subbase may vary slightly in size and design but is accurat...

Reviews: