background image

English

   - 9 -

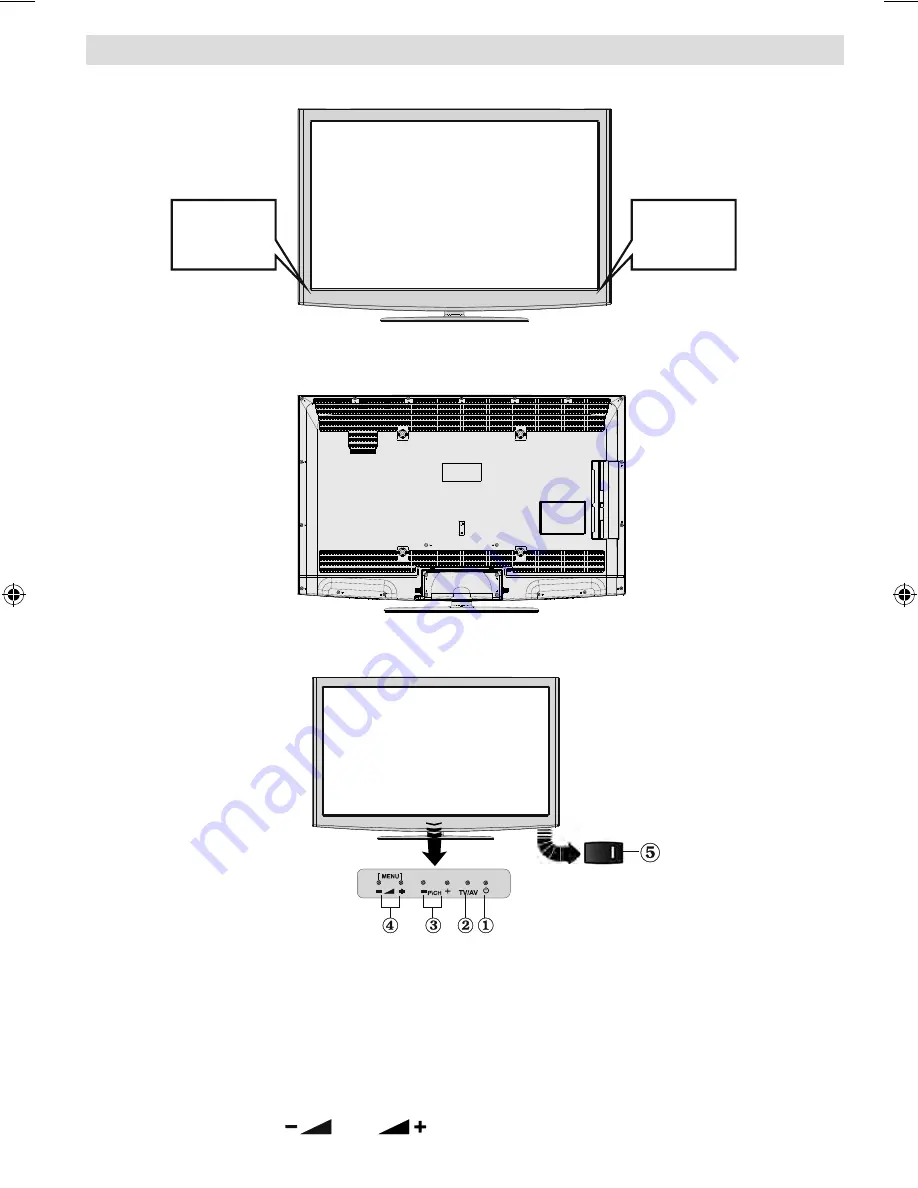
LCD TV and Operating Buttons

FRONT and REAR VIEW

Control buttons VIEW

Control Buttons

1. 

Standby/On touch button

2. 

TV/AV button

3. 

Programme Up/Down buttons

4. 

Volume Up/Down buttons

5. Power On/Off Switch is used for turning the TV on or off

.

Note: Press 

 “

” and 

 buttons at the same time to view main menu.

Remote 

Control

Sensor

3D  Glasses

Emitter

00_MB63D_[GB]_5100UK_DVB-TC_PLATINIUM6_46915LED_10070722_50183400.indd   9

00_MB63D_[GB]_5100UK_DVB-TC_PLATINIUM6_46915LED_10070722_50183400.indd   9

21.01.2011   14:34:22

21.01.2011   14:34:22

Summary of Contents for L46VG09U

Page 1: ...uctions for use L46VG09U 46 LCD Colour Television For any TV set up or usage issues Technical Helpline No 0845 604 0105 Lines are open 9am 8pm Monday to Saturday and 11am 5pm Sunday Calls charged at local rate ...

Page 2: ...perating the Channel List 18 Moving a Channel 18 Deleting a Channel 18 Renaming a Channel 18 Locking a Channel 18 Managing Stations Favourites 18 Button Functions 19 Managing Stations Sorting Channel List 19 On Screen Information 19 Media Playback Using Media Browser 20 Viewing Videos via USB 21 Viewing Photos via USB 21 Slideshow Options 22 Playing Music via USB 22 Media Browser Settings 22 Using...

Page 3: ... the usage of electronic devices is familiar to you Notice especially the chapter SAFETY PRECAUTIONS Carefully keep the handbook as future reference When selling the device or giving it away absolutely give these direction for use Thank you for choosing this product This manual will guide you for the proper operation of your TV Before operating the TV please read this manual thoroughly Please do k...

Page 4: ... is illegal to watch television whilst driving DON T listen to headphones at high volume as such use can permanently damage your hearing DON T leave equipment switched on when it is unattended unless it is specifically stated that it is designed for unattended operation or has a stand by mode Switch off using the switch on the equipment and make sure that your family know how to do this Special ar...

Page 5: ...The above mark is in compliance with the Waste Electrical and Electronic Equipment Directive 2002 96 EC WEEE The mark indicates the requirement NOT to dispose the equipment including any spent or discarded batteries as unsorted municipal waste but use the return and collection systems available If the batteries or accumulators included with this equipment display the chemical symbol Hg Cd or Pb th...

Page 6: ...y in some circumstances create a fire hazard Connection to a cable distribution system has therefore to be provided through a device providing electrical isolation below a certain frequency range galvanic isolator see EN 60728 11 The Standby On button doesn t separate this device completely from mains Moreover the device consumes power in the standby operation In order to separate the device compl...

Page 7: ...Control LCD TV Batteries 2 X AAA Instruction Book Quick Guide Cable Holder 3D Glasses 2x 1 X Video Audio Connection Cable Note You should check the accessories after purchasing Make sure that each accessory is included If you need additional pairs of 3D Glasses please purchase them from your dealer 3D Glasses instruction booklet is included with the supplied 3D Glasses package ...

Page 8: ...of TV set will be decreased to optimum level Note that some picture settings will be unavailable to be changed when the TV is in Power Save Mode When the TV is not in use please switch off or disconnect the TV from the mains plug This will also reduce energy consumption Disconnect power when going away for longer time It is highly recommended to activate Power Save Mode setting to reduce your annu...

Page 9: ...lection Changes picture mode 19 in Media Browser video mode Exit USB menu 20 No function 21 Play in Media Browser mode 22 No function 23 No function 24 Rapid reverse in Media Browser mode 25 Image size 26 Mono Stereo Dual I II Current Language 27 Red button Zooms videos in Media Browser 28 video mode Green button 29 Teletext Mix 30 Cursor up 31 Cursor left 32 Cursor down 33 Programme Down Page up ...

Page 10: ...s VIEW Control Buttons 1 Standby On touch button 2 TV AV button 3 Programme Up Down buttons 4 Volume Up Down buttons 5 Power On Off Switch is used for turning the TV on or off Note Press and buttons at the same time to view main menu Remote Control Sensor 3D Glasses Emitter ...

Page 11: ...UDIO INPUTS on the TV and audio output of your PC to enable PC audio Connect the audio cable between AUDIO INPUTS on the TV and audio outputs of your device to enable component audio SPDIF Coaxial Out 5 outputs digital audio signals of the currently watched source Use an SPDIF coaxial cable to transfer audio signals to a device that has SPDIF input RF Input 6 connects to an aerial antenna system o...

Page 12: ... video cable s not supplied connector into the YELLOW input located on the plural side of the supplied AV connection cable Colours of the connected jacks should match To enable audio connection you must use RED and WHITE inputs of the side AV connection cable Afterwards insert your device s audio cable s connectors into the RED and WHITE jack of the supplied side AV connection cable Colours of the...

Page 13: ...ard disk drives are not supported Side HDMI Connection You can use side HDMI input to connect a device that has an HDMI connector to your TV Use an appropriate HDMI cable to make such a connection Note that you should switch to the HDMI source to view the content from the connected device Power off both the TV and the device before making any connections Side HDMI Input supports connections betwee...

Page 14: ...evice that has SPDIF support use an appropriate SPDIF cable to enable sound connection External Speakers A device that supports SPDIF signal Connecting to a DVD Player If you want to connect a DVD player to your LCD TV you can use connectors of the TV set DVD players may have different connectors Please refer to your DVD player s instruction book for additional information Power off both the TV an...

Page 15: ... that features such as Standby Search Over Air Download or Timer is active The LED can also blink when you switch on the TV from standby mode Input Selection Once you have connected external systems to your TV you can switch to different input sources Press SOURCE button on your remote control consecutively for directly changing sources You can operate your TV using both the remote control and ons...

Page 16: ... Language option Use or button to select desired Teletext Language Press button after setting Teletext Language option Scan Encrypted will be then highlighted You can set Scan Encrypted as Yes if you want to scan coded stations After selecting the Scan Encrypted select Active antenna feature optional by pressing or button Use or button to set active antenna mode as on or off If an active antenna i...

Page 17: ...and stores both analogue and aerial DVB stations Digital Cable Analogue Searches and stores both analogue and cable DVB stations Whenever you select an automatic search type and press OK button a confirmation screen will appear on the screen To start installation process select Yes to cancel select No by using or and OK button After auto channel scan type is set and selected and confirmed installa...

Page 18: ...ntinue The following message will be asked Select Yes to continue or select No to cancel If you start Digital Aerial scan process automatic scanning will start You can press MENU button to cancel If you start Digital Cable scan process the following screen will be displayed You can select frequency ranges from this screen For highlighting lines you see use or button You can enter the frequency ran...

Page 19: ... that you want to delete and select Delete option Press OK button to continue A warning screen will appear Select YES to delete select No to cancel Press OK button to continue Renaming a Channel Select the channel that you want to rename and select Edit Name option Press OK button to continue Pressing or button moves to the previous next character Pressing or button toggles the current character i...

Page 20: ...ot available then information banner will be displayed with blanks If the selected channel is locked you must enter the correct four digit numeric code to view the channel default code is 0000 Enter PIN will be displayed on the screen in such a case Viewing Electronic Programme Guide EPG You can view the electronic programme guide EPG to view information about available programmes To view the EPG ...

Page 21: ...ing this feature you can search the programme guide database in accordance with the genre selected or with name match To use Match On feature simply highlight the line by using Up or Down buttons Numeric buttons indicated with letters will be displayed at the bottom of the screen Press numeric buttons repeatedly until the desired letter is available When finished highlight Start search line and pr...

Page 22: ...you select a subtitle file and press OK button you can select or deselect that subtitle file The following menu will be displayed while playing a video file Play button Starts the video playback Stop button Stops the video playback Pause button Pause the video playback Rewind button Goes backward Forward button Goes forward Subtitle Audio LANG button Sets subtitle Audio Yellow Opens subtitle time ...

Page 23: ...iewing style Loop Shuffle GREEN button Press once to disable Loop Press again to disable both Loop and Shuffle Press once more to enable only Shuffle Press again to enable all You can follow the disabled functions with the change of the icons Media Browser Settings You can set your Media Browser preferences by using the Settings dialog Press or button to highlight an item and use or button to set ...

Page 24: ...ed 3D glasses Switch on the 3D glasses supplied with your TV by using on off switch For more information on this process see 3D Glasses instruction booklet To enable and customize 3D mode on the TV perform the following Press MENU button on the remote control and select Picture by using or button Press OK button to view Picture Settings Select 3D Settings option by using button and press OK 3D Set...

Page 25: ... a normal picture 4 3 aspect ratio to fill the wide TV screen For 16 9 aspect ratio pictures that have been squeezed into a normal picture 4 3 aspect ratio use the 16 9 mode to restore the picture to its original shape Subtitle This zooms up the wide picture 16 9 aspect ratio with subtitles to the full screen Note You can shift to screen up or down by pressing buttons while picture zoom is selecte...

Page 26: ...s the colour value adjusting the colors Colour Shift Adjust the desired colour tone Hue NTSC only Adjusts the colour value Colour Temp Sets the desired colour tone Noise Reduction If the broadcast signal is weak and the picture is noisy use Noise Reduction setting to reduce the noise amount Noise Reduction can be set to one of these options Low Medium High or Off Movie Sense Press button to select...

Page 27: ... get a clear picture by trial and error method Con guring Sound Settings Sound settings can be configured according to your personal preferences Press MENU button and select the Sound icon by using or button Press OK button to view Sound Settings menu Operating Sound Settings Menu Items Press or button to highlight a menu item Use or button to set an item Press MENU button to exit Sound Settings M...

Page 28: ...subscribing to a pay channel company then insert those to the TV using the following procedure Insert the CAM and then the viewing card to the slot that is located in the terminal cover at the rear side of the TV The CAM should be correctly inserted it is impossible to insert fully if reversed The CAM or the TV terminal may be damaged if the CAM is forcefully inserted Connect the TV to the mains s...

Page 29: ...cked by using the parental control system This function enables or disables the menu protection system and allows the PIN code to be changed Press MENU button and select the Settings by using or button Press OK button to view Settings menu Use or button to highlight Parental and press OK to continue To display parental lock menu options PIN number should be entered Factory default PIN number is 00...

Page 30: ...g the numeric buttons End Enter an ending time using the numeric buttons Duration Displays duration between the starting and ending time Mode Sets a timer to be repeated as Once Daily or Weekly Use or buttons to select an option Press GREEN button to save the timer Press RED button to cancel Change Delete Controls parental settings on timers Editing a Timer Select the timer you want to edit by pre...

Page 31: ...or button to select Power Save Mode Press or button to set Power Save Mode as On or Off See the section Environmental Information in this manual for further information on Power Save Mode Note Backlight function will be invisible if Power Save Mode is set to on Blue Background Activates or deactivates blue background system when the signal is weak or absent Software Upgrade To ensure that your TV ...

Page 32: ...be aborted Teletext function buttons are listed below Teletext Mix Activates teletext mode when pressed once Press again to place the teletext screen over the programme mix Pressing again will quit the teletext mode RETURN Index Selects the teletext index page INFO Reveal Shows hidden information e g solutions of games OK Hold Holds a text page when convenient Press again to resume Subcode Pages S...

Page 33: ...channels The picture quality may degrade when two peripherals are connected to the TV at the same time In such a case disconnect one of the peripherals No Picture Is the aerial connected properly Are the plugs connected tightly to the aerial socket Is the aerial cable damaged Are suitable plugs used to connect the aerial If you are in doubt consult your dealer No Picture means that your TV is not ...

Page 34: ...x B AV and HDMI Signal Compatibility Input Signal Types Source Supported Signals Available EXT 1 SCART 1 PAL 50 60 O NTSC 60 O RGB 50 O RGB 60 O EXT 2 SCART 2 PAL 50 60 O NTSC 60 O RGB 50 X RGB 60 X SIDE AV PAL 50 60 O NTSC 60 O YPbPr 480I 60Hz O 480P 60Hz O 576I 50Hz O 576P 50Hz O 720P 50Hz O 720P 60Hz O 1080I 50Hz O 1080I 60Hz O HDMI1 HDMI2 HDMI3 HDMI4 480I 60Hz O 480P 60Hz O 576I 50Hz O 576P 50...

Page 35: ...480p 576i 576p 720p 1080i 1080p Appendix D Supported File Formats for USB Mode Supported Players Player Stream Video Decoder MSVD Audio Decoder MSAD Audio MP3 None MP3 Audio WAV AIFF None LPCM Windows Media optional WMA ASF VC1 WMA MPEG1 Program Stream MPEG 1 MPEG1 MP3 AC 3 and PCM MPEG2 Program Stream MPEG 2 MPEG2 MP3 AC 3 and PCM MPEG4 MPEG 4 H264 in MP4 container H264 and MPEG4 AAC AVI Xvid XVI...

Page 36: ... is found and downloaded successfully with next power up TV opens with new software version Note on reboot operation Reboot is the last step in software upgrade operation if download of new software is finished successfully During reboot TV makes final initializations In reboot sequence panel power is closed and front led indicates the activity with blinking Around 5 minutes later TV restarts with...

Page 37: ...cally found MHEG 5 ENGINE compliant with ISO IEC 13522 5 UK engine Profile UK only Object carousel support compliant with ISO IEC 135818 6 and UK DTT profile UK only Frequency range 474 850 MHz for UK models ii VIDEO H 264 MPEG 4 part 10 main and high profile level 4 1 MPEG 2 MP HL video decoder HD display multi format capable 1080i 720p 576p CVBS analogue output In HD channels this will not be av...

Page 38: ...echnologies Some digital television functions may not be available in all countries We continually strive to improve our products therefore speci cations may change without prior notice For advice on where to purchase accessories please contact the store where you purchased your equipment Not all 3D auxiliary equipment will automatically switch the TV to 3D and you may see two images side by side ...

Page 39: ...ubject of unauthorised modi cations or alterations or has been the subject of commercial use In the event of a problem with the product within the guarantee period please return it to your nearest Argos store If the item is shown to have had an inherent defect present at the time of sale the store will provide you with a replacement Your statutory rights remain unaffected Guarantor Home Retail Gro...

Page 40: ...Operating Instructions ...

Page 41: ...for any other purpose Do not use the 3D Glasses as sunglasses or reading glasses Do not spray cleaner directly onto the surface of the product This may result in discoloration and cracks and may cause the screen display to peel off Do not let water come into contact with the product when cleaning it Ensure that water does not enter the product This may result in electric shock or re Since the lens...

Page 42: ... 3D Televisions The TV communicates with the glasses using a infrared transmitter that is included with 3D TVs Accessories 3D Glasses 8 pin mini USB cable Quick Start Guide Cleaning Cloth NOTE The accessories represented in this manual may differ from the actual appearances ...

Page 43: ... is transmitted for1 minute The red LED blinks three times Battery Lithium polymer discharge If the battery is discharged the LED blinks for 1 minute and turns off automatically When charging is completed the LED is lit green The Auto Off function automatically turns the 3D glasses off if it senses no signal from the 3D signal emitter on the TV A change in the distance or angle from the 3D signal ...

Page 44: ...one 8 pin mini USB supplied with the product the product may be damaged Troubleshooting Problem Suggestion Q The glasses do not work A The battery Lithium Polymer may be discharged charge the battery with the 8 pin mini USB cable A Check that the distance between the TV and your 3D glasses is less than 23 ft 7 m in a straight line A Check the 3D function settings of your TV Q The LED blinks contin...

Page 45: ... degrees at 16 ft 5 m Max Signal Receiving Distance 23 ft 7 m on axis Weight Glasses 1 45 oz approx 41 g Power Supply Glasses USB Cable 8 pin mini USB cable Battery 80 mA h Operating time when On 40 hours Operating Conditions Operating Temperature 0 C 40 C Storage Temperature 20 C 60 C The images and speci cations presented in this user manual are subject to change without prior notice for quality...

Page 46: ...English 7 ...

Page 47: ...t a 100mm 10cm gap to the sides rear and top of the TV This is to allow for adequate ventilation during operation Please read the main Users Guide for more safety information before installation QUICK GUIDE L46VG09U x 4 Before operating the set the stand must be attached to the TV as illustrated below ...

Page 48: ...that a scart lead should be fitted between your TV and VCR to enhance your picture and sound quality Scart leads are essential if you have a stereo TV and VCR and wish to obtain stereo sound from your equipment These leads can be purchased from your Hitachi dealer or any good High Street electrical retailer ANT IN VCR AV 1 AV 2 Aerial RF Socket Optional Scart Lead TV to VCR RF connector lead VCR t...

Page 49: ... Device to TV wall socket Aerial RF Lead Aerial RF Socket High Definition Your LCD Television is capable of displaying High Definition pictures from devices such as a High Definition Satellite Receiver or DVD Device These devices must be connected via the HDMI socket or Component Socket Scart Lead to AV 1 on TV Note These three methods of connection perform the same function but in different level...

Page 50: ...witched on the set will be in standby and the indicator on the front of the set will illuminate channel Press Operate Standby or up down P P or numeric buttons 1 2 3 to operate insert plug European plug and switch on insert plug UK plug Programme Up Volume Up Volume Down Programme Down To select a programme number To enter the main menu For navigation of the menus ...

Page 51: ...rypted as Yes if you want to scan coded stations Afterwards select the desired Teletext Language Press OK button on the remote control to continue and the message will be displayed on the screen left right search type selection If you select CABLE option network channel scan screen will be displayed You can select frequency ranges from this screen Set Start and Stop Frequency as desired by using n...

Page 52: ...t wear the supplied 3D Glasses See 3D Glasses instruction booklet for more information See instruction book for more information 3D feature enables you to view 3D content using the supplied 3D glasses Switch on the 3D glasses supplied with your TV by using on off switch For more information on this process see 3D Glasses instruction booklet To enable and customize 3D mode on the TV view 3D Setting...

Page 53: ...50183401 ...

Page 54: ...www hitachidigitalmedia com 50183400 ...

Reviews: