background image

31

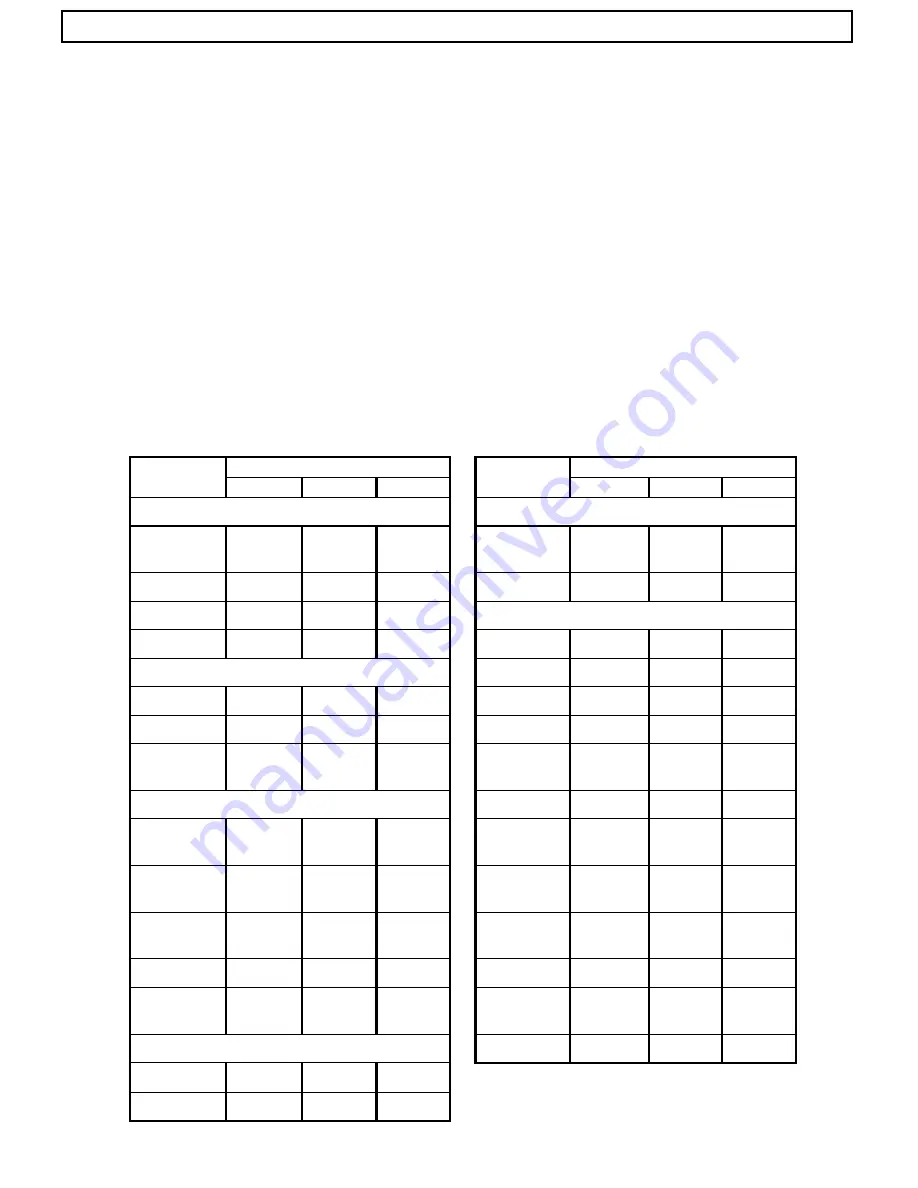
Application Files (APP-1,APP-2,APP-3)

Camera setting data can be stored in three application files.   These enable optimizing the camera for specific scene and lighting

conditions, then storing the setting data in memory for quick recall at the appropriate time.

The application files have been set at the factory as follows.

APP-1:

Standard type camera settings

APP-2:

General purpose surveillance and TV conferencing

APP-3:

Microscope settings.  Particularly the masking is suitable for good color reproduction with a light

source of about 5000 K combined with a 9200 K color monitor.

Select the file according to the application.  If the settings are changed for finer control, the setting data can be stored is each

file.

1. Items saved to application files

The following items can b saved to each file.  The factory data are shown.

Menu item

Application file

Menu item

Application file

APP-1

APP-2

APP-3

APP-1

APP-2

APP-3

MAIN MENU

LEVEL

WHITE BAL

MEM

3200K

MEM

3200K

MEM

3200K

R GAIN

0

0

0

GAIN

NORMAL NORMAL NORMAL

B GAIN

0

0

0

DTL

0

25

0

MASKING

DNR

OFF

OFF

OFF

R HUE

4

4

-8

SUB MENU 1

Y HUE

-2

-2

-5

M.BLACK

0

0

0

G HUE

-6

-6

-3

SHUTTER

OFF

OFF

AES

C HUE

-4

-4

0

DTL FREQ

STANDA

RD

STANDA

RD

HIGH

B HUE

4

4

10

SUB MENU 2

M HUE

16

16

-14

DYNA

CHROMA

OFF

ON

OFF

R SAT

-1

-1

-4

CHROMA

GAIN

0

25

0

Y SAT

-3

-3

5

AUTO

KNEE

ON

ON

ON

G SAT

9

9

-1

MASKING

ON

ON

ON

C SAT

14

14

12

SHAD

MODE

COLOR

COLOR

LUMINAN

CE

B SAT

8

8

-16

LENS

M SAT

-6

-6

-6

LENS TYPE

VIDEO

VIDEO

DC

IRIS MODE

AUTO

AUTO

MANUAL

Summary of Contents for HV-D25

Page 1: ... reference Note The model and serial numbers of your product are important for you to keep for your convenience and protection These numbers appear on the nameplate located on the bottom of the product Please record these numbers in the spaces provided below and retain this manual for future reference Model No Serial No Hitachi Denshi Ltd ...

Page 2: ... with a cart stand tripod bracket or table recommended by the manufacturer or sold with the product Any mounting of the product should follow the manufacturer s instructions and should use a mounting accessory recommended by the manufacturer 9 Moving A product and cart combination should be moved with care Quick stops excessive force and uneven surfaces may cause the product and cart combination t...

Page 3: ...t the product to heavy shock or vibration 19 Servicing Do not attempt to service this product yourself as opening or removing covers may expose you to dangerous voltage or other hazards Refer all servicing to qualified service personnel 20 Damage Requiring Service Unplug this product from the wall outlet and refer servicing to qualified service personnel under the following conditions a When the p...

Page 4: ...C amplifiers that produce heat ...

Page 5: ...Wagen Stand Dreifuß Träger oder Tisch stellen Das Erzeugnis kann sonst herunterfallen und ein kind oder einen Erwachsenen schwer verietzen Außerdem kann das Gerät schwer beschädigt werden Nur mit einem Wagen Stand Dreifuß Träger oder Tisch verwenden der vom Hersteller empfohlen oder mit dem Erzeugnis verkauft worden ist Für jegliche Anbringung sollten die Anweisungen des Herstellers befolgt werden...

Page 6: ...g Für zusätzlichen Schutz des Erzeugnisses während eines Gewitters oder bei Nichtverwendung für lange Zeit den Stecker aus der Steckdose ziehen Dies verhütet Beschädigung durch Blitzschlag und Netzspannungsstöße 15 Überlastung Wandsteckdosen Verlängerungskabel und eingebaute Bequemlickkeitssteckdosen nicht überlasten da dies Feuer oder elektrischen Schlag verursachen kann 16 Eindringen von Fremdkö...

Page 7: ...ist f Wenn das Erzeugnis eine klare Änderung in der Leistung zeigt dies weist darauf hin daß Wartung erforderlich ist 21 Ersatzteile Wenn Ersatzteile erforderlich sind darauf achten daß der Wartungstechniker nur die vom Hersteller festgelegten Ersatzteile oder Teile mit den gleichen Charakteristiken wie die ursprünglichen Teile verwendet Unautorisierte Ersatzteile können Feuer elektrischen Schlag ...

Page 8: ... sérieusement endommagé Utiliser exclusivement le chariot le socle le pied le support ou la table recommandés par le fabricant ou vendus avec l appareil Pour tout montage de l appareil respecter les instructions du fabricant et utiliser á cette fin l accessoire de montage recommandé par le fabricant 9 L appareil monté sur son chariot devra être déplacé avec précaution Des arrêts brusques une force...

Page 9: ...e ou court circuiter des piéces ce qui pourrait provoquer un feu ou un choc électrique Ne jamais renverser de liquide d aucune sorte sur l appareil 17 Substances inflammabes et explosives Eviter d utiliser l appareil en présence de gaz ainsi qu á proximité immédiate de substances inflammables et explosives 18 Chocs ou vibrations violents Lorsqu on transporte l appareil ne pas le soumettre á des ch...

Page 10: ...s dangers 22 Vérificaton de sécurité Aprés tout travail d entretien ou de réparation de l appareil demander au technicien de réparation d effectuer les vérifications de sécurité pour s assurer que l appareil est en bon état de marche 23 Montage au mur ou au plafond L appareil ne pourra être monté au mur ou au plafond que de la maniére recommandée par le fabricant 24 Chaleur Eloigner l appareil des...

Page 11: ...in a residential area is likely to cause harmful interference in which case the user will be required to correct the interference at his own expense WARNING Changes or modifications not expressly approved by Hitachi Denshi responsible for compliance could void the user s authority to operate the equipment This product does not exceed the class A class B limits for radio noise emissions from digita...

Page 12: ...ations 2 CCD properties 3 l Rear panel facilities 5 l LENS 6 Lens selection 6 Frangeback adjustment 7 l Video signal type lens adjustment 7 l Camera mounting 9 l System example 10 Notes when using cables 13 l Menu screen operation 14 Menu Structure 14 MAIN MENU 16 SUB MENU 1 18 SUB MENU 2 20 ALC 21 SPECIAL SET 22 LENS 23 IRIS GATE 25 WHITE GATE 25 LEVEL 25 MASKING 26 OUTPUT SYNC 27 ID TITLE 28 DTL...

Page 13: ... 36 ALC Auto level control 37 Lock scan mode shutter speed setting 38 Long Time Store Mode 39 l Connection to RC C10 remote control box 40 RC C10 panel facilities 40 Menu screen operation 43 Application files 45 l Function Selection by internal Switch Setting 47 l Connectors 47 l Specifications 49 l Input Output Signals 51 l Major accessories 52 l Dimensions 53 ...

Page 14: ...e experience in the fields of broadcast and industrial color cameras Top level engineering gives this camera performance quality unmatched in previous analog cameras Features C mount The C mount has become a de facto standard among industrial cameras Together with the built in flangeback adjustment mechanism the camera can accept both off the shelf lenses and sophisticated special purpose optical ...

Page 15: ...nely detailed camera control An identification ID code can be assigned to each camera in a system and allow remotely controlling multiple cameras from a single computer Notes to users Important safety notes l Use this camera with a 12 VDC power supply l Observe that flammable objects water or metal do not enter the camera interior These may lead to failure or accident l Do not modify the camera or...

Page 16: ...ration of internal parts and to derive maximum long term reliability Cleaning l A photographers blower or lens brush can be used for clearing dust from the lens and optical filters l Wipe dust from the case with a soft dry cloth If soiling is severe moisten the cloth with a solution of neutral detergent Afterwards wipe the cover with a dry cloth l Do not use petroleum distillates alcohol or spray ...

Page 17: ...ly striped necktie to result in a Moire pattern The effect should be considered when selecting costumes props and other scene elements 4 Ghosting Strong direct or reflected light near an object of interest can cause ghosting of the object to appear in the picture The effect is more obtrusive with certain iris settings and lens types Select the scene layout and camera pointing direction carefully i...

Page 18: ...he button depressed for more than 2 seconds for auto white balance Menu mode menu displayed Left direction button SETUP button Press to display the camera setup menu The direction U D L R button functions differ in the menu and direct modes U button Direct mode Not used Menu mode Press to shift cursor upwards ABB R button Direct mode Hold the button depressed for more than 2 seconds for auto black...

Page 19: ...pproaches fully open problems such as loss of resolution shading and flare overall image white out can detract from picture quality When using in applications that call for open iris the following lenses are recommended If another lens is contemplated check the performance beforehand Maker Lens type Rating Cosmicar Fujinon Canon H20ZAME R C10ZBME R S10 8DB SNDS21 J7 10BCMAS 7 5 75 mm F1 2 10 5 105...

Page 20: ...e than 3 meters distant Turn the focus ring to adjust the focus 2 Set the lens to wide angle and while using care not to disturb the focus ring turn the flangeback ring to adjust the focus Repeat the above steps until focus is obtained at both the telephoto and wide angle ends Video signal type lens adjustment Adjustment is required after replacing the lens or if using the camera for the first tim...

Page 21: ...6 Unstable indication can occur if the light source has flicker component e g fluorescent or mercury lighting change the electronic shutter mode Sub menu 1 shutter or Variable to reduce the flicker 7 Lens Level control fully at Hi but auto iris inoperative Reduce the Iris Gain setting 8 Lens Level control fully at Low but auto iris inoperative Increase the Iris Gain setting 9 Auto iris operates bu...

Page 22: ... at the top and bottom These allow mounting to either a tripod or a mounting bracket Screw type k U 1 4 20 Length 4 5 to 6 mm Screws longer than 6 mm can cause internal damage while less than 5 mm prevents secure fastening and risks dropping to cause damage and injury ...

Page 23: ...0 Level converter Lens remote unit A level converter is required if controlling the camra from a personal computer via RS 232C interface over a distance more then 15 meters Graphic stand camera Color monitor RC C10 Remote box Personal computer AC adaptor Lens remote control unit Lens Camera VBS REMOTE DC IN Y C D Sub 9pin VBS R G B SYNC Y C Graphic stand ...

Page 24: ...itor Remote control box RC C10 Personal computer AC Adaptor Camera VBS REMOTE DC IN Y C D Sub 9pin VBS R G B SYN C Y C Microscope Computer image processing Lens Camera REMOTE DC IN Personal computer AC Adaptor R G B SYN C D Sub 9pin ...

Page 25: ...REMOTE DC IN Personal computer AC Adaptor Color monitor VBS Lens Camera no 8 DC IN AC Adaptor REMOTE VBS Video signal switcher JU Z2 Camera control box When using the JU Z2 for multiple camera control set the camera internal SW405 to RC C10 See page 34 ...

Page 26: ...ype cable l RC Cable As shown in the following figure install clamp filter ZCAT 2035 0530 TDK at camera end Y C Cable Use after winding a cable around a clamp filter NTSC ZCAT2035 0930 TDK PAL ZCAT2436 1330 TDK once at camera end as shown in the following figure ...

Page 27: ...ton For mode change data setting use the L or R button SUB MENU1 APP 1 M BLACK 0 SHUTTER OFF VARIABLE 1 60 38 CCD MODE FLD DTL FREQ STANDARD GAIN HIGH 9dB GAIN MAX 18dB AGC 20dB SUB MENU2 APP 1 DYNA CHROMA OFF CHROMA GAIN 0 CONTRAST OFF KNEE ON AUTO KNEE ON MASKING ON GAMMA ON AUTO SHADING WHITE GATE OFF MESSAGE RTN ON R L L R MAIN MENU APP 1 CAM MODE MANUAL WHTE BAL MEM 3200K GAIN NORMAL ULTRA GA...

Page 28: ...e U or D button For mode change data setting use the L or R button SPECIAL SET REMOTE 9600bps LENS IRIS GATE WHITE GATE LEVEL MASKING OUTPUT SYNC ID TITLE DTL LEVEL APP 1 R BLK 0 B BLK 0 R GAIN 0 B GAIN 0 INTIALIZE IRIS GATE ON GATE AREA UP DOWN GATE AREA LEFT RIGHT GATE AREA LARGE SMALL WHITE GATE ON GATE AREA UP DOWN GATE AREA LEFT RIGHT ID TITLE ID OFF TITLE OFF DATA SET L L L L L L L L L L L L...

Page 29: ...GAIN Not effective LEVEL B GAIN Not effective 2 WHITE BAL White balance mode PRST 3200K The white balance condition is optimized at a color temperature of 3200K MEM 3200K White balance is automatically adjusted by the direct mode AWB button Use in the color temperature range from halogen to fluorescent lighting MEM5600K White balance is automatically adjusted by the direct mode AWB button Use in t...

Page 30: ...ses in the positive value setting and it decreases in the negative value setting For zero 0 setting hold down both the L and R buttons for approx two seconds However if setting is OFF 0 is not set over if the buttons are pressed 6 DNR Digital noise reduction mode OFF MODE 1 or MODE 2 is selectable In MODE 2 noise becomes lower than that in MODE 1 but a feel of image resolution becomes lower slight...

Page 31: ...25 PAL Long time store mode The camera delivers intermittent video signal output So to view continuous images it is required to use the video memory A clear image can be attained even if the subject is illuminated with a faint light source As the store time increases the degree of after image becomes higher Note With an increase in store time the degree of characteristic pattern noise white scratc...

Page 32: ...d HIGH The high band frequency is amplified Finer contour correction is carried out 6 GAIN HIGH Gain setting in GAIN HIGH mode At the time of AGC OFF mode The gain level can be set in a range of 1 to 10 dB Cannot be set in the Auto CAM MODE 7 GAIN MAX Gain setting in GAIN MAX mode At the time of AGC OFF mode The gain level can be set in a range of 11 to 20 dB Cannot be set in the Auto CAM MODE 8 A...

Page 33: ...l gradation in bright portions Knee is fixed to on in the Auto CAM mode 5 AUTO KNEE AUTO KNEE ON OFF At the on setting gradation in bright components is automatically optimized even with scene changes 6 MASKING Masking ON OFF At the on setting the overall screen gradation is set by the Special Set Masking menu Standard setting is on 7 GAMMA Gamma ON OFF Gamma on off setting In the Auto CAM mode ga...

Page 34: ... more Pressing the L button decreases it to close the lens iris more For zero 0 setting hold down both the L and R button for approx two seconds 2 Speed Set AGC and AES operating rate Settings are Slow Standard and Fast 3 IRIS GATE Iris gate ON OFF ON A video signal appearing in the window on screen is detected for AGC and lens auto electronic shutter ALC control In the MENU mode the window is pre...

Page 35: ...tions 19200bps 9600bps 4800bps Select any one of these baud rates when controlling the camera from a personal computer through RS 232C interfacing For details refer to Function Selection by Internal Switch Setting Contact us for details of the control procedure using a personal computer Technical documents including protocol data will be supplied 2 LENS Change to LENS menu 3 IRIS GATE Change to IR...

Page 36: ...is DC mode Set in a range of 1 to 15 where hunting is not produced Press R to increase and L to decrease the setting Hold button depressed for continuous change Simultaneously press R and L for about 2 seconds to set to 8 5 OPEN Limit Lens Type is DC mode Set to where the camera recognizes the iris is fully open Observe the iris and adjust in the range from Close Limit 1 to 127 to precisely where ...

Page 37: ... and R buttons for about 2 seconds to set to 0 Next adjust the lens Level control to highlight the central marker of the video signal level indicator If auto iris does not operate even at the Hi or Low extremes of the Level setting adjust the Iris Gain setting 8 REFERENCE Lens Type is Video mode Adjustment is required when replacing a Video type lens or if using the camera for the first time Adjus...

Page 38: ...T RIGHT The window can be shifted left right To shift the window rightward press the R button To shift it leftward press the L button 10 LEVEL This menu screen allows you to set up a black level and gain of R B video signal 1 R BLK R black level setting The allowable setting range is 128 to 127 Pressing the R button increases a numeric value to make the R video signal black level higher Pressing t...

Page 39: ...usly press the L and R buttons for about 2 seconds to return the selected files to the factory settings See Page 25 for the factory settings of each application file 11 MASKING Menu for setting the masking 1 R HUE Change red color phase 2 Y HUE Change yellow color phase 3 G HUE Change green color phase 4 C HUE Change cyan color phase 5 B HUE Change blue color phase 6 M HUE Change magenta color pha...

Page 40: ...for the video output signal from the VIDEO connector Set to ON for monochrome Setting ineffective during color bar 3 SYNC ON G G video signal synchronization ON OFF In the R G B mode only When output is RGB with Sync on and G on Sync is added to the G video signal 4 GL IN Impedance changeover of input to the GL IN connector HIGH The high impedance level is provided 75Ω An impedance of 75 ohms is p...

Page 41: ...ecify whether the ID is displayed on screen or not In case that the ID is displayed on screen specify its display position also OFF Not displayed TOP Displayed at the upper right corner of screen BOTTOM Displayed at the lower right corner of screen 2 At this function item specify whether the TITLE is displayed on screen or not In case that the TITLE is displayed on screen specify its display posit...

Page 42: ...L DEP Dependent level setting Detail amount and noise can be reduced in scene dark components Setting range is 128 to 127 Press the R button to increase the value reduce the detail amount and expand the video signal level range Press L button to decrease the value and reduce the range Set to 0 by simultaneously pressing the L and R buttons for about 2 seconds 2 CRISP Crispness level setting Reduce...

Page 43: ...er RGB video signal gamma point Simultaneously press the L and R buttons for about 2 seconds to set to 0 3 R ADJUST Sets red gamma point Setting range is from 128 to 127 Press R to raise and L to lower red video signal gamma point Simultaneously press the L and R buttons for about 2 seconds to set to 0 4 B ADJUST Sets blue gamma point Setting range is from 128 to 127 Press R to raise and L to lowe...

Page 44: ...ettings are changed for finer control the setting data can be stored is each file 1 Items saved to application files The following items can b saved to each file The factory data are shown Menu item Application file Menu item Application file APP 1 APP 2 APP 3 APP 1 APP 2 APP 3 MAIN MENU LEVEL WHITE BAL MEM 3200K MEM 3200K MEM 3200K R GAIN 0 0 0 GAIN NORMAL NORMAL NORMAL B GAIN 0 0 0 DTL 0 25 0 MA...

Page 45: ...3 8 SPEED 8 GL IN 75 PAL 1 50 31 OPEN LIMIT 65 GL MODE VBS CCD MODE FLD CLOSE LIMIT 85 SC COARSE 0 GAIN HIGH 9dB IRIS GAIN 0 SC FINE 0 GAIN MAX 18dB IRIS GATE H PHASE 0 AGC 20dB UP DOWN CENTER ID TITLE MESSAGE RTN ON LEFT RIGHT CENTER ID OFF SUB MENU 2 LARGE SMALL MIN SMALL TITLE OFF CONTRAST OFF WHITE GATE ID DATA Blank KNEE ON UP DOWN CENTER TITLE DATA Blank GAMMA ON LEFT RIGHT CENTER DTL AUTO S...

Page 46: ...combinational use with the manual iris lens or microscope a full black screen image is provided from the CCD image sensor during adjustment When picturing after adjustment a white screen image appears momentarily This phenomenon is not a symptom of trouble however 3 In case that the manual iris lens is used do not attempt auto black balance adjustment while taking an image of subject having extrem...

Page 47: ...en try white balance adjustment again Error message Procedure AUTO WHITE NG CHANGE TO CAM TRY AGAIN Turn off the color bar AUTO WHITE NG CHANGE TO MEMORY MODE TRY AGAIN Set up WHITE BAL MEM 3200K or MEM 5600K AUTO WHITE NG LOW LIGHT TRY AGAIN White balance cannot be made due to insufficient illumination Increase the intensity of illumination turn lens iris toward open direction or increase the gai...

Page 48: ...WHITE BAL to MEM 5600 K mode AUTO WHITE NG C TEMP LOW CHANGE TO MEM 3200K TRY AGAIN Color temperature too low for optimum adjustment Set WHITE BAL to MEM 3200 K mode AUTO WHITE NG LONG SHUTTER MODE CHANGE SHUTTER MODE TRY AGAIN Release the long shutter mode CAM MODE AUTO CHANGE TO MANUAL Set camera mode to manual ...

Page 49: ... 1 In the MENU mode set up WHITE GATE ON 2 Using the WHITE GATE menu in the MENU mode bring the display window to a monochrome part white or gray part in the image For details of the WHITE GATE function refer to p 18 Be sure to set the WHITE GATE window to a white or gray part in the image Do not set it to a colored part Auto Shading Correction Color shading may occur in the vertical direction on ...

Page 50: ...f ALC auto level control can be performed This feature ensures stable video signal output according to a wide range change in illumination Note 1 AES cannot be combined with a Video type lens 2 When not using an auto iris lens at the Lens menu set Lens Type to DC and Iris Mode to Manual ...

Page 51: ... or dark horizontal bars roll vertically across the screen see figure The shutter speed can be adjusted to minimize this effect in most cases M i n i m i z e b a r D a r k Roll B r i g h t Roll L b u t t o n Slower shutter R b u t t o n Faster shutter Notes 1 Each pressing of the L or R button changes the shutter speed by 1 H Hold the button depressed for continuous change 2 If the display scannin...

Page 52: ...D signal Store charge on CCD line A Video signal Store time 1 15 s Example WE signal In the field store mode both the CCD lines A and B are read out simultaneously After completion of storing video signal output is made on the next field Immediately before the field on which video signal output is made the WE signal is delivered from the D SUB connector equipped on the rear panel Even field CCD li...

Page 53: ...ions as D button AUTO BLACK button functions as ABB R button AUTO WHITE button functions as AWB L button Labels indicating these functions are provided as accessories Apply the labels to the camera buttons for convenience in operation The remainder of these Instructions assume the labels have been applied AWB L ABB R D SETUP Before connecting the remote control box set the camera as follows 1 SW40...

Page 54: ...and Select button to select the required adjustment corresponding LED lights BAR CAM button Selects the camera output signal BAR Color bar signal output CAM Camera video signal output White BAL button Selects the white balance mode Auto Real time automatic tracking white balance MEM In the menu mode press AWB L for automatic white balance adjustment Preset Optimum white balance at 3200 K color tem...

Page 55: ...t control data are sent to the camera Off LED green Control data are not sent from RC C10 and control is from the camera operation itself M BLK control Master black control Iris control Adjusts the lens iris LENS TYPE DC Auto Over ride adjustable about 2 f stops Remote Adjustable from fully closed to fully open Manual Iris cannot be adjusted from the RC C10 AGC and AES operation over ride can be a...

Page 56: ... the AWB L and ABB R buttons to change the mode setting or data SUB MENU1 APP 1 SHUTTER OFF VARIABLE 1 60 38 CCD MODE FLD DTL FREQ STANDARD GAIN HIGH 9dB GAIN MAX 18dB AGC 20dB SUB MENU2 APP 1 DYNA CHROMA OFF CHROMA GAIN 0 CONTRAST OFF KNEE ON AUTO KNEE ON MASKING ON GAMMA ON AUTO SHADING WHITE GATE OFF MESSAGE RTN ON MAIN MENU APP 1 CAM MODE MANUAL W MEM MODE MEM 3200K AGC OFF ULTRA GAIN OFF DNR ...

Page 57: ...ssing AWB L SPECIAL SET LENS IRIS GATE WHITE GATE MASKING OUTPUT SYNC ID TITLE DTL IRIS GATE ON GATE AREA UP DOWN GATE AREA LEFT RIGHT GATE AREA LARGE SMALL WHITE GATE ON GATE AREA UP DOWN GATE AREA LEFT RIGHT ID TITLE ID OFF TITLE OFF DATA SET MASKING ON APP 1 R HUE 2 R SAT 11 Y HUE 0 Y SAT 0 G HUE 0 G SAT 2 C HUE 0 C SAT 7 B HUE 2 B SAT 12 M HUE 9 M SAT 2 INITIALIZE OUTPUT SYNC OUTPUT R G B MONO...

Page 58: ...ored in applications files Items that can be stored in the respective files are indicated below The data shown are for the factory settings Notice there are some differences during local control of the HV D25 camera Menu items Application files Menu items Application files APP 1 APP 2 APP 3 APP 1 APP 2 APP 3 MAIN MENU MASKING W MEM MODE MEM 3200K MEM 3200K MEM 3200K R HUE 4 4 8 AGC OFF OFF OFF Y H...

Page 59: ...NU 1 LARGE SMALL MIN SMALL Iris mode VARIABLE NTSC 1 60 38 WHITE GATE DTL mode PAL 1 50 31 UP DOWN CENTER M BLK CCD MODE FLD LEFT RIGHT CENTER IRIS GAIN HIGH 9dB OUTPUT SYNC R GAIN GAIN MAX 18dB OUTPUT R G B B GAIN AGC 20dB MONO OFF R BLACK MESSAGE RTN ON SYNC ON G OFF B BLACK SUB MENU 2 GL IN 75 H PHASE CONTRAST OFF GL MODE VBS SC COARSE KNEE ON DTL SC FINE GAMMA ON LEVEL DEP 0 AUTO SHADING Execu...

Page 60: ...5 to the RS 232C position At shipment from factory SW405 is set at the RC C10 position Connectors MULTI connector SDEB 9S REMOTE connector HR10A 7R 4S Pin No Signal designation Pin No Signal designation 1 GND 1 12V output 2 WE 2 RXD SD input 3 R R Y C output 3 TXD SD output 4 G Y output 4 GND 5 B B Y output 6 VBS output 7 SYNC output 8 HD output 9 VD output Use M2 6 plug retaining screws ...

Page 61: ... GND 2 NC 2 NC 3 Control 3 EXT CONT 1 4 GND 4 EXT CONT 2 5 GND 6 HD input 7 VD input 8 EXT CONT 3 9 EXT CONT 4 10 GND 11 NC 12 GND Y C connector TCS 7547 01 401 12V IN connector RM12BRD 3PH Pin No Signal designation Pin No Signal designation 1 Y GND 12V input 2 C GND GND 3 Y output NC 4 C output ...

Page 62: ...DTL off 8 Signal to noise ratio NTSC 63 dB typ DNR ON 60 dB typ DNR OFF PAL 61 dB typ DNR ON 58 dB typ DNR OFF Y OUT 1 DTL off Gain 0 dB 9 Standard sensitivity 2000 lx F8 10 Minimum illumination 1 5 lx 50 IRE F1 6 Gain 20 dB ULTRA GAIN ON 11 Gamma correction 0 35 to 1 0 on off selectable 12 Picture distortion Total 0 not including lens characteristics 13 Registration Total 0 05 not including lens ...

Page 63: ...cture memory required for continuous picture Frame readout Image lag response deteriorates 20 Color bar NTSC SMPTE PAL Full 21 Power supply voltage 12 V rated Use a DC power supply with risetime after power on of less than 0 5 second Stable operation is ensured with DC power supply of 10 5 to 17 V No ripple and noise shall occur 22 Power consumption Approx 8 2 W camera head only Current for lens i...

Page 64: ...5 NTSC 0 3 Vp p burst 75 PAL 3 Component D sub connector Y 1 0 Vp p 75 R Y 0 525 Vp p 75 B Y 0 525 Vp p 75 4 RGB D sub connector R 0 7 Vp p 75 G 0 7 Vp p 75 B 0 7 Vp p 75 Note Menu settings select the D sub connector output for Y C component or RGB 5 Sync D sub connector HD 2 Vp p 75 VD 2 Vp p 75 SYNC 2 Vp p 75 6 Serial data 4 pin connector 1 5 Vp p Low in connection with RC C10 RS 232C level in c...

Page 65: ...Major accessories Camera control box RC C10 Camera Junction box JU Z2 RS 232C level converter JU C20 ...

Page 66: ...Dimensions ...

Page 67: ......

Reviews: