2 - 7
2-5 Names
of
Parts
General Description > Names of Parts
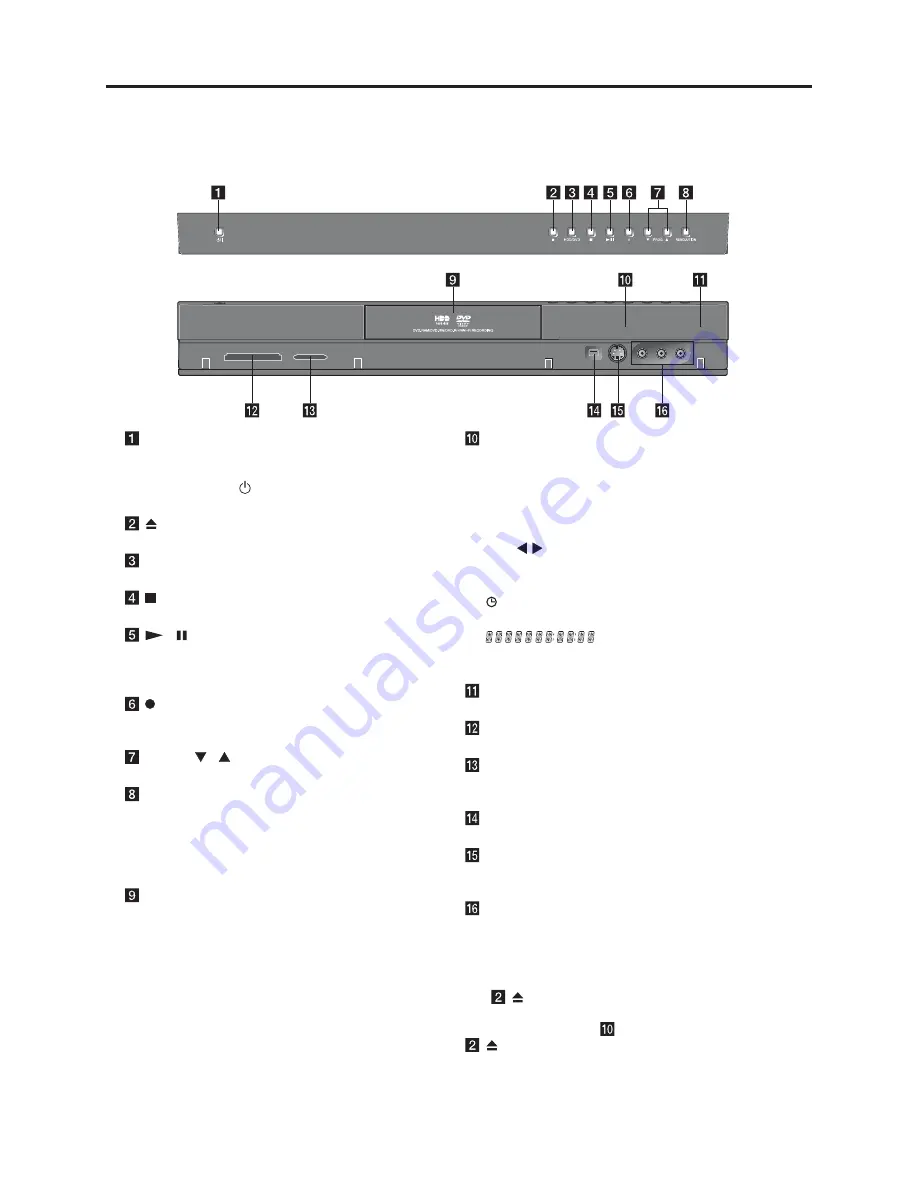
Front Pa nel
POWER button
Switches the recorder ON or OFF.
(As to the indication of the Operate switch, “ I ”
shows ON and “
”
shows electrical power
stand-by.)
(OPEN/CLOSE)
Opens or closes the disc tray.
HDD/DVD
Set the recorder’s mode to HDD or DVD.
(STOP)
Stops playback or recording.
/ (PLAY/PAUSE)
Starts playback.
Pause playback or recording temporarily, press
again to exit pause mode.
(REC)
Starts recording. Press repeatedly to set the
recording time.
PROG. (
/
)
Scans up or down through memorized channels.
RESOLUTION
Sets the output resolution for HDMI and
COMPONENT/PROGRESSIVE SCAN VIDEO OUT
jacks.
– H
DM I: 576i, 576p, 720p, 1080 i
– C
OMPONENT: 576i, 576p
Disc Tray
Insert a disc here.
Display window
Shows the current status of the recorder.
T/S:
Indicates the timeshifting mode .
REC:
The recorder is recording.
HDD:
The recorder is HDD mode.
DVD:
The recorder is DVD mode.
HDD
DVD:
The recorder is dubbing.
TV:
Indicates when the recorder is in TV tuner
mode.
: Indicates when the recorder is in timer
recording or a timer recording is programmed.
: Indicates clock, total playing
time, elapsed time, title number, chapter/track
number, channel, etc.
Remote Sensor
Point the recorder remote control here.
MEMORY CARD Slot 1
Insert a memory card (CF/MD/ST1 MD).
MEMORY CARD Slot 2
Insert a memory card (SD/Mini SD/MMC/
MMC Plus/RS MMC/MMC Mobile/xD).
DV IN
Connect the DV output of a digital camcorder.
INPUT 4 (S-VIDEO IN )
Connect the S-Video output of an external source
(TV/ Monitor, VCR, Camcorder, etc.).
INPUT4 (VIDEO IN/AUDIO IN (Left/Right))
Connect the audio/video output of an external
source (Audio system, TV/ Monitor, VCR,
Camcorder, etc.).
Note:
The
(OPEN/CLOSE) button will not operate with
this recorder turned off. After turning the recorder on to
display the clock in the
Display window, press the
(OPEN/CLOSE) button.


