background image


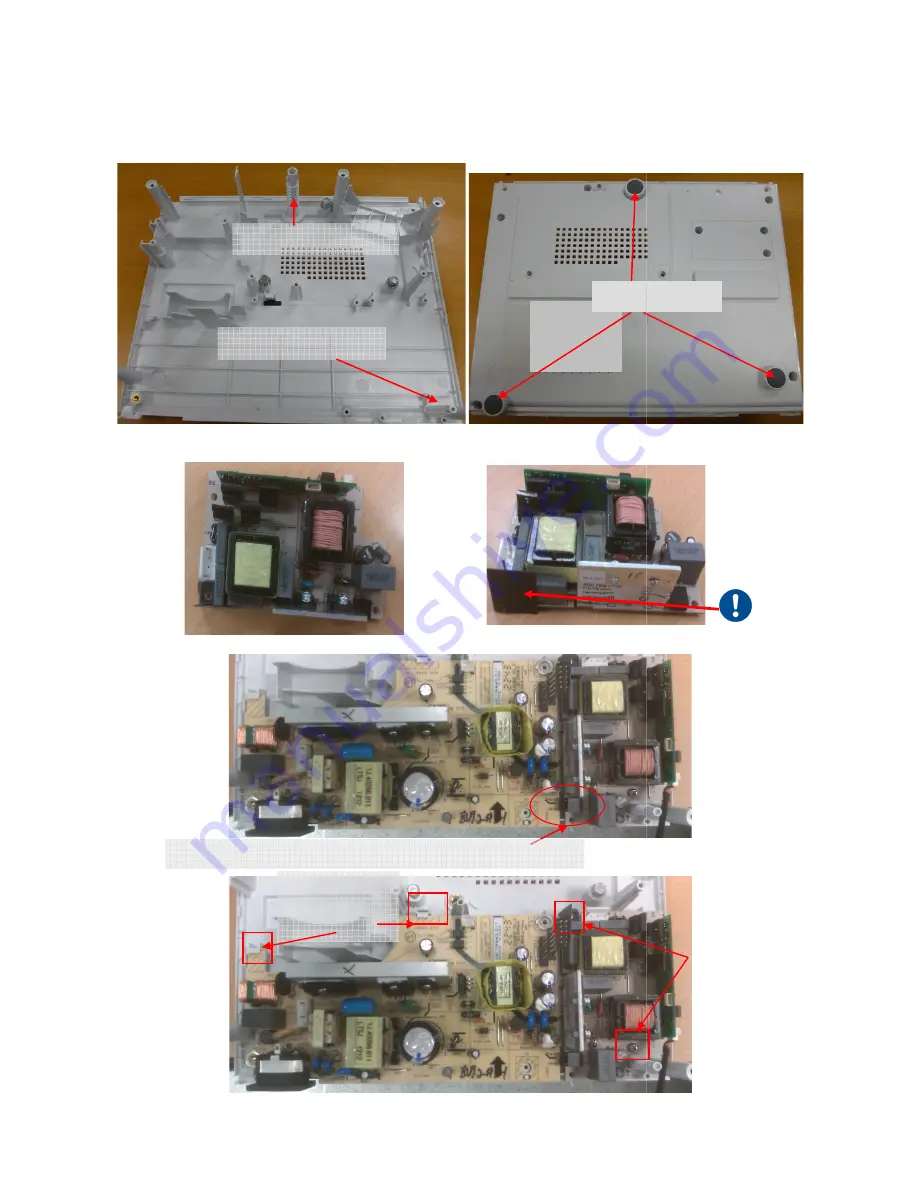
7.2 Module Assembly Key Point 

7.2.1    Lower case assembly 

 
7.2.2 (1) Make sure the mylar is attached to the ballast.

(2) Assemble power board with 

Front Adjust Foot

Rear Adjust Foot

Notice : Connect power board 

Power board 
assembled 
under hook

46 

7.2 Module Assembly Key Point – Mechanical Parts 


Make sure the mylar is attached to the ballast. 


Assemble power board with ballast cable on lower case 


Foot 

Foot 

onnect power board and ballast board first 

Power board 
assembled 

nder hook 


Rubber pad


Screw*2 

Rubber pad 

Summary of Contents for CP-DX250 guide

Page 1: ...er unit ballast after turn on the projector 4 Do not touch the exhaust fan during operation 5 Use the cables which are included with the projector or specified Service Warning Warning The technical information and parts shown in this manual are not to be used for the development design production storage or use of nuclear chemical biological or missile weapons or other weapons of mass destruction ...

Page 2: ...D Messages Definition 28 5 4 Error Count Messages Definition 29 5 5 Power Supply Trouble Shooting Guide 30 5 6 Optical Trouble Shooting Guide 33 6 Service Points 35 6 1 Maintenance 35 6 2 Replacing The Lamp 36 6 3 Resetting the Lamp Timer 38 6 4 Screw Torque List 39 7 Wiring Diagram 40 7 1 Module Assembly Key Point Optical Engine 40 7 2 Module Assembly Key Point Mechanical Parts 46 8 Disassembly D...

Page 3: ...ing choices for different projection purposes One key auto adjustment to display the best picture quality Digital keystone correction to correct distorted images Adjustable color management control for data video display High brightness projection lamp Ability to display 1 07 billion colors Multi language On Screen Display OSD menus Switchable normal and economic modes to reduce the power consumpt...

Page 4: ...N 4 pin x 1 VIDEO port RCA x 1 SD HDTV signal input Analog D Sub Component RCA x 3 through COMPUTER IN1 COMPUTER IN2 input port Digital HDMI x 1 Audio signal input AUDIO IN port Stereo mini x 1 Output terminal MONITOR OUT port D Sub 15 pin female x 1 AUDIO OUT port Stereo mini x 1 Speaker 2 watt x 1 Control terminal CONTROL port RS 232 serial control 9 pin x 1 IR receiver x 1 Front Service termina...

Page 5: ...4 2 2 Electrical Specification 2 2 1 Timing Table ...

Page 6: ...5 ...

Page 7: ...6 ...

Page 8: ... 99 K Hz VDATA Impedance 1 K ohm Amplitude low level 0 0 8 volt Amplitude high level 2 5 5 Volt Frequency 48 120 Hz SDADATA Amplitude low level 0 0 8 volt Amplitude high level 3 5 Volt SCLDATA Amplitude low level 0 0 8 volt Amplitude high level 3 5 Volt RXD Amplitude 25 25 Volt TXD Amplitude 13 2 13 2 Volt CVBS Luminance Amplitude total video sync 1 Volts peak to peak Amplitude video 0 7 Volts pea...

Page 9: ... 5 NC 6 Red return 7 Green return 8 Blue return 9 DDCP 5V 10 GND 11 GND 12 SDA 13 H sync 14 V sync 15 SCL Video Input S Video input Pin Definition 1 GND 2 GND 3 Luminance 4 Chroma RS232 Control Port Mini USB TYPE B Pin Definition 1 Composite video input Pin Definition Pin Definition 1 NC 2 RX 3 TX 4 NC 5 GND 6 NC 7 RTSZ 8 CTSZ 9 NC Pin Definition 1 Vbus 2 D 3 D 4 ID 5 GND Composite input Composite...

Page 10: ... TMDS Clock Shield 2 TMDS Data2 Shield 12 TMDS Clock 3 TMDS Data2 13 CEC 4 TMDS Data1 14 Reserved N C on device 5 TMDS Data1 Shield 15 SCL 6 TMDS Data1 16 SDA 7 TMDS Data0 17 DDC CEC Ground 8 TMDS Data0 Shield 18 5V Power 9 TMDS Data0 19 Hot Plug Detect 10 TMDS Clock ...

Page 11: ...10 3 Names of Each Part 3 1 Projector Exterior View See Control Panel on next page for detail ...

Page 12: ...11 3 2 Control Panel ...

Page 13: ...12 3 3 Remote Control ...

Page 14: ...justment 4 1 Repair Flow 4 2 Basic Operating For Switching Modes 4 3 Service Tool 4 4 Adjustment and Alignment 4 4 1 Color Wheel Delay Alignment 4 4 2 PC Alignment Procedure 4 4 3 Overfill Blue Edge adjustment ...

Page 15: ...ctory mode Function Abnormal Change M B Yes Replace M B No CW delay Alignment PC Alignment Change CW CW delay Alignment No Yes Replace CW Burn In 10mins Finish Check connectivity or change other parts Change Light Pipe Overfill Blue Edge Adjustment Yes No Use Service Tool to Write S N Use Service Tool to Read S N Replace Light Pipe ...

Page 16: ... will show Red for 1 sec then power LED show Purple Standby Mode 2 Download Mode This mode is applied for Download firmware If operators want to enter this mode they should press and hold Power key and Mode key together then plug in power cord Release the two keypads Power LED will show red light continuously In download mode you can use DLP composer lite program to download new firmware Download ...

Page 17: ...ystem will cool itself via fans During cooling Power LED will flash Purple 1 time per 1 second After cooling System will return to standby and Power LED will show Purple continuously Power On Power Off 5 Method to Enter Factory mode 1 Press Menu key OSD will show the menu image 2 Then click SOURCE key and MODE ENTER key together system will enter the Factory mode Notice Repair center could check E...

Page 18: ...eplacing a new Main board need to write data into Main Board by service tool Service Tool Required PC RS 232 cross cable Cable spec refer to Section 12 RS 232 Service Tool install procedure for the first use 1 Installation 1 Double click the Setup file for installing program 2 Click OK 3 Change an installation directory or agree default directory and then click the icon button ...

Page 19: ...r select one from the Existing Groups list and then click Continue 5 Click OK and a successful installation is completed Notice Before using Service tool please check the Control Method in Factory Mode Block 1 must be set as RS232 ...

Page 20: ...Tool 4 Change to connected COM port and Click Port Open icon 5 Read data from original Main board Click Read system Data and it will read the Adjustment data Serial Number from projector and show the Read complete message in below information block 5 1 Click this icon to read all data 5 2 Show Read Complete 4 1 Change to connected COM Port number 4 2 Click Port Open ...

Page 21: ...after read or load data Lamp Hour in projector Lamp1 2 the current lamp hours Factory1 2 the cumulated turned on hours CW delay calibrated data in projector Serial Number in projector sRGB calibrated data in projector 6 1 Click Save icon 6 2 This window will pop out and it shows the file saving folder 6 3 Enter file name here 6 4 Click Save to save data ...

Page 22: ...a Retrieve System 1 Click Load From data and select load file 2 Click Retrieve System to write the values into main board 3 After data is written back it shows the Write complete message in below information block and it is finished 1 1 Click Load From Data to load data 1 2 Select the file source 1 3 Click Load 1 4 Click Retrieve System to write data ...

Page 23: ... Enter Block 1 3 Connect PC and display R G B Gray Test Pattern RGBRAMP 4 Change CW Delay by adjusting the pattern to smooth 5 Restore the screen R G B Gray pattern 22 Alignment Color Wheel Delay Alignment display R G B Gray Test Pattern RGBRAMP Change CW Delay by adjusting the pattern to smooth ...

Page 24: ...generator Timing 1024 768 60Hz XGA models 4 Change Pattern of pattern generator Pattern A near white color 240 255 240 255 240 255 and a near black color 16 255 16 255 16 255 5 Press Auto to catch the full screen 6 Enter Factory Mode 7 Choose Block 3 8 Press Left or Right key on Calibration RGB The signal level 16 255 and 240 255 are caught and the ADC range min and max level are calculating from ...

Page 25: ... Pattern is suggested for this alignment 2 Adjust 2 Overfill adjustment screws upper side lower front side of Optical Engine behind Color Wheel 3 Alignment Criteria is to adjust these 2 screws until No Dark Edges and No Shadows can be observed in image ...

Page 26: ...25 5 Troubleshooting 5 1 Basic Trouble Shooting for End Customer ...

Page 27: ...Main BD 3 Check Power Board and Lamp Door SW 4 Check Main Board NO YES Step 1 Check Lampen wire Lamp wire and Ballast wire 3 Check CW and wire connection 4 Check Main board 2 Check Lamp 5 Check Ballast NO YES 4 2 3 3 3 5 1 4 2 No Signal Step 1 Check Input Cable 2 Check OSD Source set up 3 Check Main board YES NO 3 ...

Page 28: ...l status YES IR Remote Control NG Step 1 Check Remote module battery 2 Check Remote module 3 Check IR wire between Main board and IR board 4 Check IR Receiver on IR board YES Pixel Fail 1 Check the connection between Main BD and Chip BD 2 Check the connection between OP engine and DMD Chip 4 Check Main board YES NO NO 3 Check Chip board 3 4 4 1 2 3 ...

Page 29: ...LED Messages Definition Detailed Description Display the power on off sequence status Purple Power Off Blue Red Blue Power On Blink Warming up Shutting Down Cooling Error Code Display the Thermal status Fan Fail Over Temperature etc Red Thermal Over Temperature Blink Error Code Display the Lamp status Lamp fail Lamp spoil etc Red Lamp Fail Blink Error Code LED Messages Definition Status System Mes...

Page 30: ...P Fail LAMP OFF FAN 1 Speed Error Blower FAN speed error speed over 20 FAN 2 Speed Error Lamp FAN speed error speed over 20 Sensor 1 Open Error Main Board sensor error Sensor 1 Short Error Main Board sensor error Temperature 1 Error over limited temperature Color Wheel Error Color wheel wire connect abnormal Abnormal Power down Abnormal shut down Notice Once the error count is reset it can never r...

Page 31: ...repared to be a guide to repair trouble sets some problems happen more frequently are taken as examples 5 5 1 Problems 1 No power Yes No Yes No No Power Is CN701 pin 9 3 3v Check power BD Change main BD Is door SW pressed down Check lamp door Change power BD Pin9 ...

Page 32: ...on Has lamp wire connect correct Between Ballast BD and lamp Wire connect certainty Has power connector correct Between Power BD and ballast BD Wire connect certainty Has enable wire connect correct Between Main BD and ballast BD Wire connect certainty No Yes A ...

Page 33: ...ire connect correct Breaker wire to power BD Wire connect certainty No Change color wheel Has color wheel operated normally Yes No Yes If changes ballast BD lamp can be turned on or not No Change lamp Yes Change ballast BD ...

Page 34: ...ange lamp Check PC Alignment Check if in user s menu brightness contrast are default Clean DMD Clean Projection Lens Clean Projection Lens Clean DMD Chip Change Projection Lens Check Color Wheel delay Refer to Section 4 Delay Alignment process Replace CW if necessary Change lamp Refer to Section 4 Overfill Blue Edge adjustment Refer to Section 4 Overfill Blue Edge adjustment contrast are default S...

Page 35: ...4 12 Pixel Fail Change new DMD 34 Change Projection Lens Check parallel between Projection Lens Chip Clean DMD Chip Check connector between Chip BD and Main Re install DMD with Chip BD Change new Chip BD Change new DMD Chip Change new DMD datum and DMD BD and Main BD ...

Page 36: ...e Before you clean the case turn the projector off using the proper shutdown procedure and unplug the power cord To remove dirt or dust wipe the case with a soft lint free cloth To remove stubborn dirt or stains moisten a soft cloth with water and a neutral pH detergent Then wipe the case CAUTION Never use wax alcohol benzene thinner or other chemical detergents These can damage the case Storing t...

Page 37: ...leaning materials Be careful of sharp edges in the lamp compartment Wash hands after lamp replacement If the lamp should break it will make a loud bang when it does ventilate the room well and make sure not to inhale the gas or fine particles that come out from the projector s vent holes and not to get them into your eyes or mouth Only certified lamps are tested with this projector Use of other la...

Page 38: ...Do not insert your hands into the projector after the lamp is removed If you touch the optical components inside it could cause color unevenness and distortion of the projected images 7 Insert the new lamp into the lamp compartment and make sure it fits in the projector Connect the new lamp s wire connector to the projector 8 Tighten the screw that secures the lamp CAUTION Loose screw may cause a ...

Page 39: ...up logo open the On Screen Display OSD menu 15 Go to the SYSTEM SETTING ADVANCED Lamp Settings menu Press MODE ENTER on the projector or remote control The Lamp Settings page is displayed 16 Press to highlight Reset lamp timer and press MODE ENTER on the projector or remote control A warning message is displayed asking if you want to reset the lamp timer 17 Highlight Reset and press MODE ENTER on ...

Page 40: ...total Q ty Type Head Length Surface N m Unit M2 MACH PH 3 B NI 0 245 0 049 CW Shield BKT Link Lamp 1 3 Clip LP HSG DMD 1 Baffle LP HSG DMD 1 MACH PH 4 B NI 0 245 0 049 ILL HSG HSG DMD 2 2 MACH PH 8 B NI 0 245 0 049 LP Adjustment 2 2 M3 MACH PAN 5 NI 0 392 0 049 CW Module HSG DMD 1 1 MACH PAN 5 NI 0 392 0 049 BKT Link Lamp HSG DMD 2 2 MACH PH 7 5 NI 0 588 0 049 H Sink HSG DMD 4 4 M2 MACH RH 3 5 B N...

Page 41: ... iv Assembly Baffle LP first Fig 7 4 push Baffle LP to hook DMD HSG Fig 7 5 v When Lock the screw of Baffle LP the hand must push the left corner of Baffle LP before Fig 7 6 vi Lock the screw of Baffle LP well then release the hand Fig 7 7 vii Assembly two Overfill adjustment screws M2 8L to HSG DMD Fig 7 8 Assemble Horizontal adjustment screw as first and then Vertical adjustment screw Refer Chap...

Page 42: ... Fig 7 4 Fig 7 5 Fig 7 6 Fig 7 7 Overfill adjustment screws LP Datum of DMD HSG 1 Place Clips on BKT surface 2 Push Baffle LP to hook DMD HSG Push on the left corner until lock the screw well Lock the screw well ...

Page 43: ...justment Screw M2 8L DMD Direction ILL HSG DMD HSG 42 Fig 7 8 ILL HSG and DMD HSG Assembly To assemble ILL HSG and its attachments with DMD HSG cover over on AL and then lock with screws Fig 7 9 7 10 Fig 7 10 Overfill Horizontal Adjustment Screw M2 8L AL Screw M2 DMD HSG cover over on AL Overfill Horizontal Adjustment Screw M2 8L Fixed shafts holes ...

Page 44: ...ii Fastening Sequence 2 Fixed shafts of DMD HSG 43 DMD and Chip B D Module Judge Chip B D and DMD alignment keying first Fig 7 11 7 12 Alight keying and Assemble DMD to Chip B D Fig 7 13 Push DMD slightly and use screwdriver rotate clockwise Switch notation DMD on Chip B D Fig 7 14 Fig 7 12 13 Fig 7 14 ptical Engine Assemble Chip B D Module to DMD HSG Fig 7 15 Fig 7 15 to contact DMD Fig 7 16 1 7 ...

Page 45: ...of DMD HSG M3 4L Screw 44 Screw Torque must be confirmed to be 0 539 0 637 N m Fig 7 16 Assemble CW Module to DMD HSG and lock with screws well Fig Fig 7 17 ssemble BKT Link Lamp CW shield on DMD HSG and then lock with screws Fig 7 18 Fixed shafts of DMD HSG 1 4 M3 5L Screw BKT Link Lamp 16 2 Assemble CW Module to DMD HSG and lock with screws well Fig 7 17 ssemble BKT Link Lamp CW shield on DMD HS...

Page 46: ...onfirmed to be 0 098 0 196 N m Fig 7 19 iii Fasten the Screws well Screw Torque must be confirmed to be 0 245 0 343 N m Fig 7 19 Fig 7 19 7 1 4 6 Assemble Ring Zoom and lock with screws well Fig 7 20 Fig 7 20 7 1 4 7 Assemble Ring Focus well Fig 7 21 Notice the 3 shafts on PL and 3 holes on Focus Ring must be matched and then insert the ring into PL Fig 7 21 Screw 3 M2 3L Screw Insert focus ring ...

Page 47: ...st Foot Rear Adjust Foot Notice Connect power board Power board assembled under hook 46 7 2 Module Assembly Key Point Mechanical Parts Make sure the mylar is attached to the ballast Assemble power board with ballast cable on lower case Foot Foot onnect power board and ballast board first Power board assembled nder hook Rubber pad Screw 2 Rubber pad ...

Page 48: ... box assembl 7 2 4 Assemble nozzle assembl Lamp wire Door switch wire 47 embly on lower case embly and blower fan on lower case Plug Lamp wire first Lamp Box assembled under hook Door switch wire Mylar wire first Screw 1 ...

Page 49: ...BOT SHD THERMAL BREAKER CU Screw 1 Should be no step 48 nsert the thermal breaker wire first and then put nozzle in correct position Thermal break wire SHD THERMAL BREAKER CU Plug Thermal break wire Should be no step put nozzle in correct position Plug Thermal break wire first ...

Page 50: ...itch wire Speaker Speaker FAN wire must go under this hook 3 2 Screw EMI Gasket Door switch routing Blower fan wire routing 49 7 2 5 Assemble speaker FAN with cable on lower case lamp module and EMI gasket on lower case l break wire door switch wire 1 4 Screw fan wire routing and EMI gasket on lower case Lamp Fan Fan2 Ballast wire routing ...

Page 51: ...able Notice Make sure that Metal side of the flat cable facing upward to be seen 50 Assembling main board and main shielding Screw CW FFC cable Make sure that upward Blower cable Ballast cable Lamp Fan cable Notice the Bracket must not interfere the pins Speaker cable To Power Board Notice Plug connector accurately ...

Page 52: ...7 2 10 Assembling rear case 1 3 5 CW FFC cable 51 2 4 Screw 5 CW FFC cable routing Cable saddle CW sensor routing must in hook Screw 1 Stand off 8 sensor Cable must in hook ...

Page 53: ...7 2 11 Assembling front case Assemble IR board on IR lens Assemble front case on lower case 52 lower case Screw 1 IR Board ...

Page 54: ... screws on 7 2 13 Assemble lamp door Paste mylar FILM LAMP EXPLODE Screw 5 Screw 2 53 Make sure wire route as shown and fix the wire in cable saddle please keep spare wire on Assemble upper case with lower case and screws on FILM LAMP EXPLODE Cable saddle Screw 1 Screw 5 FILM LAMP EXPLODE Make sure wire route as shown and fix the wire in cable saddle please keep spare wire on Screw 1 ...

Page 55: ...Assemble lamp door on upper case 54 Assemble lamp door on upper case and fix by screw 1 on front case side Follow this direction to assemble Screw 1 on front case side ...

Page 56: ...55 8 Disassembly Diagram ...

Page 57: ...56 ...

Page 58: ...57 ...

Page 59: ...0 5 11 QD76741 REAR FOOT DL1 50 QR83571 QUICK START GUIDE DL1 50 12 MQ04641 FOOT PAD DL1 50 EV02841 POWER SUPPLY CORD US 50 13 MJ22801 STANDOFF D SUB 1000 EV02842 POWER SUPPLY CORD EU 50 14 GS02011 DC FAN AB5012DX 50 EW09831 RGB CABLE 50 15 GS02021 DC FAN AD07012DX 50 HL02961 REMOTE CONTROL UNIT DL1 50 16 JP79751 PWB ASS Y MAIN DL1 30 17 JP79721 PWB ASS Y IR DL1 30 18 JP79731 PWB ASS Y CHIP DL1 30...

Page 60: ...olored light 45 XGA DMD DAD2000 Control 16 pair IR receiver GPIO S Video ISL59837 VGA OUT Audio IN I2C System config EEPROM NCT3941S x2 FAN 1 2 USB Note 1 VGA IN EEPROM are stored for VGA EDID data 2 HDMI EEPROM is stored for HDMI EDID data 3 System config EEPROM is stored for Factory mode alignment data Keypad WT51F516 LED Indicator PWR BD Control System EEPROM Audio OUT Control Thermal sensor I2...

Page 61: ...ions Download cable pin assignment for the RS 232 cross cable Pin Description Pin Description 1 NC 2 RXD 3 TXD 4 NC 5 GND 6 NC 7 RTS 8 CTS 9 NC Interface Settings RS 232 protocol Baud Rate 115200 bps Data Length 8 bit Parity Check None Stop Bit 1 bit Flow Control None RS 232 CROSS cable to RS 232 terminal Female Female ...

Page 62: ...ame CR appmod game CR Write Cinema CR appmod cine CR Write User1 CR appmod user1 CR Read Picture Mode CR appmod CR Write Aspect 4 3 CR asp 4 3 CR Write Aspect 16 9 CR asp 16 9 CR Write Aspect Auto CR asp auto CR Write Aspect Real CR asp real CR Read Aspect Status CR asp CR Write Auto CR auto CR Operation Settings Write Projector Position Front Table CR pp FT CR Write Projector Position Rear Table ...

Page 63: ... Write Freeze Off CR freeze off CR Read Freeze Status CR freeze CR Write Menu On CR menu on CR Write Menu Off CR menu off CR Write Up CR up CR Write Down CR down CR Write Right CR right CR Write Left CR left CR Write Enter CR enter CR Write High Altitude mode 1 CR Highaltitude 1 CR Write High Altitude mode 2 CR Highaltitude 2 CR Read High Altitude mode status CR Highaltitude CR ...

Page 64: ...Housing I ILL Illumination L LP Light Pipe P PL Projection Lens POM Pond of Mirrors R RS232 Interface Between Data terminal Equipment and Data Communications Equipment Employing Serial Binary Data Interchange S SVGA Super Video Graphics Array A screen resolution of 800 x 600 pixels SXGA Super XGA A screen resolution of 1280x1024 pixels V VGA Video Graphics Array A screen resolution of 640x480 pixe...

Page 65: ...QR83721 CP DX250 CP DX300 YK No 0682E ...

Reviews: