background image

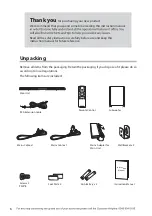
Unpacking

Remove all items from the packaging. Retain the packaging. If you dispose of it please do so 

according to local regulations.
The following items are included:

l

o

r

t

n

o

C


e

t

o

m

e

R

Mains Cable x 1

Subwoofer

Wall Bracket x 2

Screw x 2

l

a

u

n

a

M


n

o

it

c

u

r

t

s

n

I

2


x


d

a

P

 t

o

o

F

AAA Battery x 2

Mains Adapter for 

Main Unit

Instruction

Manual

Thank you 

for purchasing your new product.

We recommend that you spend some time reading this instruction manual 

Read all the safety instructions carefully before use and keep this 

instruction manual for future reference.

AUX

B

E

R

T

B

E

R

T

HDMI

DIGITAL

VOL

VOL

B

U

S

B

U

S

PAIR

DTS

TSHD

DTS

TVOL

ti

n

U


n

i

a

M

RCA Extension Cable 

Mains Cable x 1

6

PM5*8

Summary of Contents for AXS460BTU

Page 1: ...2 1 Bluetooth Soundbar with Wireless Subwoofer AXS460BTU 847 5833 For any help concerning set up and use of your sound bar Please call the Customer Helpline 0345 604 0105 7 ...

Page 2: ... Optical Coaxial Connection 14 Method 2 HDMI Hub Connection 15 Method 3 AUX Connection 17 Connecting an MP3 Player 17 Connecting to the Mains Supply 18 Pairing the Wireless Subwoofer with the Soundbar 19 General Operation 20 Standby ON 20 20 Selecting Modes 20 Adjusting the Speaker Level AUX Coaxial Optical HDMI Operation 21 Bluetooth Operation 22 NFC Near Field Communication Operation 22 Maintena...

Page 3: ...connect the adapter from the power supply Use only power supplies listed in the user instructions Read all the instructions carefully before using the unit and keep them for future reference Retain the manual If you pass the unit onto a third party make sure to include this manual Check that the voltage marked on the rating label matches your mains voltage Damage Please inspect the unit for damage...

Page 4: ...The product shall be connected to a MAINS socket outlet with a protective earthing connection ...

Page 5: ...4pm Sunday Calls to Argos enquiry lines may attract a charge and set up fee from residential lines depending on your call plan tariff Mobile and other providers costs may vary see www bt com pricing for details For Security and training purposes telephone calls to and from customer service centres maybe recorded and monitored Calls from Republic of Ireland will attract international call charges H...

Page 6: ...n o i t c u r t s n I 2 x d a P t o o F AAA Battery x 2 Mains Adapter for Main Unit Instruction Manual Thank you for purchasing your new product We recommend that you spend some time reading this instruction manual Read all the safety instructions carefully before use and keep this instruction manual for future reference AUX B E R T B E R T HDMI DIGITAL VOL VOL B U S B U S PAIR DTS TSHD DTS TVOL t...

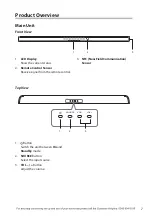
Page 7: ...current status 2 Remote Control Sensor Receive signal from the remote control 3 NFC Near Field Communication Sensor 1 Button Switch the unit between On and Standby mode 2 SOURCE Button Select the input source 3 VOL Button Adjust the volume Top View 3 2 1 SOURCE VOL VOL 1 2 3 7 ...

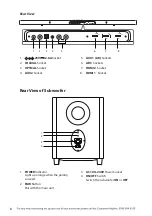
Page 8: ...AIR Button Pair with the main unit 5 AUX 1 L R Sockets 6 ARC Sockets 7 HDMI 2 Socket 8 HDMI 1 Socket 3 AC 100 240V Power Socket 4 ON OFF Switch Switch the subwoofer ON or OFF Rear View COAXIAL OPTICAL AUX 2 AUX 1 R L HDMI2 HDMI1 ARC 25V 2 6A COAXIAL OPTICAL AUX 2 AUX 1 R L HDMI2 HDMI1 ARC 25V 2 6A 7 8 4 3 2 1 6 5 AC 100 240V PAIR Power ON OFF 1 2 3 4 8 ...

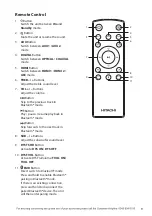
Page 9: ...e resume playback in Bluetooth mode Button Skip forwards to the next track in Bluetooth mode 8 SUB Buttons Adjust the subwoofer sound level 9 DTS TSHD Button 10 DTS TVOL Button Activate DTS TruVolume TVOL ON TVOL OFF 11 PAIR Button Direct switch to Bluetooth mode Press and hold to enable Bluetooth pairing in Bluetooth mode If there is an existing connection press and holdto disconnect the paired B...

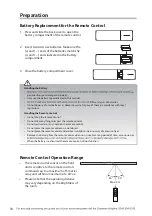
Page 10: ...p the remote control Do not allow anything to impact the remote control Do not spill water or any liquid on the remote control Do not place the remote control on a wet object Do not place the remote control under direct sunlight or near sources of excessive heat Remove the battery from the remote control when not in use for a long period of time as corrosion or re When the battery is exhausted the...

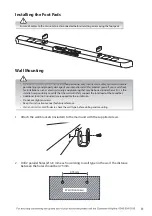
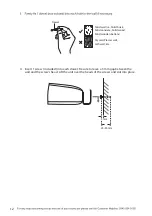
Page 11: ...of the Soundbar Additional tools not included are required for the installation Do not overtighten screws Keep this instruction manual for future reference nder to check the wall type before drilling and mounting 1 Attach the wall brackets included to the main unit with the supplied screws 475 mm Wall Front view 2 Drill 2 parallel holes Ø 3 8 mm each according to wall type in the wall The distance...

Page 12: ...to leave a 3 mm gap between the wall and the screw s head Lift the unit over the heads of the screws and slot into place 3 mm Dowel Solid wall i e Solid brick Solid concrete Solid wood Solid wooden battens Drywall Plaster wall Lath wall etc 25 30 mm 12 ...

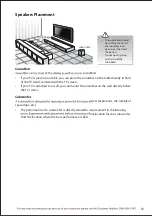
Page 13: ...mount the soundbar on the wall directly below the TV screen Subwoofer ects explosions the rumble of spaceships etc The performance of a subwoofer is directly related to its placement in the listening nal location for your subwoofer Find the location where the bass performance is best The subwoofer should be within 5 metres of the soundbar in an open area the closer the better Do not put anything o...

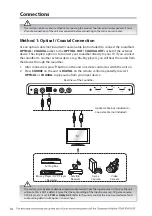
Page 14: ...audio from your input device This section involves various methods of connecting the product to other external components Ensure all audio connections of the unit are connected before connecting to the mains power socket The unit may not be able to decode all digital audio formats from the input source In this case the unit will mute This is NOT a defect Ensure that the audio setting of the input ...

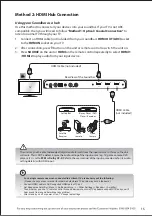
Page 15: ...D Player Recorder Set top Box Satellite Receiver Game Console Video Camera The unit may not be able to decode all digital audio formats from the input source In this case the unit will mute This is NOT a defect Ensure the audio setting of the input source e g TV game console DVD player etc is set to PCM or Dolby AC 3 Refer to the user manual of the input source device for its audio setting details...

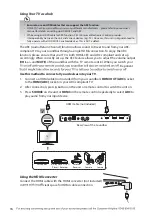
Page 16: ... When correctly set up the CEC feature allows you to adjust the volume output VOL and MUTE of the soundbar with the TV remote control When you switch your Be patient Use this method to connect all your devices into your TV 1 Connect an HDMI cable not included from your soundbar s HDMI OUT ARC socket to the HDMI ARC socket on your ARC compliant TV 2 After connection press button on the unit or remo...

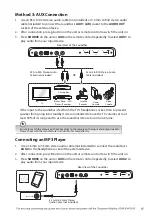
Page 17: ...Recorder Set top Box Satellite Receiver Game Console Video Camera OR 3 5mm to RCA Stereo Audio Cable included RCA to RCA Stereo Audio Cable not included Rear View of the Soundbar Connecting an MP3 Player 1 Use a 3 5mm to 3 5mm stereo audio cable not included to connect the soundbar s AUX 2 to the headphone socket of the external device 2 After connection press button on the unit or remote control ...

Page 18: ...his soundbar only DO NOT use the mains adapter and mains cable for other purposes Soundbar Unwind the mains adapter cable to its full length Connect mains cable to the mains adapter and then connect to the 25V 2 6A socket on the rear of the unit and a mains socket at the other end Make sure the mains adapter is fully inserted into the mains socket Subwoofer Connect the other end of the mains cable...

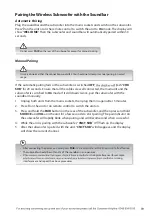
Page 19: ...ld not attempt manual pairing in normal usage If the automatic pairing fails or the subwoofer is switched OFF ash CHK SUB for 20 seconds Ensure that all the cables are well connected the main unit and the subwoofer is switched to On mode If it still doesn t work pair the subwoofer with the soundbar manually 1 Unplug both units from the mains sockets then plug them in again after 3 minutes 2 Press ...

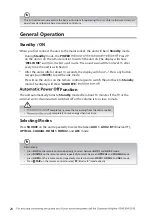
Page 20: ...te control again to switch the unit back to Standby mode The display will show GOODBYE Alternatively press AUX on the remote control repeatedly to select between AUX 1 and AUX 2 mode press DIGITAL on the remote control repeatedly to select between OPTICAL and COAXIAL mode press HDMI on the remote control repeatedly to select between HDMI 1 HDMI 2 and ARC mode Press PAIR on the remote control to se...

Page 21: ...the volume levels between the TV program and adverts After TVOL TruVolume is switched ON it can adjust the volume levels while watching TV or movies which might cause the volume level dropping from time to time If you notice this AUX Coaxial Optical HDMI Operation There are COAXIAL OPTICAL AUX 1 L R AUX 2 and HDMI sockets located at the rear of the unit Analogue audio sound signals from other sour...

Page 22: ...IR on the remote control to clear all pairing setting PAIRING ash in the display and the unit is now ready for pairing Follow step 2 3 in First time pairing above to pair your Bluetooth device The operational range between the unit and the device is approximately 6 metres Before connecting a Bluetooth device to the unit ensure you know the device s capabilities Compatibility with all Bluetooth dev...

Page 23: ...ound from the soundbar and subwoofer Please try either one of the solutions below Make sure that the unit is not muted Press or VOL button to resume normal listening Press on the unit or on the remote control to switch the soundbar to standby mode Then press the button again to switch the soundbar on Unplug both the soundbar and the subwoofer from the mains socket then plug them again Switch on th...

Page 24: ...ar and Subwoofer nd AXS460BTU on my Bluetooth device Ensure the Bluetooth function is activated on your Bluetooth device Ensure you have paired your unit with the Bluetooth device Some NFC enabled mobile devices cannot pair directly with the unit Download and install NFC reader apps into your NFC enabled mobile device Please refer to your mobile device s guidebook for more details Pair the NFC ena...

Page 25: ...ht 2 1 kg Dimension 985 mm W x 54 mm H x 74 mm D Subwoofer Power Supply AC100 240 V 50 Hz Power Consumption 65 W Ecodesign Information Subwoofer Information on Power Consumption Power Consumption of Standby Mode N A Network Standby Power Consumption 2 0 W Time interval for power management function switches the unit automatically into standby N A Power consumption in network standby if all wireles...

Page 26: ...26 ...

Page 27: ...Amplifier RMS Output specifications Soundbar Subwoofer Total Total Peak Power 50 RMS 65 RMS 115 RMS 460 W ...

Page 28: ......

Reviews: