background image

25

Check by the abnormality mode table 8.3. 

able 8.1  Checking of Wire Connection by Test Run

T

COOL

MED

A/C

ADDS.  RN

ALARM

COOL

MED

A/C

ADDS.  RN

ALARM

Indicated
for a second
alternately

Abnormal Indoor
Unit No.

Abnormal Ref.
Cycle No.

Alarm Code

Alarm Code

Model Code

Connected No.
of Indoor Units

Model Code

Indication

Model

Inverter

Multi

Heat-pump

Cooling Only

Others

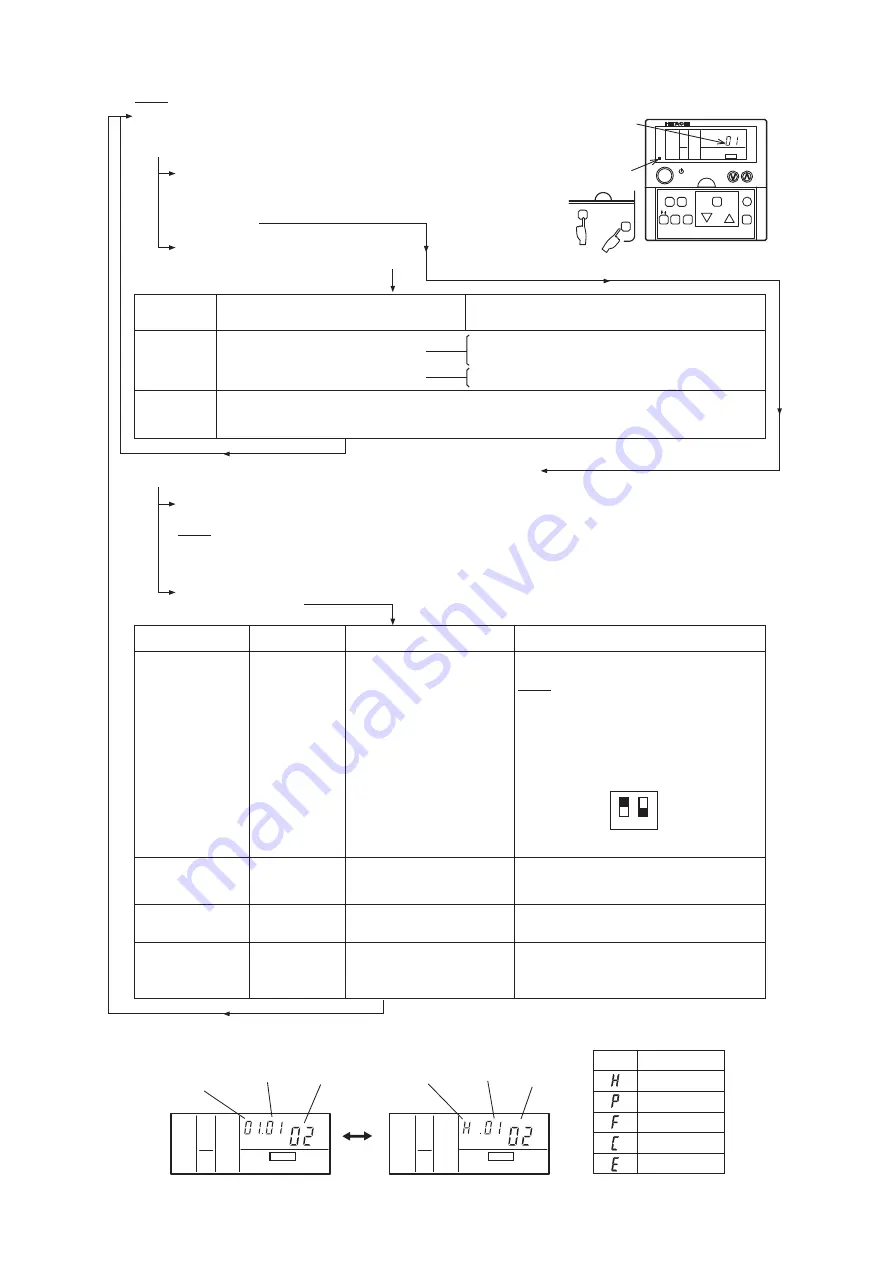
(1)  Turn ON the power source of the units.
(2)  Procedure for "TEST RUN" mode of remote control switch.
 

Depress the "MODE" and the "CHECK" switches together


for more than 3 seconds.


If "TEST RUN" and the counting number of the


connected units with the remote control switch


(for example "05") are indicated on the remote


control switch, the connection of remote control


cable is correct.


If no indication appears or the number of the units


indicated is smaller than the actual number of


the units, some abnormalities exist.

(3)

Back to (1) after checking

Back to (1) after checking

(4)  Select TEST RUNNING MODE by depressing "MODE" switch.  (COOL or HEAT)
(5)  Depress "RUN/STOP" switch.


The "TEST RUN" operation will be started.  (The 2 hours OFF-TIMER will be set and the "TEST RUN" operation


will be finished after 2 hours unit operation or by depressing the "RUN/STOP" switch again.)

   NOTE:


The "TEST RUN" operation ignores the temperature limitation and ambient temperature during heating


operation to have a continuous operation, but the protections are alive.


Therefore, the protection may activate when the heating "TEST RUN" operation is performed in high ambient temperature.


If the units do not start or the operation lamp on the remote control switch is flashed,


some abnormalities exist.

(6)

Remote
Control Switch
Indication

No Indication

* The power source of outdoor unit is not turned ON.
* The connection of the remote control cable
 is incorrect.
* The connecting wires of power supply line
  are incorrect or loosed.

1. Connecting Points of Remote Control Cable Terminal
  Board of Remote Control Switch and Indoor Unit
2. Contact of Terminals of Remote Control Cable
3. Connecting Order of each Terminal Boards
4. Screw Fastening of each Terminal Boards

* The power source of outdoor unit is not turned ON.
* The operating line wiring between indoor unit and
  outdoor unit is not connected.

Counting
number of
connected units
is incorrect.

Inspection Points after the Power Source OFF

NOTE:  "TEST RUN" shall be performed with each refrigerant cycle (each outdoor unit).

Remote Control
Switch Indication

The operation lamp
flashes. (1 time/1 sec.)
And the Unit No. and
Alarm Code "03" flash.

The unit does not
start.

The power source of outdoor unit
is not turned ON.
The connecting wires of operating
line are incorrect or loosed.

The unit does not
start.

Remote control cable is broken.
Contact of connectors is not good.
The connection of remote control
cable is incorrect.

This is the same as items (3)-1 and 2.

The unit does not
start, or starts once
and then stops.

The connection of the thermistors
or other connectors are incorrect.
Tripping of protector exists, or elses.

1. Connecting Order of each Terminal Boards
2. Screw Fastening of each Terminal Boards
NOTE:
Recovering method of FUSE for operating circuit.
There is a fuse ("FUSE4" on Indoor Unit PCB1, "EF1"
on Outdoor Unit PCB1) to protect operating circuit
on the PCB, when the power lines are connected to
operating lines.
If fuse is melted, operating circuit can be recovered
once by setting the dip switch on the PCB, as below.

The operation lamp
flashes. (1 time/2 sec.)

Indication or flash
except above.

The unit does not
start.

The connection of the remote
control cable between indoor units
is incorrect.

The operation lamp
flashes. (1 time/1 sec.)
And the Unit No. 

00

.

Alarm Code 

dd

 and

Unit Code 

E.00

 flash.

Unit Condition

Wrong Portions

Wrong Portions

Inspection Points after the Power Source OFF

  * Set the switch #1 to ON position to recover the
 operation 

circuit.

ON

OFF

Indoor Unit PCB1

DSW7

1 2

TEMP.

RUN / STOP

MODE FAN SPEED

VENTI

RESET

CHECK

LOUVER

ON/OFF TIMER

TIME

COOL

HIGH

A/C

SET TEMP.

CHECK

UNIT

CHECK

MODE

Setting Temperature

Operation Lamp

Remote Control Switch

Alarm Code Indication of Remote Control Switch

(Do it by service people.)

Check by the abnormality mode table 8.3. 
(Do it by service people.)

Summary of Contents for 4FSVN1Q

Page 1: ...4FSVN1Q 5FSVN1Q 6FSVN1Q 5FSYN1Q 6FSYN1Q Model Outdoor Unit ORIGINAL INSTRUCTIONS P 0 0 6 9 2 Q INVERTER DRIVEN MULTI SPLIT SYSTEM HEAT PUMP AIR CONDITIONERS SET FREE mini R410A ...

Page 2: ......

Page 3: ...ed for large difference in temperature for changing operate mode This air conditioners only is appliable of cooling or heating mode do not operate cool and heat mode together NOTE Install this air conditioners by local regulations or standards 23WB 46 DB 30 DB 15 5 WB 15WB 5 DB 15 DB 20 WB ...

Page 4: ...if it is not used Do not install the outdoor unit where there is a high level of oil mist flammable gases salty air or harmful gases such as sulphur Do not use any sprays such as insecticide lacquer hair spray or other flammable gases within approximately one 1 meter from the system If circuit breaker or fuse is often activated stop the system and contact your service contractor Do not perform ins...

Page 5: ...pump unit is decreased according to the outdoor air temperature Therefore it is recommended that auxiliary heating equipment be used in the field when the unit is installed in a low temperature region Please contact your local agent as the occasion arises The standard utilization of the unit shall be explained in these instructions accessories to determine if they are correct Check the model numbe...

Page 6: ...ting 24 23 20 6 1 General Check 6 Electrical Wiring 19 5 9 Collecting Refrigerant 18 5 8 Additional Refrigerant Charge 17 5 7 Caution of the Pressure by Check Joint 15 14 5 5 Air Tight Test 13 5 4 Piping Connection 12 5 3 Multi Kit 5 Refrigerant Piping Work 7 5 4 1 Factory Supplied Accessories 5 2 Structure 1 3 Transportation and Handling 3 1 Combination of Indoor and Outdoor Unit 4 7 5 1 Piping M...

Page 7: ...Absorbing Rubber Crankcase Heater Pressure Sensor High Pressure Switch Bypass Solenoid Valve Stop Valve for Gas Line Stop Valve for Liquid Line Electrical Expansion Valve Strainer Distributor Check Joint for High Low Pressure Cool Heat Oil Return Cpillary Tube Strainer Oil Return Solenoid Valve Oil Seperator Fan Motor Propeller Fan Strainer ...

Page 8: ...igerant Heat Exchanger Thermistor Ambient Thermistor Liquid Line Refrigerant Piping Connection Piping Connection NO Material NO Strainer Oil Seperator Strainer Strainer Electrical Expansion Valve Stop Valve for Gas Line Stop Valve for Liquid Line Bypass Return Oil Bypass Return Oil High Pressure Protect High Pressure Low Pressure Remark Accumulator Compressor Heat Exchanger Capilary Tube Capilary ...

Page 9: ...rogen during brazing Prevention from Oxidation during Brazing Lubrication Oil for Flare Surface Use a synthetic oil which is equivalent to the oil used in the refrigeration cycle Applying Oil to the Flared Surface Synthetic oil absorbs moisture quickly Check refrigerant cylinder color Refrigerant Charging Liquid refrigerant charging is required regarding zeotoropic refrigerant Vacuum Pump Vacuum P...

Page 10: ...t put any material on the product Apply two lifting wires onto the outdoor unit when lifting it by crane Lifting Method When lifting the unit ensure a balance of the unit check safety and lift up smoothly 1 Do not remove any packing materials 2 Lift the unit under packing condition with two 2 ropes as shown in Fig 3 1 Fig 3 1 Lifing Work for Transportation Put Cloth or Paper or paper Do not put an...

Page 11: ...unt the field supplied hoods at the discharge side of the outdoor unit and the inlet side of the heat exchanger Install the outdoor unit where it is in the shade or it will not be exposed to direct sunshine or direct radiation from high temperature heat source Do not install the outdoor unit where dust or other contamination could block the outdoor heat exchanger Install the outdoor unit in a spac...

Page 12: ...Nut Special Washer Filled Mortar Concrete Fig 4 3 Position of Anchor Bolts NOTE When the mark dimension is secured piping work from bottom side is easy without interference of foundation Anchor bolts hole 3 Example of fixing outdoor unit by anchor bolts Cut this portion when this type of anchor bolt is used If not it is difficult to remove the service cover Concrete Anchor Bolt Max 21mm After cut ...

Page 13: ...t charge oxygen acetylene or other flammable and poisonous gases into the refrigerant cycle when performing a leakage test or an air tight test These types of gases are extremely dangerous and can cause an explosion It is recommended that compressed air nitrogen or refrigerant be used for these types of tests 5 1 Piping Materials 1 Prepare locally supplied copper pipes 2 Select the piping size fro...

Page 14: ...based on a JIS standard JIS B8607 Flare Nut Dimension Use the flare nut as below Flare Nut Dimension B Diameter R410A Dimension is based on a JIS standard JIS B8607 Flare Nut Cap the end of the pipe when the pipe is to be inserted through a hole Do not put pipes on the ground directly without a cap or vinyl tape at the end of the pipe 8 unit mm unit mm unit mm ...

Page 15: ...ding 2 Additional Refrigerant Charge R410A to the tables Gas Pipe Indoor Unit Pipe Model Table 5 2 Indoor Unit Pipe Model Table 5 1 Limitation of Outdoor Unit Outer Diameter of Pipe Model Gas Liquid 5 2 Refrigerant Piping Work Diameter Liquid Pipe liquid length liquid length 9 RPI 1 0 1 5FSNQL H RPIZ 1 0 1 5FSN1Q RCI 1 0 1 5FSN1Q RCD 1 0 1 5FSN2Q RPK 1 0 1 5FSNQ RPF I 1 0 1 5FSNE RPI 1 8 2 0FSNQL ...

Page 16: ...Kit Max Pipe Length between Branch Pipe and Indoor Choose Branch Pipe From a Branch Pipe to Indoor of Max Distance From every Branch Pipe to Indoor of connecting this system is calculted in the following formula Total refrigerant charge of thereinto Total Liquid Length Total Liquid Total Liquid Total Liquid Length Liquid Pipe Total with Example Symbol Mark Size Line Branch System RAS 4 6FSVN1Q RAS...

Page 17: ...alize Pipe Outdoor Unit Outdoor Unit Oil Trap is recommended at every 30meters lift Oil Trap is recommended at every 30meters lift with with with EXAMPLE Branch System of Embranchment Centralize Pipe RAS 5FSVN1Q RAS 5FSVN1Q ...

Page 18: ...Outer Diameter Multi Kit for Line Branch 5 3 Table Multi Kit Multi Kit Gas Line Liquid Line Quantity Unit Inner Diameter ...

Page 19: ... 3 Points Fig 5 2 Remove Service Cover 1 Confirm that the valve is closed 2 Prepare a field supplied bend pipe for liquid line Connect it to the liquid valve by flare nut through the square hole of bottom base 3 For Gas Piping Connection Prepare a field supplied bend pipe for gas line Braze it and the factory supplied pipe flange at the outside of the unit Do not apply the double spanner work here...

Page 20: ...frigerant piping from touching the weak part of the building such as wall ceiling etc If touched abnormal sound may occur due to the vibration of the piping Pay special attention in case of short piping length 3 Apply the oil thinly at the seat surface of the flare nut and pipe before tightening And when tightening the flare nut use two spanners Lubrication Oil is field supply Manufacturer IDEMITS...

Page 21: ...charging hose can be connected Spindle Valve Counterclockwise Open Clockwise Close O Ring Refrigerant Piping Rubber Cap Tighten the cap with a torque Do not apply an abnormal big force to 5 0N m or smaller The back seat construction is not provided Do not loosen the stop ring If the stop ring is loosened it is dangerous since the spindle will hop out 5 Connect the gauge mani fold using charging ho...

Page 22: ...air conditions and the dewing on the pipe surface by the low pressure Check to ensure that there is no gas leakage When large amount of the refrigerant leaks the troubles as follows may occur 1 Oxygen Deficiency 2 Generation of Harmful Gas Due to Chemical Reaction with Fire Indoor Unit 1 Maximum Permissible Concentration of HFC GAS R410A R410A is an incombustible and non toxic gas However if leaka...

Page 23: ...wing table because of high pressure side and low pressure side changes by operation mode Cooling Operation Heating Operation Check Joint for Gas Stop Valve A Low Pressure High Pressure Check Joint for Piping B High Pressure Low Pressure Check Joint for Liquid Stop Valve C NOTE Be careful that refrigerant and oil do not splash to the electrical parts when removing the charge hoses Exclusive for Vac...

Page 24: ...tal Ref Charge 2 Charging Work 3 Record of Additional Charge Record the refrigerant charging quantity in order to facilitate maintenance and servicing activities Total refrigerant charge of this system is calculated in the following formula 0 This System kg Charge refrigerant R410A into the system as follows 1 For charging refrigerant connect the gauge mani fold using charging hoses with a refrige...

Page 25: ...th phase is contained in the power supply wires If not electrical parts will be damaged 3 Check to ensure that the capacity of power supply is enough If not the compressor will be not able to operate because of abnormal voltage drop at starting 4 Check to ensure that the earth wire is connected 5 Check to ensure that the electrical resistance is more than 1 megohm by measuring the resistance betwe...

Page 26: ...in front of the fixing screw of the service panel Otherwise the screw can not be removed NOTES 2 Total wiring length for remote control switch can be extended up to 500m If total wiring length less than 30m it is possible to use the normal wiring 0 3mm2 except shielded twist pair control between outdoor unit and indoor unit control wiring between indoor units 1 In case of total wiring length at in...

Page 27: ...able Shielded Twist Pair Cable 0 75mm 2 x 2 This cable dose not need any polarity Do not apply an excessively high voltage to this cable Rated Voltage 12V Remote Control Switch Option Remote Control Switch Option Power Source Cable Pay an attention to the phase of power source when wiring Shielded Twist Pair Cable 0 75mm 2 x 2 This cable dose not need any polarity Do not apply an excessively high ...

Page 28: ...minal and attach insulation tape or sleeve as shown in the figure Insulation Tape or Sleeve Correct Incorrect Do not use a solderless terminal when a single wire is used If used it causes abnormal heating at the caulking portion of the terminal If a single wire is used connect the wire direct as shown in the figure Make a loop of the wires so that disconnecting the wirings for replacing parts is n...

Page 29: ...witch with a space of 3 5mm or more between each phase Follow this table setting Dip Switch ALL OFF Shipment Set Test Run Heat symbol denote the position of Dip Switch contact joint ALL OFF Shipment Set Optional Function Setting External Input and Ref Cycle No Setting Communication Setting Capacity Setting Pipe length Setting Shipment I U is located higher than O U 20m than I U 25m RAS 4FSVN1Q RAS...

Page 30: ... according to the T Do not operate the system until all the check points have been cleared resistance is more than 1 megohm by measuring the resistance between ground and the terminal of the electrical parts If not do not operate the system until the electrical leakage is found and repaired the outdoor unit are fully opened and then start the system main power source has been ON for more than 12 h...

Page 31: ...trol Cable 3 Connecting Order of each Terminal Boards 4 Screw Fastening of each Terminal Boards The power source of outdoor unit is not turned ON The operating line wiring between indoor unit and outdoor unit is not connected Counting number of connected units is incorrect Inspection Points after the Power Source OFF NOTE TEST RUN shall be performed with each refrigerant cycle each outdoor unit Re...

Page 32: ...C WB o C 7 Check Refrigerant Temperature Liquid Temperature o C Discharge Gas Temperature o C 8 Check Pressure Discharge Pressure MPa Suction Pressure MPa 9 Check Voltage Rated Voltage V Operating Voltage V Starting Voltage V 10 Check Compressor Input Running Current Input kW Running Current A 11 Is the refrigerant charge adequate 12 Do the operation control devices operate correctly 13 Do the saf...

Page 33: ...lity of Protective Circuit in outdoor Unit Failure of Protection detecting Circuit 41 Overload cooling Possibility of high pressure device activation O U Pipe Thermistor Temp is Higher than 55o C and the Comp Top Temp is Higher than 95o C when O U Protection Device is activated 42 Overload heating Possibility of high pressure device activation I U Freeze Protection Thermistor Temp is Higher than 5...

Page 34: ...er Control Circuit Fuse MPa Mpa A A W Min Compressor Protection High Pressure Switch This switch cuts out the operation of the compressor when the discharge pressure exceeds the setting RAS 4 6FSVN1Q 0 20 0 15 0 20 0 20 Non Adjustable 3 4 15 3 2 0 05 50 28 4 5 3 4 15 0 05 25 28 4 5 Automatic Reset Non Adjustable Automatic Reset Non Adjustable Non Adjustable 0 20 0 15 3 2 RAS 5 6FSYN1Q ...

Page 35: ......

Page 36: ...P00692Q 2013 11 V00 ...

Reviews: