background image

ON SCREEN DISPLAY 


26

ON SCREEN DISPLAY 


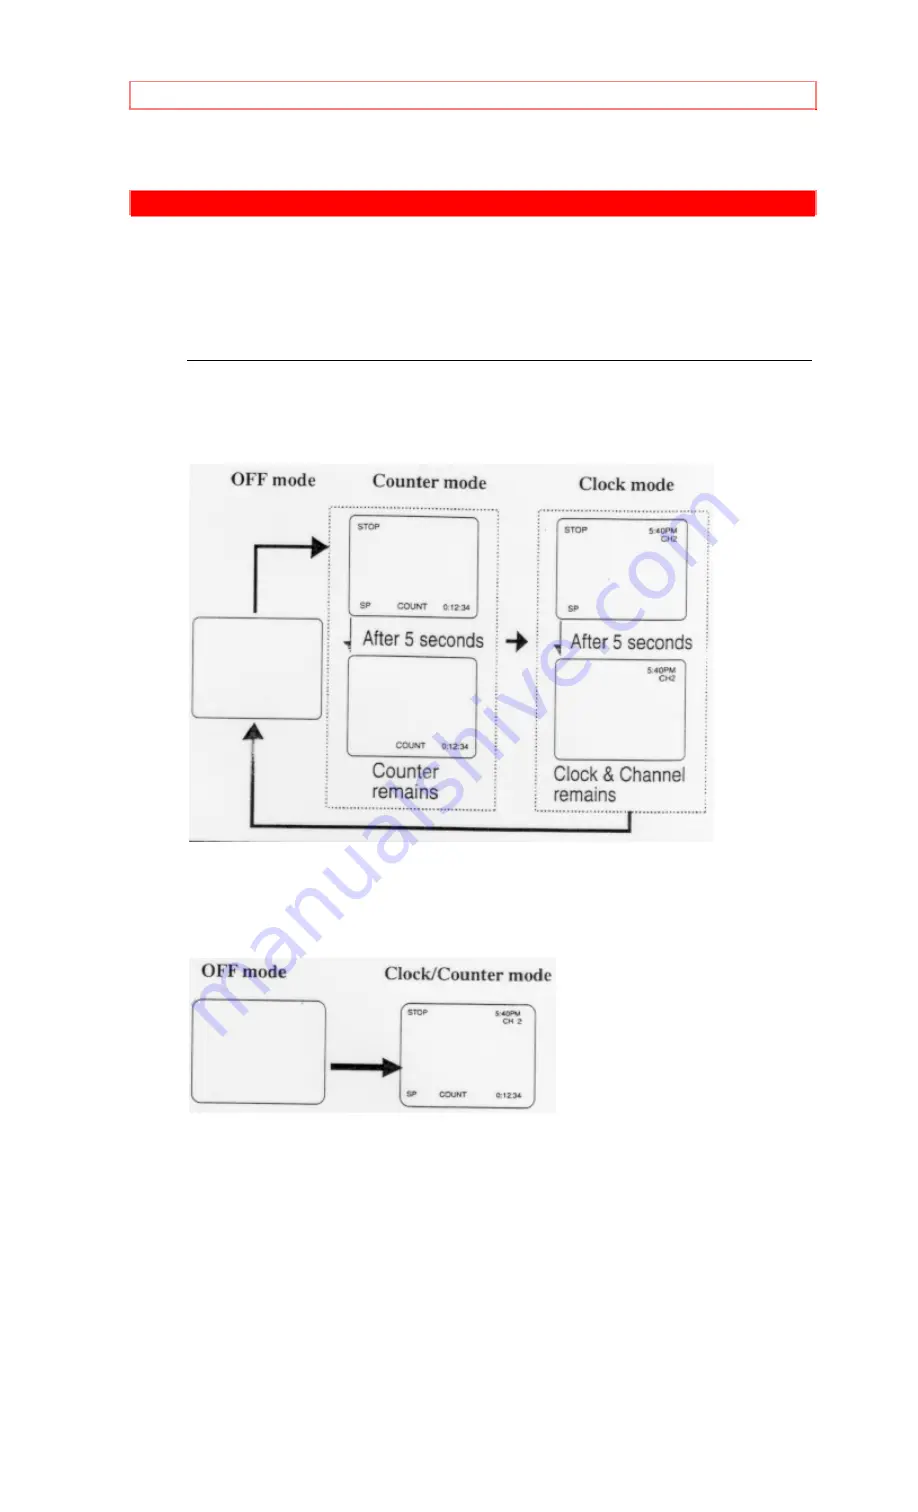
To check the Counter, Clock and Channel number on the TV screen, press 
SELECT button on the remote control. Each time you press the SELECT 
button on the remote control, the TV screen will change as follows: 

When the Closed Caption mode is OFF: 

• In the Counter mode, after 5 seconds, only the counter remains. To clear it, 
press SELECT button. 
• In the Clock mode, after 5 seconds, only the clock and the channel number 
remain. To clear them, press SELECT button. 


When the Closed Caption mode is ON: 

• The On Screen Display will disappear after 5 seconds. 
• This is true even if MUTE button is pressed, or PAUSE/STILL button is 
pressed while recording. However, the On Screen Display will appear for 5 
seconds when SELECT button is pressed. 


Summary of Contents for 13VR10B

Page 1: ...hesizer tuner with direct station call Closed caption system Game mode Auto power on and off system Auto rewind when the end of a tape is reached 2 Step picture search operation CM skip Still Digital Auto Tracking DTR Rental play mode Auto repeat Time search Index search Three different tape speeds SP LP SLP OTR One Touch Recording 1 Year 8 events including Daily and Weekly Timer Recording VCR plu...

Page 2: ...19 TO RETURN TO TV MODE WHEN SCANNING 19 DELETING OR ADDING PRESET CHANNEL 20 AUTO PRESET AGAIN 20 SELECTING THE LANGUAGE 21 DAYLIGHT SAVING TIME 21 TO CANCEL THE DAYLIGHT SAVING TIME 22 SETTING THE CLOCK AUTO MANUAL 22 AUTO CLOCK SETTING 22 MANUAL CLOCK SETTING 24 TO CHANGE CLOCK SETTING 25 ON SCREEN DISPLAY 26 SPECIAL FEATURES 27 DEGAUSSING 27 AUTO REWIND EJECT 27 TV OPERATION 28 WATCHING A TV P...

Page 3: ...CORDINGS 52 HINTS FOR AUTOMATIC TIMER AND VCR PLUS TIMER RECORDINGS 52 AUTO RETURN 52 SLEEP TIMER 54 TO CANCEL THE SLEEP TIMER 54 TROUBLESHOOTING GUIDE 55 MAINTENANCE 57 CABINET CLEANING 57 HEAD CLEANING 57 SERVICING 57 TECHNICAL SPECIFICATIONS 58 CABLE CHANNEL DESIGNATIONS pg 34 59 WARNING TO REDUCE THE RISK OF FIRE OR ELECTRIC SHOCK DO NOT EXPOSE THIS APPLIANCE TO RAIN OR MOISTURE CAUTION TO RED...

Page 4: ...TABLE OF CONTENTS 4 The caution marking is located on the rear of the cabinet ...

Page 5: ...the like 8 Accessories Do not place this video product on an unstable cart stand tripod bracket or table The video product may fall causing serious injury to a child or adult and serious damage to the appliance Use only with a cart stand tripod bracket or table recommended by the manufacturer or sold with the video product Any mounting of the appliance should follow the manufacturer s instructions...

Page 6: ...nect the antenna or cable system This will prevent damage to the TV VCR due to lightning and power line surges 15 Power Lines An outside antenna system should not be located in the vicinity of overhead power lines or other electric light or power circuits or where it can fall into such power lines or circuits When installing an outside antenna system extreme care should be taken to keep from touch...

Page 7: ... the same characteristics as the original part Unauthorized substitutions may result in fire electric shock or other hazards 21 Safety Check Upon completion of any service or repairs to this TV VCR ask the service technician to perform safety checks to determine that the TV VCR is in proper operating condition 22 Heat This TV VCR should be situated away from heat sources such as radiators heat reg...

Page 8: ... block the ventilation holes Install unit in a horizontal position Avoid locations subject to strong vibration Do not place the VCR near strong magnetic fields Do not move the unit from a cold to a hot place or vice versa AVOID THE HAZARDS OF ELECTRICAL SHOCK AND FIRE Do not handle the power cord with wet hands Do not pull on the power cord when disconnecting it from AC wall outlet Grasp it by the...

Page 9: ...nd found to comply with the limits for a Class B digital device pursuant to Part 15 of the FCC Rules These limits are designed to provide reasonable protection against harmful interference in a residential installation This equipment generates uses and can radiate radio frequency energy and if not installed and used in accordance with the instructions may cause harmful interference to radio commun...

Page 10: ...tape is inserted Auto rewind when the end of a tape is reached not in the case of timer recording 2 Step picture search operation You can view a video program at a high speed or super high speed in either a forward or reverse direction in LP and SLP mode CM skip Allows you to easily skip a commercial range of a recorded television program during playback Still Freeze the picture at any time for cl...

Page 11: ...to be made of daily broadcasts and the Weekly timer allows recording to be made once a week up to the end of the tape VCR plus You can program the timer for automatic recording using the VCR Plus numbers that are printed in most newspaper TV listings and TV Guide Auto return After timer recording is finished the beginning of the recorded program s can be searched Sleep timer Allows you to turn off...

Page 12: ...ers THREE DIFFERENT TAPE SPEEDS Before recording select the tape speed from SP mode Standard Play LP mode Long Play or SLP mode Super Long Play The table below shows the maximum recording playback time using T60 T120 or T160 tapes in each mode INSERTING A CASSETTE Insert the cassette in the direction as shown Push in gently but continuously on the center back of the cassette until it is drawn into...

Page 13: ...VIDEO CASSETTE 13 the hole with plastic tape ...

Page 14: ...NNEL buttons Press to select the channel for viewing or recording PICTURE CONTROL function They may also be used to adjust the picture control See page 17 TRACKING function Press to minimize video noise lines or dots on screen during the Play mode See page 19 REAR VIEW illustration 13 EARPHONE jack Connect to earphone not supplied for personal listening The size of the jack is 1 8 monaural 3 5mm 1...

Page 15: ...26 TAPE COUNTER MEMORY button Press to set counter memory on and off See page 21 27 PAUSE STILL button Press to temporarily stop the tape during the recordgin or to view a still picture during playback 28 STOP button Press to stop the tape motion 29 LIGHT button Press to light up buttons If it is dark white buttons are lighted up to show these position 30 TAPE SPEEED button Press to set desired re...

Page 16: ...bination Antenna to the ANT terminal of the TV VCR as shown in the diagram below For the best reception extend the VHF UHF Rod Antenna fully and adjust its position Avoid handling the top section when making adjustments NOTE Before pluggin the Rod antenna into antenna terminal check that the pin is not bent If it is bent straighten the pin as illustrated then plug the pin into antenna terminal VHF...

Page 17: ...m of the building as close to the poing of cable entry as practical CABLE WITH CONVERTER DESCRAMBLER BOX If your cable service supplies you with a converter box you can use the basic connection shown here With this connection you can record and view any channel including scrambled channels However channel selection must be made with the converter box This means that channels cannot be changed usin...

Page 18: ...ht batteries into the battery compartment in the direction indicated by the polarity markings 3 Replace the cover EXTERNAL INPUT MODE When using an external input signal another VCR or camcorder connect the player s audio video output cables to the AUDIO IN VIDEO IN jacks of your TV VCR Then press CHANNEL button or enter 00 with number button so that AUX appears on the screen ...

Page 19: ...ng CH or button or SELECT button marks indicate the selected language 4 Begin auto preset Press MENU button to point to AUTO PRESET Then press SELECT button The tuner scans and memorizes in the active channels in your area NOTES The TV VCR distinguishes between standard TV channels and CATV automatically If you want to play or record a video tape BEFORE presetting the tuner you must press MENU but...

Page 20: ...tton repeatedly or number buttons on the remote control until your desired channel number appears Example CH8 4 Delete or add it from into memory Press ADD DELETE button The channel number changes to light red The channel is deleted from memory To delete another channel repeat steps 3 and 4 If you press the ADD DELETE button again the channel is memorized again Added channel is in light blue Delet...

Page 21: ...ner stops on the lowest memorized channel TV mode from CH02 CATV mode from CH01 SELECTING THE LANGUAGE 1 Select LANGUAGE Press MENU button repeatedly to point to LANGUAGE 2 Select ENGLISH or ESPANOL Select ENGLISH or ESPANOL Spanish using CH or button 3 Exit the Language mode Press MENU button repeatedly until the TV VCR returns to the TV mode DAYLIGHT SAVING TIME Select this feature and the TV VC...

Page 22: ...ving Time mode Press MENU button repeatedly until the TV VCR return to the TV mode TO CANCEL THE DAYLIGHT SAVING TIME Repeat steps 1 to 3 Then press CH or button until OFF appears and press MENU button to return to TV mode SETTING THE CLOCK AUTO MANUAL Set the clock accurately for proper automatic timer recording If the Public Broadcasting Station PBS is available in your area follow AUTO CLOCK SE...

Page 23: ...edly until ON appears 3 Enter the channel number for the PBS station Press MENU button Then press CH or button repeatedly until the channel number for your local PBS station appears If you do not know the PBS channel number remain on AUTO The TV VCR will automatically search all available channels for the local PBS station and will select that channel 4 Exit the Auto Clock Setting Press MENU butto...

Page 24: ...he correct local PBS station or set the clock manually and turn off the Auto Clock Setting Feature MANUAL CLOCK SETTING Make sure You must use the remote control for the following steps Power must be turned on In the example below the clock is to be set to DATE March 1st 1996 SETTING TIME 5 40PM 1 Select SETTING CLOCK Press MENU button repeatedly to point to SETTING CLOCK Then press SELECT button ...

Page 25: ...are not displayed they begin counting from 00 when you press MENU or SELECT button Use this feature to synchronize the clock with the correct time This unit has a built in calendar up to the year 2010 TO CHANGE CLOCK SETTING If you want to change the clock 1 Follow steps 1 and 3 2 Select a digit you want to change using SELECT button or ADD DELETE button 3 Enter correct numbers using CH or button ...

Page 26: ...FF In the Counter mode after 5 seconds only the counter remains To clear it press SELECT button In the Clock mode after 5 seconds only the clock and the channel number remain To clear them press SELECT button When the Closed Caption mode is ON The On Screen Display will disappear after 5 seconds This is true even if MUTE button is pressed or PAUSE STILL button is pressed while recording However th...

Page 27: ...WIND EJECT When the end of a tape is reached during recording playback or fast forwarding the tape will automatically rewind to the beginning power off and tape ejects This function is operative only when Repeat Play is set to the OFF position The tape will not auto rewind during timer recording or One Touch Recording When the tape is rewound to the preset memory position of the Counter Memory dur...

Page 28: ...Adjust the volume Press VOLUME or button to adjust the volume GAME MODE This function enables you to adjust the TV screen making it suitable for use with a TV GAME Make sure You must use the remote control unit for the following steps 1 Select USER S SET UP Press MENU button repeatedly to point to USER S SET UP Then press SELECT button 2 Set GAME MODE to ON Press CH or button repeatedly until ON a...

Page 29: ...TION 29 3 Exit the Game mode Press MENU button repeatedly until the TV VCR return to the TV mode TO CANCEL THE GAME MODE Repeat step 1 Then step 2 to select OFF Press MENU button repeatedly to return to TV mode ...

Page 30: ... will automatically set to OFF Make sure You must use the remote control unit for the following steps 1 Select PICTURE CONTROL Press MENU button repeatedly to point to PICTURE CONTROL Then press SELECT button 2 Select item you want to adjust Press SELECT button repeatedly until desired control is displayed Each time you press SELECT button BRIGHT CONTRAST COLOR TINT and SHARPNESS will appear on th...

Page 31: ...ditions which may cause captions errors are listed below a Automobile ignition noise b Electric motor brush noise c Weak snowy picture d Multiplex signal reception displaying picture ghosts or airplane flutter e Playback of poorly recorded or worn VCR tapes f If the TV VCR displays a black box on the TV screen this means that the TV VCR is set to the TEXT mode To clear screen select CAPTION1 CAPTI...

Page 32: ...N MODE IS ON The On Screen Display will disappear after 5 seconds This is true even if MUTE button is pressed or PAUSE STILL button is pressed while recording However On Screen Display will appear for 5 seconds when SELECT button is pressed ...

Page 33: ...rolled only by the buttons on the VCR When playing pre recorded tapes or tapes recorded on units other than your own noise lines black and white streaks may appear on the playback picture If this occurs you can adjust the tracking control manually by pressing CH or button until the streaks disappear To return to the DTR function stop the tape once and start playback again You can reduce the noise ...

Page 34: ... on the remote control The TV VCR will advance the tape for 30 seconds If commercials will continue press CM SKIP button again Each additional press will increase the skip time by 30 seconds It is up to 180 seconds 6 presses STILL PICTURE You can view a still picture on the screen during playback the Still mode Press PAUSE STILL button during playback Press PLAY button to return to playback NOTE I...

Page 35: ...U button repeatedly to point to USER S SET UP Then press SELECT button 2 Set RENTAL to ON Press MENU button to point to RENTAL Press CH or button repeatedly until ON appears 3 Exit the Rental setting Press MENU button repeatedly until the TV VCR returns to the TV mode 4 Start playback Press PLAY button to start playback RENTAL PLAY appears Once you select the Rental mode it stays in effect even af...

Page 36: ...SET UP Press MENU button repeatedly to point to USER S SET UP Then press SELECT button 2 Select ALL or BLANK Press MENU button repeatedly to point to REPEAT PLAY Press CH or button repeatedly until your desired selection ALL or BLANK appears 3 Exit the Repeat Play setting Press MENU button repeatedly until the TV VCR returns to the TV mode 4 Start Playback Press PLAY button to start the Repeat Pla...

Page 37: ... the tape to the beginning point at which you want to review 2 Reset the counter to 0 00 00 Pres COUNTER RESET button repeatedly 3 Select the Counter Memory mode Press COUNTER MEMORY button so that MEMORY appears on the TV VCR screen 4 Begin recording or playback Press REC or PLAY button Press STOP button when recording or playback is completed 5 To activate the Counter Memory Press REW or F FWD b...

Page 38: ...E SEARCH mode Press TIME SEARCH button OR Press MENU button repeatedly to point to TIME SEARCH Then press SELECT button 2 Enter your desired time Press CH or button repeatedly until your desired time appears Example 2 50 for 2 hours 50 minutes 3 Begin Time Search Press REW or F FWD button The tape will move to the specified point The time counts down as the searching progresses When 0 00 is reache...

Page 39: ...ex search can be set up to 20 This function is not operative in recording mode Counter Memory function is not operative in this mode You must use the remote control for this procedure Make sure Power must be turned on Insert a tape In the example below You are watching fourth program progrm number 4 and want to fast forward to seventh program program number 7 You must skip three programs 1 Select ...

Page 40: ...ry time an index signal is skipped the number in the program indicator decreases by one 4 After Index Search When the preset program is reached normal playback will start TO CANCEL THE INDEX SEARCH While setting Press MENU button While the Index Search is in progress Press STOP EJECT button on the TV VCR or the remote control This will end the Index Search ...

Page 41: ...d 1 Select the channel to be recorded Press number buttons on the remote control or the CHANNEL or button 2 Select the tape speed Press SPEED button to select the desired tape speed SP LP SLP 3 Begin recorded Press REC button The REC indicator flashes 4 Stop recording Press STOP button when recording is completed SKIPPING SOME MATERIALS DURING RECORDING Press PAUSE STILL button to temporarily stop...

Page 42: ...st be turned on Insert a cassette tape with its erase prevention tab in place If necessary rewind or fast forward the tape to the point at which you want to begin recording NOTE This function cannot be done by the remote control 1 Select the channel to be recorded Press number buttons on the remote control or the CH or button 2 Begin OTR Press REC OTR button on the TV VCR as many times as needed T...

Page 43: ...the SLP mode maximum recording time assuming the tape is started at the beginning is 8 hours using T 160 or 6 hours using T 120 If the tape runs out before the end time the TV VCR will switch to the Stop mode immediately eject the tape and the TV VCR power will be turned off ...

Page 44: ... record over into the TV VCR s cassette compartment 3 Press SPEED button to select the desired recording speed SP LP or SLP 4 Press CHANNEL or button repeatedly so that AUX appears on the screen 5 Begin playback of the tape in the Source Playing VCR 6 Press REC button on the TV VCR NOTE For best results during dubbing use the TV VCR s front panel controls whenever possible The remote control might...

Page 45: ...ast forward the tape to the point at which you want to begin recording Preset the tuner Avoid over lap of programs There is a case that a program will not be performed when programs overlap The program with the earliest start time has priority When the earliest program has finished and the programs which should start still overlap the recording will start in the order of the program number If you ...

Page 46: ...ng To record a TV program at the same time on the same channel every day Example Monday through Sunday Press CH down button repeatedly until EVERY DAY appears Press SELECT button For weekly recording To record a TV program at the same time on the same channel every week Example every Monday on channel 7 at 5 00PM Press CH down button repeatedly until EVERY and your desired day of the week appears ...

Page 47: ...H or button repeatedly until your desired minute appears Example 50 for 8 50PM Press SELECT button 8 Set the channel number Press CH or button repeatedly until your desired channel number appears Example CH61 Press SELECT button 9 Set the tape speed Press CH or button repeatedly until your desired tape speed appears Example LP Press SELECT button 10 Exit the program mode Press SELECT button Progra...

Page 48: ... select a program number you want to cancel 3 Press ADD DELETE button 4 Press MENU button to return to the TV mode While recording is in progress 1 Press POWER button 2 Press STOP EJECT button on the TV VCR If you press POWER button to turn off before the end time timer recording will continued Repeat steps 1 2 select a program number you want to cancel and press ADD DELETE button Press MENU butto...

Page 49: ...annel 26 To set another repeat steps 3 and 4 5 Exit the guide channel set up mode Press MENU button TO CORRECT CHANNEL NUMBERS While setting a user channel number press CH or button to select correct numbers After setting a user channel number 1 Follow steps 1 and 2 2 Select a guide channel number using SELECT or ADD DELETE button 3 Select correct user channel numbers using CH or button 4 Press ME...

Page 50: ...ing Avoid over lap of programs There is a case that a program will not be performed When programs overlap The program with the earliest start time has priority When the earliest program has finished and the programs which should start still overlap the recording will start in the order of the program number If you programmed as the illustration the timer recording would be carried out as follows s...

Page 51: ... date for the VCR plus code appears on the DATE line Press SELECT button For every day recording To record the TV program every day Press CH down button repeatedly until EVERY DAY appears Press SELECT button For weekly recording To record the TV program every week Press CH down button repeatedly until EVERY and your desired day of the week appears together Press SELECT button NOTE To confirm or ch...

Page 52: ...re the end time timer recording will continued Refer to After setting a program above to cancel it CHECKING START END TIME OF AUTOMATIC TIMER AND VCR PLUS TIMER RECORDINGS 1 Press POWER button so that the REC indicator goes off 2 Press MENU button to point to TIMER PROGRAMMING 3 Press SELECT button 4 Select a program number you want to check using CH or button The details of selected program appea...

Page 53: ...RN Press CH or button repeatedly until ON appears 3 Exit the auto return mode Press MENU button repeatedly to return to the TV mode 4 Auto Return will begin When all the timer recordings are completed the TV VCR will rewind to the beginning of the recorded program s NOTES If you press POWER button during rewinding a tape the Auto Return will be stopped The Counter Memory function does not operate ...

Page 54: ...button after a desired time period Press SLEEP button on the remote control repeatedly until your desired sleep time appears Each additional push will increase the on time by 30 minutes It is set up to 120 minutes TO CANCEL THE SLEEP TIMER Press SLEEP button repeatedly until SLEEP 0 MINUTE appears ...

Page 55: ...not possible The timer recording is set incorrectly Set the timer recording correctly The timer recording is not set to ON Set the timer recording to ON Cannot go into Record mode The erase prevention tab on cassette is missing Place transparent tape over missing erase prevention tab Playback picture is partially noisy The tracking control is not set correctly Adjust the Tracking control for bette...

Page 56: ...one of the captions were displayed information Broadcasters may at times use a time compression process to speed up the actual program so that additional advertising time can be given Since the decoder cannot read the compressed captions will be lost My prerecorded video tape does not show any captions The tape box it as being closed captioned The video tape was either an illegal copy or the tape ...

Page 57: ...ption is clear This does not mean that the recorded program has been erased Dirt accumulated on the video heads after long periods of tape playback or the usage of rental or worn tapes can cause this problem In this case video head cleaning requires highly technical attention therefore consult the nearest Authorized Service Center Clean heads only when problems occur SERVICING Should your TV VCR b...

Page 58: ... 15 27 32 H x 14 49 64 D 38 6cm W x 40 2cm H x 37 5cm D Weight 27 51 lbs 12 5 kg Accessories 1 remote control unit Part No UREMT36SR009 2 AA batteries 1 warranty card Part No 0EMN01146 1 user s card Part No 0EMN01170 Check your cable company s compatibility requirements For information about how to obtain these accessories please call TOLL FREE 1 800 448 2244 for your nearest Hitachi Authorized Pa...

Page 59: ...CABLE CHANNEL DESIGNATIONS pg 34 59 CABLE CHANNEL DESIGNATIONS pg 34 ...

Reviews: