Hisense LTDN42V77KMH User Manual Download Page 9

7

Making connections

Make sure that you only use the type of power source indicated on the 
marking label.
Always unplug the power cord when not using the TV for a long 
period of time.

Selecting a location

You should select a location for the TV:

Where direct light does 
That has indirect and soft lighting
Where the TV has access to an antenna or cable TV connection
Where the TV has access to a power outlet

Note:

may cause eye strain.

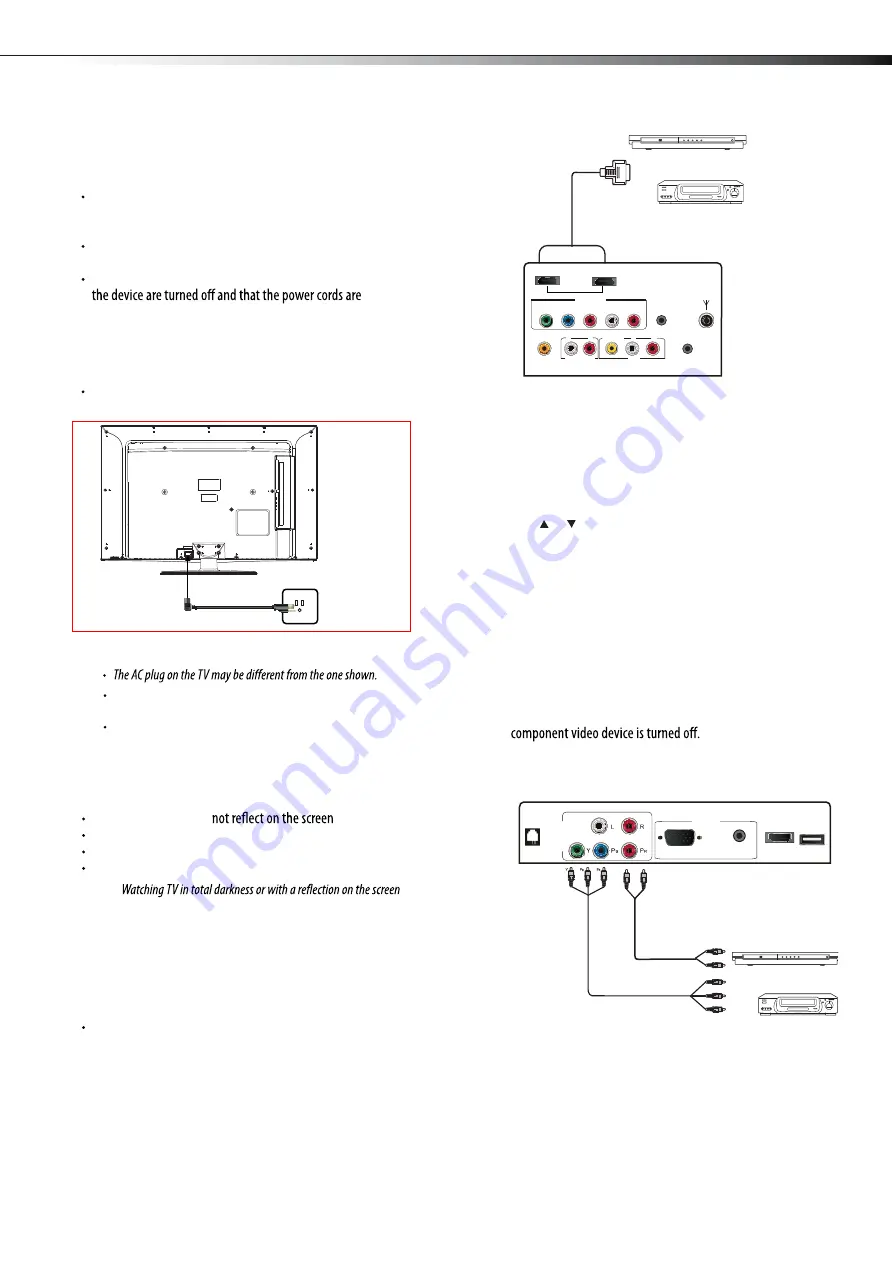
Connecting an HDMI device

Note: 

If your device has an HDMI connection, we recommend you use it to 

get the best picture and sound quality possible.

To connect an HDMI device:

Connect one end of an HDMI cable (not included) to the HDMI 1 
or HDMI 2 jack on Or HDMI3 on the side of your TV.

then connect the other end of the cable to the HDMI OUT jack on   


Note:

 To connect a DVI device, use a DVI to HDMI adapter cable to connect 

to the 

HDMI

 jack on the TV, then connect an audio cable to the 

PC  AUDIO 

jack on the back of the TV.

To play from the HDMI device:

1

Turn on the TV, then press 

INPUT

. The 

INPUT SOURCE

 menu 

opens.

2

Press   or   to select 

HDMI1

,

HDMI2

,

HDMI3

,  then press 

ENTER.

3

Turn on the HDMI device, then set it to the correct mode. Refer to 
the instructions that came with the HDMI device.

Connecting a component video device

Component cables often have red, green, and blue color-coded video 
connectors and red and white audio connectors. Match the colors when 
making connections.

To connect a component video device:

1

Make sure that your TV’s power cord is unplugged and the 

2

Connect a component video cable to the 

COMPONENT OUT

 jacks 

on the component video device.

3

Connect the other end of the component video cable to the 

COMPONENT

 jacks on the back/side of your TV.

4

Connect an audio cable to the 

AUDIO OUT

 jacks (L/R) on the 

component device.

5

Connect the other end of the audio cable to the 

COMPONENT


AUDIO-R 

and 

AUDIO-L

 jacks on the back/side of your TV.

Y  

B

R

L       

R

Component video device

C

o

mp

onent video 

cable

Audio c

a

b

le

Making connections

Before you make any connections:

Check the plugs on the ends of cables to make sure that they are 
the correct type before you try plugging them into jacks on the 
TV.
Make sure that all plugs are securely inserted into the jacks. 
Loose connections can result in image or color problems.
When connecting devices to the TV, make sure that the TV and 

unplugged.

Connecting the power

To connect the power cord:

Connect the power cable to the 

AC IN

 jack on the back of the TV, 

then connect the other end to a power outlet.

Notes:

HDMI device

HDMI cable

LTDN40V86MH

HDMI2

COMP 2

HEADPHONE

AUDIO OUT

VIDEO

L

R

L

R

AV

DIGITAL

AUDIO OUT

Y

P

B

P

R

L

R

HDMI1

SERVICE

ANT IN

HDMI3

COMP1

PC AUDIO

RJ12

PC

USB

VGA

the HDMI device.

POWER CORD INLET 

POWER CORD

Summary of Contents for LTDN42V77KMH

Page 1: ...ES Innovation for life MODEL NO LTDN42V77KMH HOSPITALITY LCD TELEVISION...

Page 2: ...ice Connecting an antenna cable TV or satellite TV box Connecting a VCR camcorder or game console Connecting a computer Connecting a home theater system Connecting headphones Understanding the basics...

Page 3: ...watching a program especially on a larger than life TV Make sure that you place or install the TV where it cannot be pushed pulled over or knocked down Make sure that you route all cords and cables so...

Page 4: ...remove any cover or expose the device to rain or moisture No user serviceable parts are Lightning For added protection for your device receiver during a lightning storm or when it is left unattended...

Page 5: ...new surroundings for about an hour before switchingiton ormakesurethattheroomtemperaturerisesgradually Condensation may also form duringthe summer if the TV is exposed to the breeze from an air condi...

Page 6: ...ucetheriskofhazards donotperformanyservicingother thanthatcontainedintheoperatinginstructionsunlessyouare To install a wall mount bracket 1 Lay your TV face down on a table or bench Make sure that you...

Page 7: ...CH VOL DMP CCD MTS SAP SLEEP SOUND EXIT TV 1 2 3 5 6 4 7 8 9 0 LAST PICTURE MUTE 1 2 VOL VOL Press to increase or decrease the volume CCD SOUND more information Press to select the sound mode You can...

Page 8: ...r with explanations in the on screen display OSD Follow the steps shown in the OSD TV Press to select the TV as the video input source Selectscreenmode INPUT Press to open the INPUT SOURCE menu then p...

Page 9: ...blue color coded video connectors and red and white audio connectors Match the colors when making connections To connect a component video device 1 Make sure that your TV s power cord is unplugged an...

Page 10: ...ressINPUT The INPUTSOURCE menu opens 2 Press or to select Video then press ENTER 3 Turn on the device then start playback on the device Connecting a computer To connect a computer 1 Make sure that you...

Page 11: ...on the TV The INPUTSOURCEmenu opens 2 Press or to highlight the video source you want then press ENTER Options include TV Video Component1 Component2 Selecting a channel Tip Ifyouareusingacableorsate...

Page 12: ...label if preset broadcast program name signal type audio information resolution and current program start and end times when watching a digital Analog signal information Displays channel number channe...

Page 13: ...English French or Spanish settings and daylight saving Adjust the clock used to synchronizing the image Set display time of Menu Lets you select certain programs to be blocked Lets you zoom in out pic...

Page 14: ...s you increase or decrease the contrast of the picture Increasethecontrasttoadjustthewhiteareasofthe picture or decrease the contrast to adjust the black areas of the picture Contrast Lets you increas...

Page 15: ...sfollow Step B If you want to block an unrated program turn on this function You can select all the ratings listed in the charts below Press or tohighlightanoption thenpress or toaccess theoption Pres...

Page 16: ...available channels Time Lets you set the exact time You can setup date time time zone and daylight saving Source Labels Lets you name input source Reset AV settings Change setting back to default pic...

Page 17: ...ssed If a setting is grayed the setting is not available in the current video input mode TV cabinet creaks When the TV is in use the temperature rises naturally and may cause the cabinet to expand or...

Page 18: ...ppareilnumeriquedelaclasseBestconformealanormeNMB 003 du Canada Standard Television Receiving Apparatus Appareil de r ception t l vision ordinaire Canada BETS 7 NTMR 7 HDMI trademarks or registered tr...

Page 19: ...TV picture defaults to Normal viewing mode Normal Audio OFF Installer can go to and adjust settings and Zoom Aspect is full screen User Save Lock FUNCTION Lock Allows installer to lock the following...

Page 20: ...e menu adjustment in menu Locks Installation menu adjustment in menu Locks DMP menu adjustment in menu Installation Lock DMP Lock V Chip Locks V Chip function in menu Hotel mute Hotel Channel Setting...

Page 21: ......

Reviews: