Hisense LTDN42V77KMH User Manual Download Page 17

15

Remote control

General

Note:

 If the problem is not solved by using these troubleshooting 

The picture has a few bright 
or dark spots.

A few bright or dark spots on an 
LCD screen is normal. It does not 

Good picture, but no 
sound.

Make sure that the sound is not 
muted.
Make sure that the sound mode is 
set to 

Stereo

 or 

Mono

. For more 

information, see “Selecting the 
audio mode” on page 12.

Audio noise.

Make sure that there is no 
interference with infrared 
equipment such as a cordless 
telephone or headphones. Move 
the infrared equipment away 
from the TV to eliminate the 
noise.

Problem

Solution

Remote control does not 
work.

Make sure that the TV power cord 
is plugged in.
Make sure that there are no 
obstructions between the remote 
control and the remote control 
sensor on the front of the TV.
Make sure that the batteries are 
installed correctly. For more 
information, see “Installing 
remote control batteries” on 
page 6.
Replace the batteries. For more 
information, see “Installing 
remote control batteries” on 
page 6.

Trouble programming your 
existing universal remote 
control.

See instructions and a table of 
common codes in “Programming 
a universal remote control to 
work with your TV” on page  7.
Codes are subject to change. For 
up to date codes, go to 
www.dynexproducts.com.
Replace the batteries. For more 
information, see “Installing 
remote control batteries” on 
page 6.
Refer to the User Guide that 
accompanied your universal 
remote control and contact the 
manufacturer if problems persist.

Problem

Solution

Problem

Solution

One or more channels do 
not display.

Make sure that the channels are 
not blocked. For more 
information, see “Setting parental 
controls” on page 13.

Password is lost.

Enter 

0532

 to access parental 

controls, then set a new 
password. For more information, 
see “Setting parental controls” on 
page 13.

Some settings cannot be 
accessed.

If a setting is grayed, the setting is 
not available in the current video 
input mode.

TV cabinet creaks.

When the TV is in use, the 
temperature rises naturally and 
may cause the cabinet to expand 
or contract which can cause a 
creaking noise. This is not a 
malfunction.

Control buttons on the TV 
do not work.

Disconnect the power cord, wait a 
few seconds, then reconnect the 
power cord and turn on the TV.
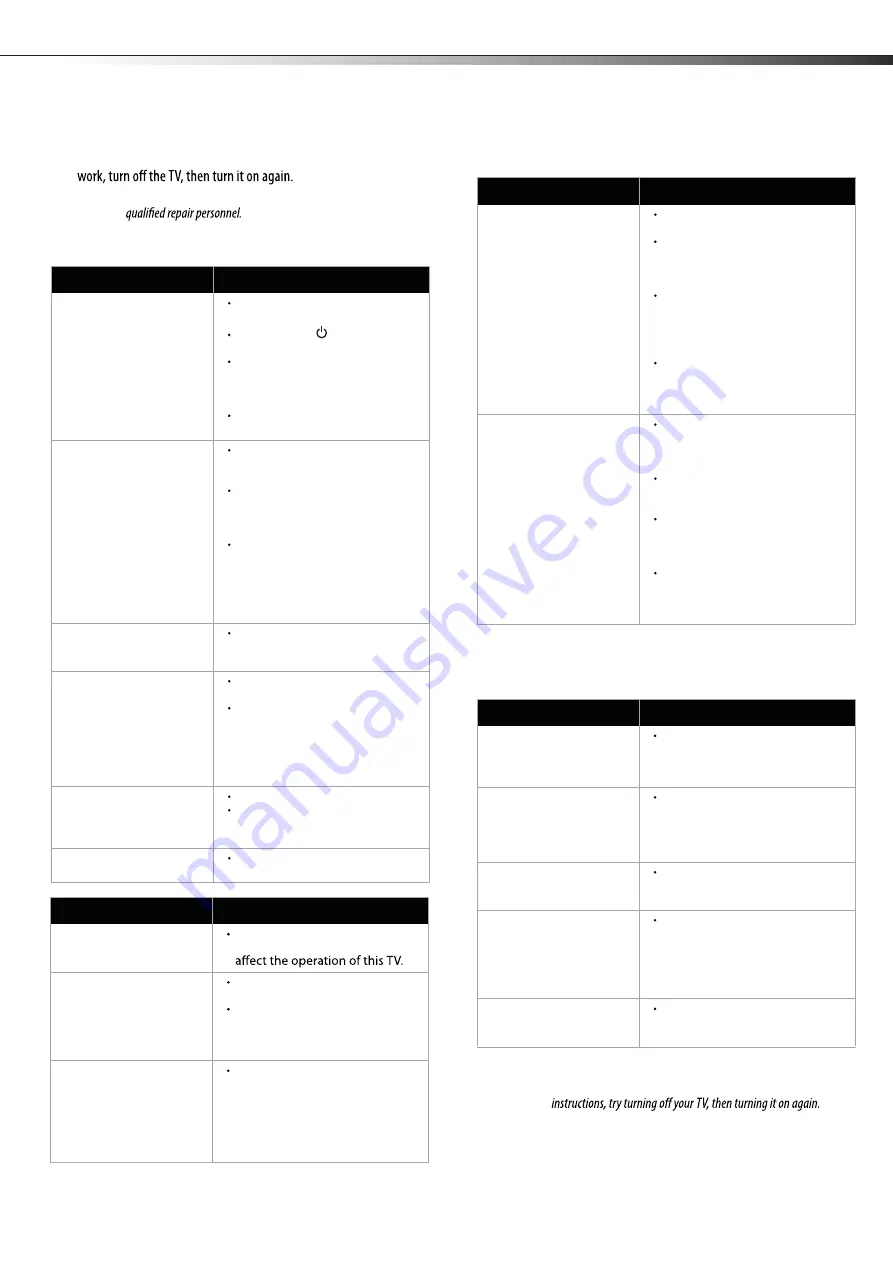
Troubleshooting

Before calling for service, check the following information for possible 
solutions to problems you may experience. If none of these solutions 

Caution:

 Do not try to repair the TV yourself. Refer all servicing to 

Video and audio

Problem

Solution

No picture (screen is not lit) 
and no sound.

Make sure that the power cord is 
plugged in.

Press 

POWER

 on the TV or the 

remote control.
Make sure that the correct video 
input source is selected. For more 
information, see “Selecting the 
video input source” on page 9.
Try another channel. The station 
may be experiencing problems.

Dark, poor, or no picture 
(screen is lit), but sound is 
good.

Adjust the brightness. For more 
information, see “To adjust the 
picture:” on page 12.
Make sure that the correct picture 
mode is selected. For more 
information, see “To adjust the 
picture:” on page 12.
Make sure that the antenna or 
cable TV is connected correctly 
and securely. For more 
information, see “Connecting an 
antenna, cable TV, or satellite TV 
box” on page 8.

No color, dark picture, or 
color is not correct.

Adjust the color saturation. For 
more information, see “Adjusting 
the picture” on page 12.

Only snow (noise) appears 
on the screen.

Try another channel. The station 
may be experiencing problems.
Make sure that the antenna or 
cable TV is connected correctly 
and securely. For more 
information, see “Connecting an 
antenna, cable TV, or satellite TV 
box” on page 8.

Dotted lines or stripes 
appear on the screen.

Adjust the antenna.
Move the TV away from noise 
sources such as cars, neon signs, 
or hair dryers.

Double images.

Try using a highly directional 
outdoor antenna or cable TV.

Troubleshooting

LTDN40V86MH

Summary of Contents for LTDN42V77KMH

Page 1: ...ES Innovation for life MODEL NO LTDN42V77KMH HOSPITALITY LCD TELEVISION...

Page 2: ...ice Connecting an antenna cable TV or satellite TV box Connecting a VCR camcorder or game console Connecting a computer Connecting a home theater system Connecting headphones Understanding the basics...

Page 3: ...watching a program especially on a larger than life TV Make sure that you place or install the TV where it cannot be pushed pulled over or knocked down Make sure that you route all cords and cables so...

Page 4: ...remove any cover or expose the device to rain or moisture No user serviceable parts are Lightning For added protection for your device receiver during a lightning storm or when it is left unattended...

Page 5: ...new surroundings for about an hour before switchingiton ormakesurethattheroomtemperaturerisesgradually Condensation may also form duringthe summer if the TV is exposed to the breeze from an air condi...

Page 6: ...ucetheriskofhazards donotperformanyservicingother thanthatcontainedintheoperatinginstructionsunlessyouare To install a wall mount bracket 1 Lay your TV face down on a table or bench Make sure that you...

Page 7: ...CH VOL DMP CCD MTS SAP SLEEP SOUND EXIT TV 1 2 3 5 6 4 7 8 9 0 LAST PICTURE MUTE 1 2 VOL VOL Press to increase or decrease the volume CCD SOUND more information Press to select the sound mode You can...

Page 8: ...r with explanations in the on screen display OSD Follow the steps shown in the OSD TV Press to select the TV as the video input source Selectscreenmode INPUT Press to open the INPUT SOURCE menu then p...

Page 9: ...blue color coded video connectors and red and white audio connectors Match the colors when making connections To connect a component video device 1 Make sure that your TV s power cord is unplugged an...

Page 10: ...ressINPUT The INPUTSOURCE menu opens 2 Press or to select Video then press ENTER 3 Turn on the device then start playback on the device Connecting a computer To connect a computer 1 Make sure that you...

Page 11: ...on the TV The INPUTSOURCEmenu opens 2 Press or to highlight the video source you want then press ENTER Options include TV Video Component1 Component2 Selecting a channel Tip Ifyouareusingacableorsate...

Page 12: ...label if preset broadcast program name signal type audio information resolution and current program start and end times when watching a digital Analog signal information Displays channel number channe...

Page 13: ...English French or Spanish settings and daylight saving Adjust the clock used to synchronizing the image Set display time of Menu Lets you select certain programs to be blocked Lets you zoom in out pic...

Page 14: ...s you increase or decrease the contrast of the picture Increasethecontrasttoadjustthewhiteareasofthe picture or decrease the contrast to adjust the black areas of the picture Contrast Lets you increas...

Page 15: ...sfollow Step B If you want to block an unrated program turn on this function You can select all the ratings listed in the charts below Press or tohighlightanoption thenpress or toaccess theoption Pres...

Page 16: ...available channels Time Lets you set the exact time You can setup date time time zone and daylight saving Source Labels Lets you name input source Reset AV settings Change setting back to default pic...

Page 17: ...ssed If a setting is grayed the setting is not available in the current video input mode TV cabinet creaks When the TV is in use the temperature rises naturally and may cause the cabinet to expand or...

Page 18: ...ppareilnumeriquedelaclasseBestconformealanormeNMB 003 du Canada Standard Television Receiving Apparatus Appareil de r ception t l vision ordinaire Canada BETS 7 NTMR 7 HDMI trademarks or registered tr...

Page 19: ...TV picture defaults to Normal viewing mode Normal Audio OFF Installer can go to and adjust settings and Zoom Aspect is full screen User Save Lock FUNCTION Lock Allows installer to lock the following...

Page 20: ...e menu adjustment in menu Locks Installation menu adjustment in menu Locks DMP menu adjustment in menu Installation Lock DMP Lock V Chip Locks V Chip function in menu Hotel mute Hotel Channel Setting...

Page 21: ......

Reviews: