background image

13

Operation

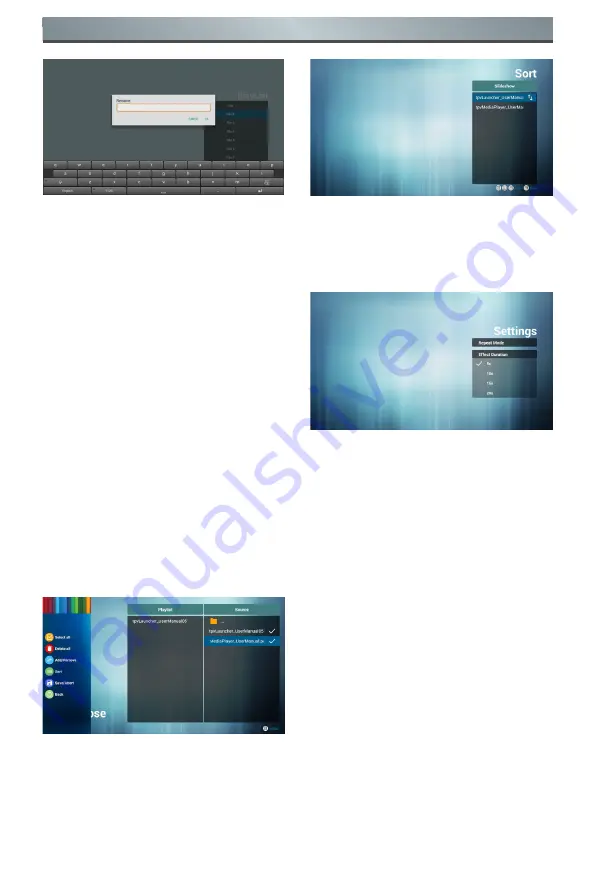
7.  Once you start to edit a playlist, you 

will see below screen.

Source - files in storage. 
Playlist – files in playlist.

There are 4 icons which map to the 

keys of remote controller.  

Option key – launch slide bar.

Play key – play media file. 

Info key – show media info. 

OK key – select/unselect file.


7-1. In the slide bar, it helps you to 

do the followings:
- S

elect all: select all storage files.

- D

elete all: delete all playlist files.

- Add/Remove: update playlist from 

source.
- Sort: sort playlist.
- Save/Abort: save or abort the 

playlist.
- Back: return.

8.  If you choose “Sort” in the slidebar, 

you can change the order of files one 

by one.

9.  Select “Settings” on home page, this 

page has two parts, “Repeat Mode” 

and “Effect Duration”.
Repeat Mode: play mode.
Effect Duration: photo effect duration.

Summary of Contents for 65B4E30T

Page 1: ...English Read the manual carefully and ensure you have fully understood its contents before operating this device for the first time ...

Page 2: ......

Page 3: ...ctronic equipment collection To determine the locations for dropping off such waste electrical and electronic equipment contact your local government office the waste disposal organization that serves your household or the store at which you purchased the product End of Life Directives Recycling Your new Public Information Display contains several materials that can be recycled for new users Pleas...

Page 4: ...isture If turning off the display by detaching the power cable wait for 6 seconds before re attaching the power cable for normal operation To avoid the risk of shock or permanent damage to the set do not expose the display to rain or excessive moisture When positioning the display make sure the power plug and outlet are easily accessible IMPORTANT Always activate a screen saver program during your...

Page 5: ...qualified service personnel Servicing is required when the apparatus has been damaged in any way such as power supply cord or plug is damaged liquid has been spilled or objects have fallen into the apparatus the apparatus has been exposed to rain or moisture does not operate normally or has been dropped 15 The batteries batteries installed shall not be exposed to excessive heat such as sunshine fi...

Page 6: ...ng television set is being retained or relocated the same considerations as above should be applied This equipment is compliant with Class A of EN55032 CISPR 32 In a residential environment this equipment may cause radio interference CAUTION These servicing instructions are for use by qualified service personnel only To reduce the risk of electric shock do not perform any servicing other than that...

Page 7: ...rference when the equipment is operated in a commercial environment This equipment generates uses and can radiate radio frequency energy and if not installed and used in accordance with the instruction manual may cause harmful interference to radio communications Operation of this equipment in a residential area is likely to cause harmful interference in which case the user will be required to cor...

Page 8: ...l Equipment DVD VCR VCD 8 3 2 Connecting a PC 8 3 3 Connect USB 9 4 Operation 10 4 1 Media Player Introduction 10 4 2 PDF Reader Play 12 4 3 U player Autoplay Instructions 14 4 4 U Disk Files Playback and Copy Instructions 15 4 5 App Customization 15 5 OSD Menu 16 5 1 Navigating the OSD Menu 16 5 2 Operation on the OSD Menu 17 6 Compatibility of the USB Device 22 7 Input Mode 25 8 Cleaning and Tro...

Page 9: ...ng items with your package content LCD Display User Manual Remote Control with AAA Batteries Power Cord HDMI Cable The supplied power cord varies depending on destination Power Cord Remote Control and AAA Batteries HDMI Cable User Manual OK VOL CH RETURN HELP INFO OPTION SOURCE SET FORMAT FUNCTION Items may differ in different locations Display design and accessories may differ from the images sho...

Page 10: ...btain a standard wall mounting kit commercially available We recommend using a mounting interface that complies with TUV GS and or UL1678 standard in North America Protective Sheet VESA Grid Table 1 Lay a protective sheet on a table which was wrapped around the monitor when it was packaged beneath the screen surface so as not to scratch the screen face 2 Ensure you have all accessories for mountin...

Page 11: ...refer to the guide received with the respective bracket To lessen the probability of injury and damage resulting from fall of the monitor in case of earthquake or other natural disasters be sure to consult the bracket manufacturer for installation location Ventilation Requirements for enclosure locating To allow heat to disperse leave space between surrounding objects as shown in the diagram below...

Page 12: ... is off Move to the right item or Increase the adjustment while OSD menu is on 5 button Decrease the volume of the audio when OSD menu is off Move to the left item or decrease the adjustment while OSD menu is on 6 button Move the highlight bar up to adjust the selected item while OSD menu is on 7 button Move the highlight bar down to adjust the selected item while OSD menu is on 8 MENU button Ente...

Page 13: ...input from the wall outlet 2 MAIN POWER SWITCH Switch the main power on off 3 AUDIO IN Audio input for VGA source 3 5mm stereo phone 4 AUDIO OUT Audio output for external AV device 5 LAN Internet function 6 D SUB VGA IN VGA video input 7 HDMI2 IN 8 HDMI1 IN Connect to a source device via an HDMI cable 9 RS232 Receive command signals from the external RS232 device 10 USB PORT Connect to a USB stora...

Page 14: ...ME button Go to Android Launcher first widgets 8 FUNCTION button Reserved 9 COLOR buttons Reserved 10 Source Button Choose input source 11 Settings Button Access the OSD menu 12 NAVIGATION buttons Up down left and right operation key 13 OK button Confirm an entry or selection 14 INFO button Show Information OSD 15 OPTIONS button Access currently available options for Media Input PDF Player 16 VOLU...

Page 15: ... may cause injury to your skin NOTE Remove the batteries from the battery compartment when not using for an extended period of time 2 3 3 Handling the Remote Control Do not drop or apply shock to the remote control Do not allow any liquid to get inside the remote control If water has entered the remote control wipe the remote control with a dry cloth immediately Do not place the remote control nea...

Page 16: ...1 Using HDMI Video Input RS232 HDMI 1 HDMI 2 DVD VCR VCD HDMI OUT HDMI IN 3 2 Connecting a PC 3 2 1 Using HDMI Input RS232 HDMI 1 HDMI 2 PC HDMI OUT HDMI IN 3 2 2 Using VGA Input PC LAN LINE IN HEADPHONE RS232 HDMI 1 HDMI 2 D SUB LAN AUDIO IN RS232 HDMI 1 HDMI 2 D SUB AUDIO OUT VGA IN VGA AUDIO IN VGA OUT AUDIO OUT ...

Page 17: ... HEADPHONE RS232 HDMI 1 HDMI 2 D SUB RS232 RS232 3 2 4 Using Network Interface INTERNET WiFi LAN LAN LINE IN HEADPHONE or 3 2 5 Connecting an External Audio Device HDMI 2 LAN AUDIO RS232 HDMI 1 HDMI 2 D SUB AUDIO OUT AUDIO OUT 3 3 Connect USB USB 2 0 5 0V 500mA USB 3 0 5 0V 900mA ...

Page 18: ...on empty 3 Select the Compose on the home page and you should first select a playlist to edit between File 1 and File 7 The pencil icon represents the play list is non empty 4 If you select the empty playlist the application will guide you to choose media sources All media files should be located in the root directory For example Video at root movies Photos root pictures Music root music 5 You can...

Page 19: ...rt playlists Save Abort save or abort the playlist Back return 8 If you are in a scroll bar and select Sort you can change the order of files one by one 9 In choosing the desired file information and press button you can get detailed information 10 In choosing the desired file and pressing the play button you can directly play media files 11 If you make a playlist containing all of the image files...

Page 20: ...n empty 3 Select Compose on home page first you should choose one playlist to edit from File 1 and File 7 The pencil icon means the playlist is non empty 4 If an empty playlist is chosen the app will guide you to select the media source All media files should be placed in root directory For example pdfs in root pdf 5 You could edit or delete a non empty playlist just choose the desired playlist wh...

Page 21: ... unselect file 7 1 In the slide bar it helps you to do the followings Select all select all storage files Delete all delete all playlist files Add Remove update playlist from source Sort sort playlist Save Abort save or abort the playlist Back return 8 If you choose Sort in the slidebar you can change the order of files one by one 9 Select Settings on home page this page has two parts Repeat Mode ...

Page 22: ...he USB port on the display 4 Press the remote control setting button to enter the OSD menu 5 Press right button to select advanced options 6 Press down button to select UPlayer setting press OK to enter UPlayer setting 7 Press left right button to switch on or off 8 Repeat time to set how long to play a picture it does not affect video playback The video playback will play the next program after t...

Page 23: ...n to open directly Press OPTIONS button to pop up the option menu 6 Users can choose to play copy or move etc for example if you want to copy a file to the internal storage Movies folder select copy and it will pop up Destination 7 After selecting the directory to copy to press the left right buttons on the remote control to select Paste or Cancel as shown below 8 Press the OK button to complete t...

Page 24: ...e submenu 4 In the submenu press or button to toggle between items press or button to adjust the settings If there is a submenu press OK button to enter the submenu 5 Press button to return to the previous menu 5 1 2 Navigating the OSD Menu Using the Display s Control Buttons 1 Press MENU button to display the OSD menu 2 Press or button to select the item to adjust 3 Press MENU button to enter the...

Page 25: ...ize Black Level 0 100 Brightness 0 100 Contrast 0 100 Dynamic Brightness On Off Available only in the HDMI1 2 Source Advanced VGA Auto Adjust Horizontal 0 100 Vertical 0 100 Clock 0 100 Phase 0 100 Eyes Protect Mode On Off Color temp Standard Cool Warm Over scan On Off Available when PC mode Video RGB Range Auto Full Range Limited Range PC Mode PC Video Auto You can use this function to change the...

Page 26: ... On Step 1 Lock the remote control button and mouse operation functions after 5s if there is no operation Step 2 After the functions are locked press the Set button on the remote control for 5 seconds and then enter the correct password in the password dialog box to unlock the functions Step 3 Repeat step 1 after operation Or press the Set button on the remote control to turn off lock function tho...

Page 27: ... Set the time Source VGA HDMI1 HDMI2 OPS home PDF Media CMS Customer Last Source File Number 1 7 It depends on the source MEDIA PDF Sleep Time Off 10min 20min 3 0min 60min 90min 120min 180min 24 0min Auto Sleep Off 5S 10S 30S 60S Time Sync Network Time Off Time Zone London Calcutta Harare Karachi Brazzaville Beirut Jerusalem Tehran Baghdad Ulaanbaatar Damascus Sydney Paris Rome London Dubai Tokyo ...

Page 28: ... source set in the Boot On Source 2 If the source is set in USB the booting page is the U disc homepage Play List Play list 1 7 1 Play List is grayed 2 When the Boot On Source is PDF or Media Player Play List is available Boot Wake UART Wake On Off When UART wake On RC off or power saving can either be waken up by UART wake HDMI VGA Wake On Off When HDMI Wake On and the current source is HDMI1 2 p...

Page 29: ...er when booting the priority is higher than the source specified by the schedule boot Repeat Time 8S 16S 24S 32S Supported file type 1 Photo png jpg 2 Video dat vob ts mkv mov 3gp flv webm wmv asf mp4 avi mpg Restore Restore Default Cancel OK System Reset NOTES To wake up PD in the HDMI source you can set HDMI wakeup On This product supports timed shutdown and timed startup functions Refer to the ...

Page 30: ... Max bit rate 80Mbps Audio coder decoder MP2 MP3 MPEG 4 MPEG4 File format MKV MP4 3GP V Supported picture size in a range From 48x48 pixels 1920x1080 pixels Max frame rate 30fps Max bit rate 38 4Mbps Audio coder decoder MP2 MP3 AAC 1 MS MPEG4 v1 v2 v3 is not supported 2 GMC global movement compensation is not supported H 263 H 263 File format 3GP MP4 V Supported picture size SQCIF 128x96 QCIF 176x...

Page 31: ...ps Max bit rate 45Mbps Audio coder decoder MP2 MP3 AAC WMA Audio decoding Type Audio coder decoder Container Decoding Coding Channel Remarks MPEG audio MPEG1 2 2 5 Audio Layer1 2 3 Decode MP1 MP2 MP3 V 2 Bit rate 8Kbps 320Kbps CBR and VBR Sampling rate 8KHz 48KHz Windows Media Audio WMA version 4 4 1 7 8 9 wmapro Decode WMA V 2 Bit rate 8Kbps 320Kbps Sampling rate 8KHz 48KHz Do not support WMA Pro...

Page 32: ... Adobe RGB JPEG BMP BMP File format BMP V Supported max picture size 4096x4096 pixels GIF GIF File format GIF V No limit in resolution ratio PNG PNG File format PNG V No limit in resolution ratio NOTES If the standard bite rate frame rate of the contents is higher than the compatible frames second listed in the above table audio or video may not work Video contents with a bit rate or frame rate hi...

Page 33: ...60 Hz 594 MHz 16 9 3840 x 2160 P 30 Hz 3840 2160 30 Hz 297 MHz 16 9 3840 x 2160 P 25 Hz 3840 2160 25 Hz 297 MHz 16 9 3840 x 2160 P 24 Hz 3840 2160 24 Hz 297 MHz 16 9 1080 P 59 94 60 Hz 1920 1080 60 Hz 148 5 MHz 16 9 1080 P 50 Hz 1920 1080 50 Hz 148 5 MHz 16 9 1080 P 29 97 30 Hz 1920 1080 30 Hz 74 25 MHz 16 9 1080 P 25 Hz 1920 1080 25 Hz 74 25 MHz 16 9 1080 P 23 97 24 Hz 1920 1080 24 Hz 74 25 MHz 1...

Page 34: ...75 Hz 31 5 MHz WVGA 720 400 70 Hz 28 32 MHz 4 3 SVGA 800 600 60 Hz 40 MHz 4 3 XGA 1024 768 60 Hz 65 MHz 4 3 WXGA 1152 870 75 Hz 100 MHz 4 3 WXGA 1280 720 60 Hz 74 5 MHz 5 3 SXGA 1280 1024 60 Hz 108 MHz 5 4 UXGA 1600 900 60 Hz 108 MHz 4 3 UXGA 1680 1050 60 Hz 146 25 MHz 16 10 HD1080 1920 1080 60 Hz 148 5 MHz 16 9 WXGA 1366 768 60 Hz 85 75 MHz 16 9 ...

Page 35: ...r a soft lint free cloth If the surface becomes dirty soak a soft lint free cloth in a mild detergent solution Wring the cloth to remove excess liquid Wipe the surface of the display to remove dirt Then use a dry cloth of the same type to dry Do not scratch or hit the surface of the panel with fingers or hard objects of any kind Do not use volatile substances such as insert sprays solvents and thi...

Page 36: ... to the back of the display Picture is distorted with abnormal patterns 1 The signal cable is not connected properly 2 The input signal is beyond the capabilities of the display 1 Make sure that the signal cable is attached firmly 2 Check the video signal source to see if it is beyond the range of the display Please verify its specifications with this display s specification section Can hear sound...

Page 37: ...y not display This is not a malfunction After Images can still be seen on the display after the display is powered off Examples of still pictures include logos video games computer images and images displayed in 4 3 normal mode A still picture is displayed for an over extended period of time Do not allow a still image to be displayed for an extended period of time as this can cause a permanent aft...

Page 38: ...Internal memory 8GB eMMC Power 100 240V 50 60Hz 4A Power Consumption Max 280 W Power Consumption Typ 170 W Power Consumption Standby Off 0 5 W Dimensions Without Stand W x H x D 1459 x 835 x 82 mm Environmental Condition Item Specifications Temperature Operational 5 40 C Storage 20 60 C Humidity Operational 20 80 RH No condensation Storage 10 90 RH No condensation Altitude Operational 0 3 000 m St...

Page 39: ...2019 All rights reserved Specifications are subject to change without notice Q41G65M166101B ...

Reviews: