background image

16

Basic Features

1. Make sure that you have: 

Installed the remote control batteries.

Connected an antenna or cable.

Connected the power cord.

Matched the remote control with TV.

2. Press [POWER  ] button to turn on your TV. 

3. The

Setup Wizard

 menu displays. Follow Step 1 through 

10 in the Setup Wizard menu procedure.

IMPORTANT: At first, you have to match the remote 
control with TV.

To turn your TV on or off (standby mode):

1. Plug the power cord into an AC power outlet.

2. Press [POWER] button, your TV turns on. 

3. Press [POWER] button again to turn off your TV. When 

you turn off your TV, it goes into standby mode.

The Setup Wizard menu appears the first time you turn 
on the TV. It will assist you to specify the menu language, 
Picture Mode, Tuner Mode and Channel Installation.

IMPORTANT: Make sure that the antenna or cable is 
connected and a wired or wireless Internet connection is 
available.

Turning the TV On for the First Time

Turning the TV on or off

WARNING

When your TV is in standby mode, it is still receiving 
power. To completely disconnect power, unplug the power 
cord.

1. Press the [CH 

V

/ V ] button on the TV/remote control to 

change the channel.

2. Press the [VOL + / - ] button on the TV/remote control to 

adjust the volume.

3. Press the numeric buttons on the remote control to 

display the corresponding channels.

Changing Channels / Volume

NOTE

Changing the channels can also be achieved by directly 
entering the channel number using the numeric keys on 
the remote control. If you are entering a two or three digit 
channel number, the time between key presses should be 
less than 3 seconds.

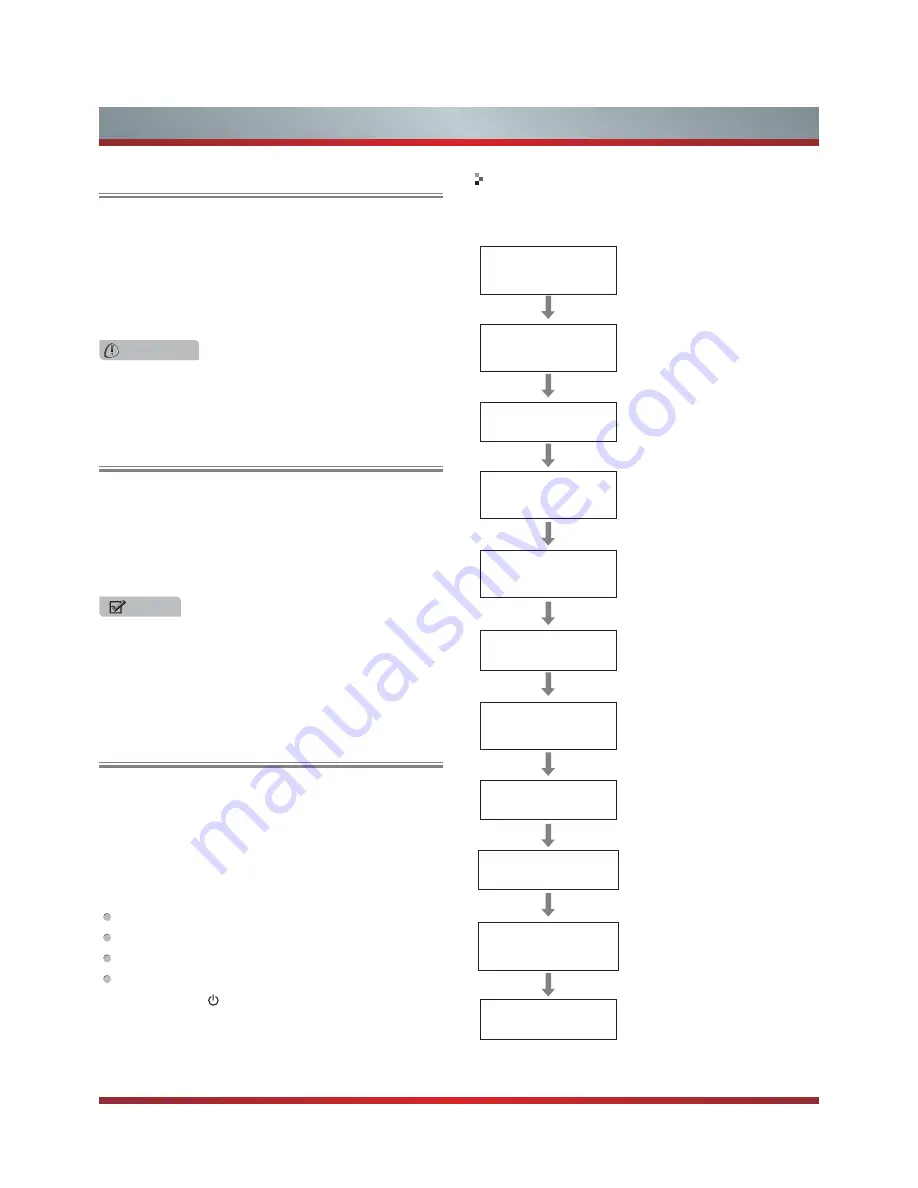
Follow the on-screen instructions to customize your TV 
settings according to your preferences.

Pairing the remote control

Step 1

Step 2

Step 3

Step 4

Step 5

Step 6

Step 7

Step 8

Step 9

Step 10

Selecting Home or Store.

Selecting menu language.

Hisense legal information

Connecting to the Internet to 
Ethernet cable or wireless.

Signing in with your Google 
Account

Check the box to send the 
usage statistics and crash 
reports to Google automatically.

Enter ZIP code so that you 
receive accurate programming 
information.

Select the video input you use 
to connect your TV service to 
your TV.

Select your Audio amplifier 
manufacturer. To control your 
receiver, connect the IR blaster.

The initial settings are 
completed.

Pairing remote 

controller

Select usage 

patterns

Select menu 

language

Legal notice

Connect to the 

Internet

Google Account

Help make 

Google TV better

Enter ZIP code

Set up TV service

Set up Audio 

Receiver control

That’s it!

Setup Wizard

Summary of Contents for 42K611W

Page 1: ...42K611W ᯏਭφ ᶗᖘ ᇐփṼ PP ES G ...

Page 2: ...ipment does cause harmful interference to radio or television reception which can be determined by turning the equipment off and on the user is encouraged to try to correct the interference by one or more of the following measures Reorient or relocate the receiving antenna Increase the separation between the equipment and the receiver Connect the equipment into an outlet on a circuit different fro...

Page 3: ...II ...

Page 4: ...tlets and extension cords as this can result in a risk of fire or electric shock 18 Do not push objects through any openings in this unit as they may touch dangerous voltage points or short out parts that could result in fire or electric shock Never spill or spray any type of liquid into the unit 19 If an outside antenna or cable system is connected to the unit be sure the antenna or cable system ...

Page 5: ... a malfunction Do not install the LCD Panel near electronic equipment that produces electromagnetic waves Some equipment placed too near this unit may cause interference Effect on infrared devices There may be interference while using infrared devices such as infrared cordless headphones Declaration of Conformity This device complies with part 15 of the FCC Rules Operation is subject to the follow...

Page 6: ...airing the Remote 8 Installing Batteries in the Remote Control 9 Making Connections 9 Basic Features Turning the TV on or off 16 Changing Channels Volume 16 Turning the TV On for the First Time 16 Accessing Home Menu 17 Home Menu Options 18 Settings Accessing the Main Menu 19 Setting up channels 20 Network 20 DLNA Settings 21 Media Share Settings in Computer 21 Adjusting aspect ratio 22 Selecting ...

Page 7: ...ly Applications Google Account 24 Google Chrome 24 Play Store 25 Search 26 TV Movies 26 HiMedia 27 Digital Media Receiver 28 Network Function 28 Netflix 29 YouTube 29 Network Apps Service Information 30 Other Information Trouble Shooting 31 General 33 ...

Page 8: ...llustrations below to complete the installation steps 1 Secure the stand column to the base plate with the 4 screws M4 12mm provided See Figure 1 2 Secure the stand cover to the stand column vertically with the 2 screws M4 12mm provided See Figure 2 3 Secure the stand cover to the stand column horizontally with the 2 screws ST4 14mm provided See Figure 3 WARNING Be sure to disconnect the AC power ...

Page 9: ...l installer or service technician for assistance The manufacturer is not responsible for any damages or injuries that occur due to mishandling or incorrect assembly The selected screws are 9 5 11 mm in length when measured from the attaching surface of the TV s rear cover The diameter and length of the screws differ depending on the Wall Mount Bracket model 2 Place the provided spacers in the corr...

Page 10: ...as shown below Avoid operating the TV at temperatures below Inadequate air 41 F 5 C Leave at least this much space around the set Leave at least this much space around the set 4 inches 10cm 4 inches 10cm 4 inches 10cm 4 inches 10cm 4 inches 10cm 2 3 8 inches 6cm 12 inches 30cm 12 inches 30cm Wall Wall Air circulation is blocked Inadequate air circulation can lead to overheating of the TV and PD FD...

Page 11: ...nu to setup your TV s features OK Confirm selections VOL VOL Adjust the volume Navigation Buttons ޕ ޔ Select the channel Navigation Buttons Power button Turn on the TV or put the TV in standby mode Caution The TV continues to receive power even in standby mode Unplug the power cord to disconnect power NOTES FOR ILLUSTRATION ONLY Powering up or down the TV requires several seconds of processing tim...

Page 12: ... History application Display the home screen long press to open task switcher Launch the PIP function to allow you to display the TV screen in an inset window For details to see the following SDUW RI WKLV VSHFL FDWLRQ 79 8VLQJ 3 3 Voice search Touch pad with mouse cursor and click Displays special options associated with each feature Keys at the front of the remote control The LED on the remote co...

Page 13: ...nually pair the devices by following the steps below Functions keys printed in orange are accessed by pressing the Fn Function key Launch Google Chrome Launch the Quick Search 1 Press POWER button your TV turns on 2 Press and hold the red color A and OK remote control buttons simultaneously for 3 seconds 3 When the green LED lights release the buttons and wait for the TV to pair with the remote 7K...

Page 14: ...ayer Digital Set Top Box or other A V devices with component YPBPR video and audio output jacks VIDEO AUDIO L R Connect to the composite video and audio L R output jacks on external video devices VGA PC DVI AUDIO IN Connect to a PC or other devices with a VGA interface HEADPHONE Connect headphone or analog sound system using RCA Y cable 1 8 stereo mini to L R phono not provided DIGITAL AUDIO OUT C...

Page 15: ...OUT jack on the antenna cable or cable satellite box If you are using an antenna with twin lead cable you may need a 300 75 ohm adapter not provided to connect it to the back of your TV Likewise if you are using several antennas you may need a combiner not provided 3 Connect the other end of the cable to the ANT CABLE IN jack on the side of your TV 1 Use the audio and video cables to connect the e...

Page 16: ...Cable Support digital connections between HDMI enabled AV devices such as PVR DVD Blu Ray AV receiver and digital devices Some devices such as PVR or DVD player require HDMI signal to be set to output in the device s settings Please consult your device user manual for instructions 1 Use an HDMI cable to connect the A V device s HDMI output jack to the TV s HDMI jack 2 Plug the connected devices in...

Page 17: ...CA Y cable 1 8 stereo mini to L R phono not provided to connect analog sound system to the TV s HEADPHONE jack 2 Plug the connected devices into the mains socket before switching on the TV 3 Select the corresponding source from the TV NOTES When a digital audio system is connected to the DIGITAL AUDIO OUT jack decrease the volume of both the TV and the system 5 1 CH channel audio is available when...

Page 18: ...t DHCP automatically provide the IP address subnet mask gateway and DNS so you don t have to enter them manually Most home networks are Dynamic Networks Some networks require a Static IP address If your network requires a Static IP address you must enter the IP address subnet mask gateway and DNS values manually on your TV s Cable Setup Screen when you set up the network connection To get the IP a...

Page 19: ...Point AP Hisense TVs will not support a connection in compliance with new Wi Fi certification specifications If your AP supports WPS Wi Fi Protected Setup you can connect to the network via PBC Push Button Configuration or PIN Personal Identification Number WPS will automatically configure the SSID and WPA key in either mode Connection Methods You can setup the wireless network connection three wa...

Page 20: ...plifier 1 Connect an IR Blaster to the TV and place it properly on the AV receiver 2 Enter Settings Local settings AV Receiver setting 3 Then you can set the IR Blaster to control your AV Receiver The details will show on the options below NOTE Two or more video input devices or two or more audio amplifiers AVRs cannot be controlled simultaneously with IR Blaster If you want to control a video inp...

Page 21: ...n on the TV remote control to adjust the volume 3 Press the numeric buttons on the remote control to display the corresponding channels Changing Channels Volume NOTE Changing the channels can also be achieved by directly entering the channel number using the numeric keys on the remote control If you are entering a two or three digit channel number the time between key presses should be less than 3...

Page 22: ...his manual Settings Weather Display the weather information of the currently set city and select it to see the details Time Display the current time information and click to enter Settings Date time location Network State Display the network connection and click to enter Settings Network Live TV Display the contents of Live TV Click the window or press the Live TV key on the remote control to watc...

Page 23: ...e Menu Options 1 Press MENU button when the Home screen is displayed 2 Select Customize home items To replace applications Select the item you want to replace Select Replace Select the item you want to add instead Select done Customize home items To remove an item widget from the Home menu Select the item widget you want to remove Select Remove from Home Select done To add items to the Home menu S...

Page 24: ...layed Item Description Network Manage internet connection Picture Adjust the Picture Sound Adjust the Sound Channel Set up and edit channels Video input Set up TV service provider Search Manage searchable items clear shortcuts Applications Manage applications and development options Language input devices Manage system language input devices IP remotes Accounts sync Manage accounts and data sync P...

Page 25: ... LAN as described in the previous section 2 Press Home button to access the Home menu 3 Go to Settings Network Ethernet 4 Set IP settings to Dynamic Auto acquires and enters the needed Internet values automatically 5 When done select Status to check the Internet connectivity If the Network Function has not acquired the network connection values go to the directions for Manual Use the Automatic Net...

Page 26: ...DMP Digital Media Player device to enjoy movies pictures music and other multimedia materials in your computer through DLNA connection DLNA Setting needs to be set on TV and computer Respectively 1 To use DLNA to enjoy movies pictures music you have to connect the TV into a network first 2 For more information on how to configure your network refer to Network You are recommended to locate both the...

Page 27: ...the TV screen When watching a 16 9 widescreen program or movie the display image fills the TV screen Cinema Stretch the 4 3 aspect ratio image vertically and horizontally to fill the screen at 1 2 35 aspect ratio 1 1 Pixel Map Displays the native signal format pixel by pixel without any video processing or scaling In this mode 1920 x 1080 resolution sources fill the screen while all other resoluti...

Page 28: ...H Ÿ ź EXWWRQV WR VHOHFW RQH RI WKH GHYLFHV DQG press OK button Edit the device name so that you can easily identify a device connected to each input source 1 Press Home button to access the Home menu 2 Go to Settings Channel Select Device 3 You can also access the input source by selecting Input button 4 3UHVV WKH Ÿ ź EXWWRQV WR VHOHFW RQH RI WKH GHYLFHV RX want to edit 5 You should press button t...

Page 29: ... 2 If you don t have a Google Account you can create one during the Google TV set up process or you can create one on computer and then use on Google TV Changing Google Accounts 1 To add or remove a Google Account from Google TV go to Settings Accounts sync 2 To add a new account select Add Account 3 To remove an account click the account show in Manage Accounts and then select Remove Account 4 Ad...

Page 30: ...y access while you re surfing the web To Bookmark a Webpage 1 Open Google Chrome 2 Navigate to the webpage you want to bookmark 3 Press the Menu button and select Save 4 From the following menu select Add to bookmarks You can name your bookmark on the next screen 5 Select OK to save changes To access your Google Chrome browsing history press the Menu button and select History To clear your history...

Page 31: ...ect an option You can also enter a URL into Google TV search to navigate directly to a website Customize Search Results It s easy to configure your Google TV search experience to include results from TV Movies Apps Podcasts and more 1 Press the Search button type Settings and select the Settings application 2 Select Search Searchable items to customize what appears when you search Safe Search Use ...

Page 32: ...o applications such as Google Photo Show the content in DLNA devices Show the content in USB devices Photo Apps Photo 4 3UHVV Ÿ ź Ż Ź EXWWRQ WR VHOHFW WKH IROGHU ILOH RX ZDQW to open and then press ENTER to enter play the folder file 5 Press Back to return to the previous directory 6 Press OK to play the file 7 Press OK button to display exit the video control bar Buttons available during playback...

Page 33: ...affected by the capacity of your Internet connection Use of NETFLIX video on demand and other Internet services may require the creation of a separate account through a computer with internet access 3 Certain NETFLIX services may not be available for this TV model 4 NETFLIX video on demand and other Internet services may require payment of one time and or recurring charges 5 You are solely respons...

Page 34: ...1HWIOL LFRQ DQG SUHVV OK to enter it or press NETFLIX button to enter Netflix website directly 3 Input Email and Password in following window to sign in Operation instructions 1HWÀL 0RYLHV KRPH SDJH Title Function Suggestions for you The movies suggested for you by Netflix New Arrivals The new arrivals Genres Browse movies in different genres Instant Queue Your list of movies Search Search for ava...

Page 35: ...da 866 348 2353 Network Apps Service Information 3 3UHVV Ÿ ź Ż Ź EXWWRQ WR PRYH WKH FXUVRU WR VHOHFW service items in the YouTube home page and OK button to confirm 4 Press Back button to return the upper menu or press Home button to close the menu ...

Page 36: ...e is blurry or cuts out momentarily If using an external antenna check the direction position and connection of the antenna Adjust the direction of your antenna or reset or fine tune the channel Horizontal vertical stripe on picture or picture is shaking Check if there is interfering source nearby such as appliance or electric tool The plastic cabinet makes a clicking type of sound Click sound can...

Page 37: ...ct Make sure configuration is correct according to your network service provider Connect Netflix fail Check network connection is correct both physically and configuration Make sure that network connection test is successful For Netflix Enter Netflix to reset Netflix account Log out Netflix or change log in account For Netflix 1 Press Home button on remote to exit VUDU 2 Enter Netflix to reset Net...

Page 38: ...ize diagonal 42 inches Screen resolution 1920 1080 Audio power 8 W 8 W Power consumption Please refer to the rating label Power supply 120 V 60 Hz Receiving systems Analog NTSC Digital ATSC QAM Environmental conditions Temperature 41 F 95 F 5 C 35 C Humidity 20 80 RH Atmospheric pressure 86 kPa 106 kPa Component Input 480 I 60 Hz 480 P 60 Hz 720 P 60 Hz 1080 I 60 Hz 1080 P 60 Hz VGA Input VGA 640 ...

Reviews: