background image

4.1  View your PC's display on a TV

Your new graphics card has TV out capability. You can attach your card to a
television and monitor at the same time. Or you can connect it to your VCR
and record your monitor's display.

Your card is compatible with PAL and NTSC TV colour system, and is
factory pre-set to the appropriate TV colour system for use in your country.
If  you need to set your card to the TV colour system for use  in your television,
follow the procedures described below. 

4

Using TV Out

9

GB

Remark: Software screen shots are subject to change due to

software updates.

Enabling and Disabling the Television Display

Connect your TV to the display card

1.
2. 

3. 
4. 

5.   

6. 

Start "CATALYST™ Control Center", from 
the windows task bar, click the Start button:

For Windows XP, point to All Programs>
ATI Control Environment>CATALYST™
Control Center.

*
  
  
* For Windows 2000, point to Programs>ATI

Control Environment>CATALYST™ Control
Center.

Press "View" to change to "Advanced View"
In "Desktop and Display Setup", press 
"Detect Displays". Your connected TV will 
be detected and listed in "Additional
displays:" box.
Drag the new TV display icon to the empty 
display box above.
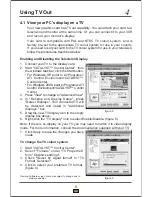
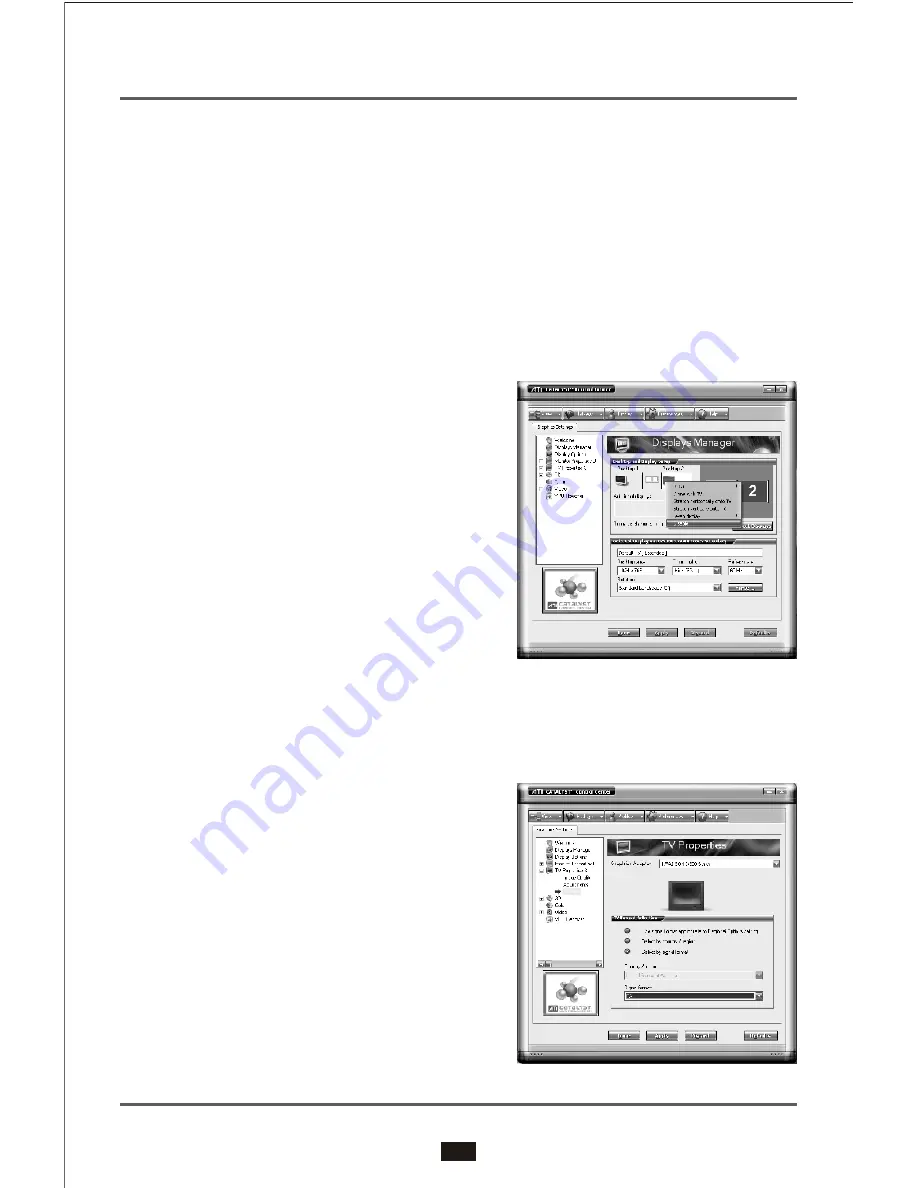
Right-click the "TV dispaly" icon to select Enable/Disable. (figure 5)

Note: If there is no display on your TV, you may need to switch it to video display 
mode. For more information, consult the documentation supplied with your TV.

figure 5

figure 6

7.   Click Apply to save the changes you have 
      made

To change the TV colour system

1. 
2. 

3. 

4.  

Start "CATALYST™ Control Center".
Select "Formats" under "TV Properties" 
from "Graphics settings".
Check  "Select  by  signal  format"  in  "TV 
Format  Selection".
Click to select your preferred TV format. 
(figure 6)

Summary of Contents for X1650 series

Page 1: ...vice pursuant to Part 15 of the FCC Rules These limits are designed to provide reasonable protection against harmful interference in a residential installation This equipment generates uses and can radiate radio frequency energy and if not installed and used in accordance with the instructions may cause harmful interference to radio communications However there is no guarantee that interference wi...

Page 2: ...tness for a particular purpose and non infringement Copyright 2006 Hightech Information System Ltd All rights reserved HIS and all HIS product and product feature names are trademarks and or registered trademarks of Hightech Information System Ltd All other company and or product names are trademarks and or registered trademarks of their respective owners Features performance and specificat ions a...

Page 3: ...s require 2 slots space and X1650 series heatsink models require one slot space 512MB of system memory or more recommended CD ROM drive for installation software DVD playback requires DVD drive and decoder software not included Operating Systems Windows XP Windows XP x64 Edition 24 X1650XT RV560 12 X1650PRO X1650 pixel shader processors X1650XT RV560 5 X1650PRO X1650 vertex shader processors Thank...

Page 4: ...pecifications Optional External DVI I to VGA connector for Secondary CRT monitor 128 256 512MB 128bit 4 channel GDDR3 DDR2 memory Dual integrated 10 bit per channel palette DACs operating at up to 400MHz Connectors Memory Bus Interface RAMDAC Model HIS X1650 Series PCIe PCI Express x16 Drivers Included Windows XP Windows XP x64 Edition 2x Dual link DVI connector for Digital Flat Panel S Video or C...

Page 5: ...display adapter you may need to disable it For details refer to the documentation of your computer system 4 Locate the appropriate expansion bus slot on your motherboard PCI Express cards uses a PCI Express slot Please consult your motherboard manual for the appropriate slot Before installing your new card into your PC system make sure that you have discharged any static electricity from your body...

Page 6: ...Insert the card carefully and press it in firmly until the card is fully seated 6 Fasten the mounting bracket to the chassis Make sure the card is properly aligned 7 Replace the cover on your system 4 GB ...

Page 7: ...D Graphics card may feature connectors or headers for connecting to a standard VGA monitor or a digital analogue flat panel TV and other video devices Please refer to the appropriate sections below 2 2 Cable Connections 2 2 1 Connecting to VGA monitor or LCD monitor analogue Example 1 To connect a VGAmonitor or a LCD monitor analogue to your graphics card plug the video signal cable to the 15 pin ...

Page 8: ...e several minutes Using Your ATI HDTV Video Cable Use the HDTV Video Cable to watch DVD movies and play video games on your High Definition Television For maximum performance when you watch DVD movies or play computer games on your HDTV you should find the mode and screen resolution that provide the best result on your TV and use those settings exclusively Copy protected DVDs restrict playback to ...

Page 9: ...click Launch ATI driver installation on the first pop up window and click Video Adapter Easy Install to start 3 Software Installation 7 GB Before proceeding with the driver installation you MUST read the Readme txt figure 1 in the DOC directory on the Installation CD ROM for the installation procedures Please insert the installation CD ROM into your PC CD ROM drive to retrieve the said document Yo...

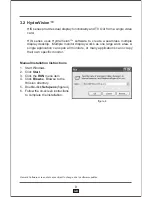
Page 10: ...ck Setup exe figure 4 Follow the on screen instructions to complete the installation figure 4 3 2 HydraVision HIS series provides dual display functionality and TV Out from a single video card HIS series uses HydraVision software to create a seamless multiple display desktop Multiple monitor display works as one large work area A single application can span all monitors or many applications can oc...

Page 11: ...ick the Start button For Windows XP point to All Programs ATI Control Environment CATALYST Control Center For Windows 2000 point to Programs ATI Control Environment CATALYST Control Center Press View to change to Advanced View In Desktop and Display Setup press Detect Displays Your connected TV will be detected and listed in Additional displays box Drag the new TV display icon to the empty display...

Page 12: ...te cable or S Video cable attach one end of the cable to Video In on your graphics card and the other to the Video Output on your video device 10 GB The video output connectors on your VCR camcorder or laserdisc player will be similar to these Use S VIDEO OUT or COMPOSITE VIDEO OUT S Video will provide better results 4 headed Input Output Adapter Video Out Video In OR S VIDEO OUT COMPOSITE OUT 5 O...

Page 13: ...s Chipsatz Treibern 450 Watt Netzteil oder besser empfohlen Die IceQ und heatpipe Modelle der X1650 Serie benötigen 2 freie Steck plätze die X1650er Serie mit Lüfter nur einen 512MB Hauptspeicher oder mehr CD ROM Laufwerk zur Treiberinstallation DVD Wiedergabe benötigt ein DVD Laufwerk und Dekoder Software nicht im Lieferumpfang Betriebssysteme Windows XP Windows XP x64 24 X1650XT RV560 12 X1650PR...

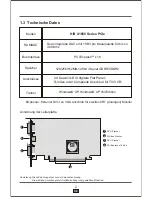
Page 14: ...ecker DVI I Stecker PCI Express x16 Bus Anmerkung Diese Zeichnung dient nur der Veranschaulichung Die wirkliche Anordnung Ihrer Grafikkarte hängt vom gewählten Modell ab 1 3 Technische Daten PCI Express x16 Speicher Anschlüsse Bus Interface RAMDAC Windows XP Windows XP x64 Edition Treiber Dual integrierte DACs mit 10 Bit pro Kanalpalette für bis zu 400 Mhz Modell 128 256 512MB 128bit 4 Kanal GDDR3...

Page 15: ...kplätzen am Chassis gehalten wird und ziehen Sie die Karte aus dem Steckplatz heraus ODER wenn Ihr Computer eine in die Karte integrierte Anzeige hat müssen Sie sie deaktivieren Einzelheiten finden Sie in der Dokumentation zu Ihrem Computer 3 DE 1 2 Schalten Sie den Computer und alle angeschlossenen Peripheriegeräte aus Nehmen Sie das Gehäuse vom PC ab Bringen Sie den entsprechenden Steckplatz für...

Page 16: ... Ihren PC wieder ins Gehäuse ein 5 Setzen Sie die Karte vorsichtig ein und drücken Sie sie fest bis sie richtig sitzt 6 Bringen Sie den Befestigungsbügel am Chassis an Die Karte muss richtig ausgerichtet sein DE 4 ...

Page 17: ...er LCD Monitor analog an die Grafikkarte anzuschließen stecken Sie das Videosignalkabel in den 15 poligen VGA Stecker auf Ihrer Karte Beispiel 2 Um den VGA Monitor oder LCD Monitor analog an Ihre Grafikkarte anzuschließen die mit einem DVI I Ausgangsstecker versehen ist stecken Sie einen DVI I VGA Adapter in den DVI I Stecker auf der Grafikkarte und stecken Sie dann das Videosignalkabel in den Ada...

Page 18: ...entsprechenden Gerätehandbuch Schalten Sie Ihren Computer an Hinweis Solange Windows nicht startet erscheint keine Anzeige auf Ihrem TV Das kann einige Minuten dauern Dieser Anschluss ist optional je nachdem ob die Karte HDTV unterstützt oder nicht und mit einem ATI HDTV Video Ausgangs kabel zum Anschluss an HDTV 2 2 4 Bevor Sie ATI HDTV installieren muss ein Monitor an Ihren Computer angeschlosse...

Page 19: ...ie Registerkarte YPbPr Klicken Sie auf OK Klicken Sie auf die Schaltfläche Erweitert Klicken Sie auf die Registerkarte Adapter und dann auf die Schaltfläche Alle Modi auflisten Klicken Sie auf 640 x 480 Wählen Sie dann entweder 640 x 480 60Hz Schrittweise 30Hz Interlaced Hinweis YPbPr is nur mit den 30Hz oder 60HZ Einstellungen verfügbar Verwendung des ATI HDTV Videokabels Verwenden Sie das HDTV V...

Page 20: ... auf Video Adapter Easy Install um die Installation zu starten Automatische Installation Wenn die Dialogbox nicht erscheint klicken Sie doppelt oder starten Atisetup exe im Wurzelverzeichnis der CD ROM Setzen Sie die Installation gemäß den Anweisungen auf dem Bildschirm fort Die Baureihe HIS bietet auf einer einzigen Video Karte Doppelanzeige und TV Ausgabe Die Baureihe HIS verwendet HydraVision S...

Page 21: ...icken Sie auf die Start Taste Bei Windows XP zeigen Sie auf All Programs ATI Control Environment CATALYST Control Center Bei Windows 2000 zeigen Sie auf Programs ATI Control Environment CATALYST Control Center Drücken Sie in Desktop and Display Setup auf Detect Displays dann wird Ihr angeschlossener Fernseher erkannt und in der Additional displays Box aufgelistet Ziehen Sie das Symbol für die neue...

Page 22: ...programm um bewegliche oder stehende Bilder aufzunehmen 4 teiliger Eingangs Ausgangs Adapter Video Out Video In ODER S VIDEO OUT COMPOSITE OUT Die Video Ausgangs Stecker an Ihrem Videokassettenrekorder Camcorder oder Laserdiskplayer ähnelt diesen Benutzen Sie S VIDEO OUT oder COMPOSITE VIDEO OUT S Video ist besser 5 Optionale Funktion Nutzung des Video Eingangs Nur für Modelle mit Video Ein und Au...

Page 23: ...s d espace et les séries X1650 exigent l espace pour un slot Il est conseillé d avoir au moins 512MB de mémoire vive Lecteur CD ROM pour l installation de software Lecture des DVD nécessite une lecteur DVD et un logiciel décodeur ne sont pas inclus Systèmes d Exploitation Windows XP Windows XP x64 Edition 24 X1650XT RV560 12 X1650PRO X1650 processeurs de pixel shader X1650XT RV560 5 X1650PRO X1650...

Page 24: ... de la carte 1 3 Spécifications Optionnel Connecteur externe DVI I VGA pour l écran CRT secondaire HIS X1650 Series PCIe Interface de bus Mémoire Connecteurs Pilotes inclus RAMDAC Modèle Windows XP Windows XP x64 Edition PCI Express x16 Mémoire 128 256 512MB 128bit 4 channel GDDR3 DDR2 Intégrée Dual 10 bit par channel palette DACs avec la vitesse jusqu a 400MHz Connecteur 2X Dual link DVI pour Dig...

Page 25: ...eur est livré avec des fonctionnalités d affichage graphique embarquées il vous faudra les désactiver Pour les détails référez vous à la documentation de votre système d ordinateur REMARQUE Avant d installer votre nouvelle carte dans votre système PC assurez vous que vous avez déchargé toute électricité statique de votre corps en touchant toute surface métallique mise à la masse telle qu un châssi...

Page 26: ...arte et introduisez la en exerçant une pression jusqu à ce que la carte ait pris entièrement son assise 6 Fixez la bride de montage au châssis Assurez vous que la carte est alignée correctement 7 Replacez le couvercle sur votre système ...

Page 27: ... Pour brancher un moniteur VGA ou un moniteur LCD analogique sur votre carte graphique branchez le câble de signal vidéo sur le connecteur VGA 15 broches de votre carte 2 Exemple Pour brancher un moniteur VGA ou un moniteur LCD analogique sur votre carte graphique équipée d un connecteur de sortie DVI I enfichez un adaptateur DVI I VGA dans le connecteur DVI I sur la carte graphique puis enfichez ...

Page 28: ...puis sélectionnez l entrée YPbPr Remarque reportez vous au manuel de votre TVHD ou périphérique à entrée composante pour obtenir des informations de configuration propres à votre dispositif TVHD Plaque arrière de la carte graphique ATI Câble de sortie vidéo TVHD d ATI Video In Y Pb Pr Ports d entrée vidéo TVHD classiques Câbles à fiche RCA mâle disponibles auprès des revendeurs de matériel électro...

Page 29: ...guration Double cliquez sur l icône Affichage cliquez sur l onglet Paramètres puis utilisez le curseur Zone d écran pour sélectionner la résolution de votre choix Remarque si la résolution que vous sélectionnez n est pas associée à un réglage le système réduira la résolution au réglage compatible leplus proche Cliquez sur le bouton Avancé puis sur l onglet Modes d affichage Cliquez sur l onglet YP...

Page 30: ...ter de la performance supérieure des meilleures résolutions et des fonctionnalités particulières de votre carte Avant de procéder à l installation du pilote vous DEVEZ lire le fichier Readme txt dans le répertoire DOC sur le CD ROM d installation pour les procédures d installation Veuillez insérer le CD ROM d installation dans le lecteur CD ROM de votre PC afin de récupérer ledit document Si la bo...

Page 31: ...ows cliquer sur le click sur le bouton Start démarrer Pour Windows XP pointez sur All Programs ATI Control Environment CATALYST Control Center Pour Windows 2000 pointez sur Programs ATI Control Environment CATALYST Control Center Dans Desktop and Display Setup Installation du bureau et de l affichage pressez sur Detect Displays alors votre téléviseur branché sera détecté et apparaîtra dans la list...

Page 32: ...ixes Branchement de votre appareil vidéo 1 2 3 4 5 6 5 Page de fonctionnalité en option Utilisation de l entrée vidéo Cette fonctionnalité est une option selon que la carte possède une fonctionnalité VIVO ou non Uniquement pour un modèle à entrée vidéo sortie vidéo VIVO Les connecteurs de sortie vidéo sur votre magnétoscope caméscope ou lecteur de disque laser sont similaires à ceux ci Employez la...

Reviews: