20
Troubleshooting
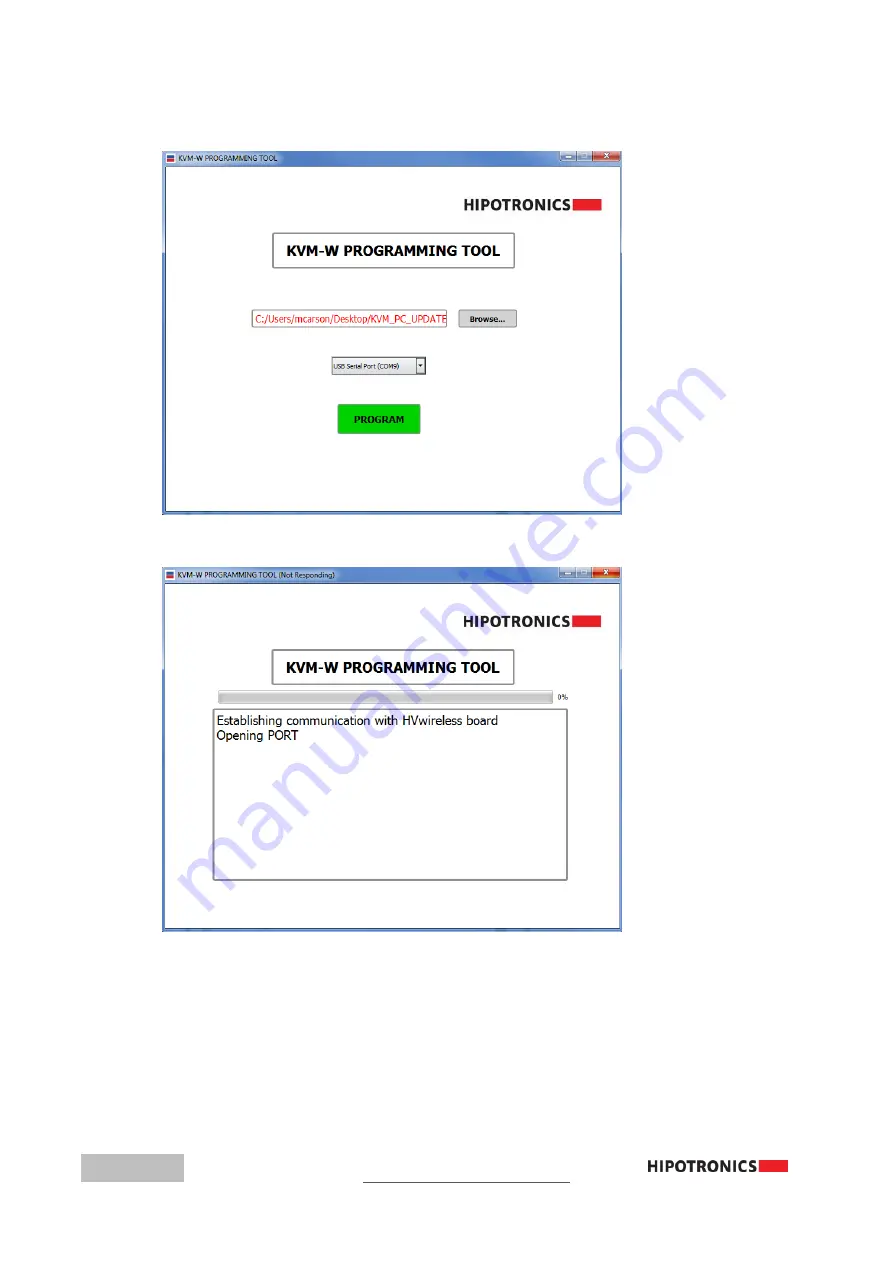
b.
Select the correct COM Port from the drop down menu, which should appear as “USB Serial Port (COM#)”
c. Click Program, and the application will start to establish communication with the wireless
module
Page 1: ...Operating Instructions KVM W Series Wireless Series Kilovolt Meters Version 1 1...
Page 2: ...Title Wireless KVM Date 02 2018 Authors Layout Part number KVM W Revision History V1 0 02 2018 MC Initial draft of the document V1 1 01 2020 MC Added Waveform Capture description...
Page 3: ...n number this information can be found on the registration plate on the right panel of the instrument The firmware version can be found in the bottom right corner of the settings window Unauthorized o...
Page 4: ...operations failure to follow the instructions could result in errors in measurement Indicates hazards There is a risk of equipment damage or personal injury or death Carefully read and follow the inst...
Page 5: ...ument provides a solution which achieves the optimal combination of traditional know how and leading edge technology This operating manual is designed for completeness and easy location of the require...
Page 6: ...7 2 2 Summary 7 3 Theory 8 3 0 Introduction 8 3 1 Test Standards 8 3 2 Application 8 4 Wireless Module 9 4 0 Ports 9 5 Connection and Setup 11 5 0 Ground Connections 11 5 1 Device Connections 11 5 2...
Page 7: ...Cleaning the Instrument 22 8 0 2 Instrument Calibration 22 8 1 Instrument Storage 22 8 2 Packing and Transport 23 8 3 Recycling 23 9 Customer Support 24 9 0 Declaration of Conformity 25 Hipotronics I...
Page 8: ...mmediately 1 1 General The KVM W Series AC DC Wireless Kilovoltmeters are highly accurate portable and modern voltage measurement and calibration systems Each model in this series contains a high volt...
Page 9: ...less Module 7 3 x4 25 x3 3 18 5cm x 10 8cm x 8 4cm KVM100W DO 11 x11 x25 28cmx28cmx62cm KVM200W DO 11 x11 x45 28cmx28cmx116cm KVM300W DO 45 8 x41 7 x80 5 116 4cmx106cmx204 4cm KVM400W DO 45 x39 x103 2...
Page 10: ...safety rules written in this document and the associated safety practices specified by their company and government Local and state safety procedures should also be consulted Company regional or natio...
Page 11: ...t in electrical shock to the user or damage to the instrument 2 2 Summary Note Many accidents that happen around high voltage equipment involve personnel who are not familiar or perhaps too familiar w...
Page 12: ...view any two of the available measurement types at the same time through the application A Hold button is also located near the bottom of the screen on the app that when pressed will retain the insta...
Page 13: ...harge the KVM W LED Indicator Programmable color from app Will turn off when app is not connected to it and not charging and blink every 30 seconds while in sleep mode Will blink every 2 seconds when...
Page 14: ...10 Wireless Module Antenna Increases wireless transmission range Ground Stud Attach ground cable to this in order to ensure proper reference grounding BNC Port Attach BNC from HV Divider to here...
Page 15: ...of the HV divider and run to the KVM wireless module To recharge the wireless module plug the USB cable into the USB C port and the wall adapter into a mains outlet 5 2 Connecting KVM W to Mobile Dev...
Page 16: ...cted it will display the ID of the device below the right measurement display The LED indicator on the KVM W will be a glowing a solid color when it is connected to a mobile device through WiFi If the...
Page 17: ...times per second Below the left measurement display is an option for selecting either DC or AC Coupling At the bottom middle of the screen there is a hold button that when pressed will grab the instan...
Page 18: ...click on the button A solid color indicates that the measurement is being plotted and if the button is mostly transparent then it is disabled from the graph The color of the button also correlates to...
Page 19: ...You can then find these tests by pressing the Load icon 6 2 Waveform Capture To view a snapshot of the signal that is currently being measured by the KVM W click the waveform button on the app next t...
Page 20: ...nd it will display the graph from that test To share a report press the Share icon as indicated below and it will list several options that you can share through including email Numbers etc The report...
Page 21: ...evice When either of these are changed the app will need to reboot and reconnect to the wireless module So after the app closes it will direct you to the iPhone WiFi settings where you can reconnect t...
Page 22: ...on the KVM W app If it still will not connect close the app disconnect from the KVM s WiFi and try again If you are still unable to connect remove the charging cable turn the unit off and then on agai...
Page 23: ...Troubleshooting 19 2 Run the KVM W_Programming_Tool that was included on your USB drive with the KVM W a Click Browse and select the file on that same USB drive with the extension hex...
Page 24: ...bleshooting b Select the correct COM Port from the drop down menu which should appear as USB Serial Port COM c Click Program and the application will start to establish communication with the wireless...
Page 25: ...d Do not close the application or unplug the module while programming is in process e Once the programming is complete it will display Programmed Successfully and you may then close the application an...
Page 26: ...l or spirits Caustic cleansers and solvents Trio Chlorothene etc should definitely be avoided 8 0 2 Instrument Calibration When delivered new from the factory the instrument is calibrated in accordanc...
Page 27: ...Whenever possible protect the instrument from mechanical damage during transport with padding Mark the container with the pictogram symbols Fragile and Protect from moisture 8 3 Recycling When the in...
Page 28: ...hed at the following address HIPOTRONICS Customer Service 1650 Route 22 Brewster NY 10509 Tel 1 845 279 3644 E mail service Hipotronics com We prefer contact via email Then the case is documented and...
Page 29: ...e documents So the product complies with the requirements of the EMC directive 2004 108 EC and the low voltage directive 2006 95 EC Product KVM W Description The KVM W Series AC DC Wireless Kilovoltme...
Page 30: ...g its position as to liability purchaser in processing or settling any such claim without prejudicing its position as to liability Warranty Claim Procedure Compliance with the following Warranty Claim...