


English
19
3.3 Safety devices
When using the nail magazine, the nail detector prevents triggering without a nail loaded, which could
damage the fastening tool.
The contact pressure safety device is intended to prevent the free flighting of nails (i.e. actuation and driving
a nail when the nosepiece is not in contact with the workpiece). When using a nail magazine, the fastening
tool can be pressed against the surface and triggered only when a nail is loaded in the tool.
3.4 Features
The fastening tool is equipped with an ergonomic, non-slip and vibration-absorbing grip, a belt and scaffold
hook and a support leg. The tool is protected from overloading by electronic overload protection and from
overheating by temperature monitoring.
3.5 Bluetooth
The tool is equipped with a Bluetooth interface. Wireless communication via Bluetooth is possible as soon
as the battery has been fitted and the fastening tool switched on by pressing the on/off button.
Data transfer continues for three hours after the tool has switched to standby mode or after the tool has
been switched off by pressing the on/off button.
To deactivate Bluetooth manually, press and hold the on/off button for at least 5 seconds until the LED lights
blue twice.
When the battery is removed, no further data is transferred.
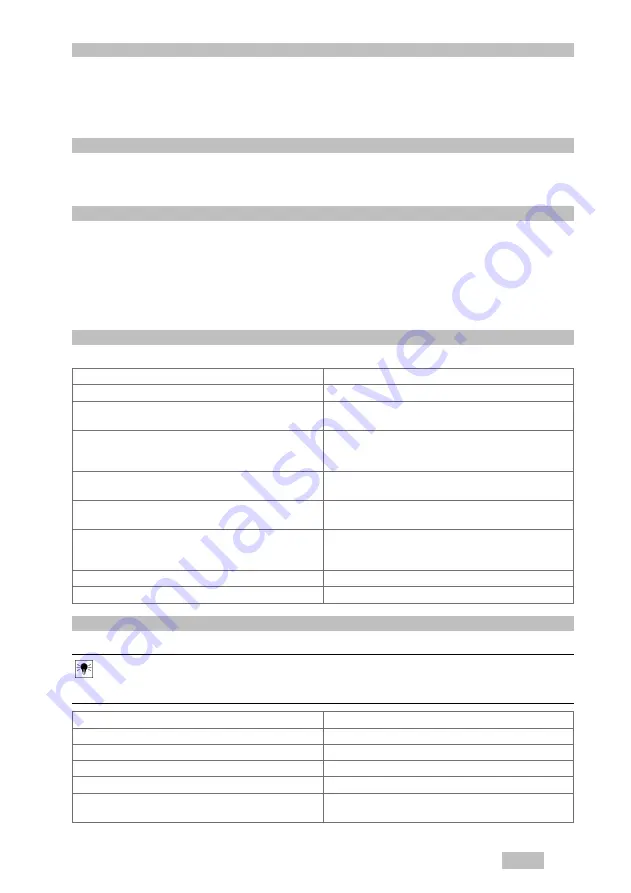
3.6 Status indicator
The status indicator provides information about the status of the fastening tool.
Status
Meaning
Off
• The fastening tool is switched off.
The LED lights green.
• The fastening tool is switched on and ready for
use.
The LED blinks green every 3 seconds.
• The fastening tool is in stand-by mode. Press
the nose of the tool against the working surface
to switch it on.
The LED lights blue.
• The fastening tool is switched on, nail strips
require to be loaded.
LED blinks blue.
• The fastening tool is switched on, the magazine
is completely empty.
The LED blinks green.
• The fastening tool is too hot or the battery
has insufficient power. Please refer to
“Troubleshooting”.
The LED blinks red.
• Malfunction – please refer to “Troubleshooting”.
The LED lights red.
• Malfunction – please refer to “Troubleshooting”.
3.7 Indication of battery charge status
When one of the battery release buttons is pressed the display indicates the battery’s state of charge.
Note
Reliable indication of the charge status is not possible while a fastener is being driven or immediately
after a fastener is driven.
Status
Meaning
All four LEDs light green.
• Charge status is 75 % to 100 %.
Three LEDs light green.
• Charge status is 50 % to 75 %.
Two LEDs light green.
• Charge status is 25 % to 50 %.
One LED lights green.
• Charge status is 10 % to 25 %.
One LED flashes green.
• Charge status is below 10 %. The battery has
insufficient power.
Printed: 26.09.2017 | Doc-Nr: PUB / 5376263 / 000 / 00
Summary of Contents for BX 3
Page 2: ...1 Printed 26 09 2017 Doc Nr PUB 5376263 000 00 ...
Page 3: ...2 3 4 5 Printed 26 09 2017 Doc Nr PUB 5376263 000 00 ...
Page 4: ...6 7 Printed 26 09 2017 Doc Nr PUB 5376263 000 00 ...
Page 6: ...Printed 26 09 2017 Doc Nr PUB 5376263 000 00 ...
Page 416: ...410 中文 Printed 26 09 2017 Doc Nr PUB 5376263 000 00 ...
Page 417: ...Printed 26 09 2017 Doc Nr PUB 5376263 000 00 ...