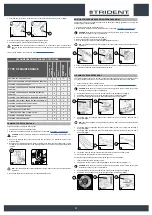
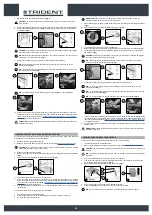


5. As soon as the correct password is inserted, the “ZONE PROGRAMMING” menu will appear on
the display (
Fig.5
).
6. To activate or deactivate the “ZONE” key on the work menu, simply select the “ON” or “OFF”
option (6) on the “ZONE” row, which can be found on the right-hand side of the display (
Fig.5
).
N.B.
: if the ON button is active, it means that PROGRAM ZONE mode can be used. Meanwhile,
if the OFF button is active, it means that PROGRAM ZONE mode cannot be used.
OFF
Programmazione Zone
Zone 1
Zone 2
Zone 3
Zone 4
Esci
ZONE
MANUAL
ON
5
6
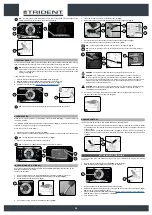
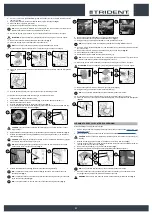
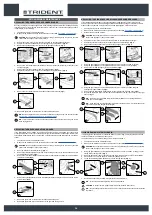
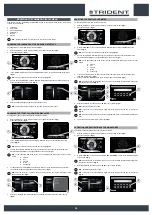
ACTIVATION OR DEACTIVATION OF THE MANUAL FUNCTION
To activate or deactivate the work zones, proceed as follows:
1. With the machine on, press the menu button (1) on the working screen (
Fig.1
).
2. Press the setting (2) (
Fig.2
).
3. In the “MAIN MENU” screen, select the “ZONE PROGRAMMING” option (3) on the left-hand side
of the screen (
Fig.3
).
N.B.
: when the button (3) is pressed, the pop-up menu for inserting the password will appear at
the centre of the screen (
Fig.4
).
4.
Enter the password chosen and press "ENTER" (4) to confirm (
Fig.4
).
N.B.
: The default password is 1000.
N.B.
: if you enter one of the password digits incorrectly, simply press the key (5) to delete it
(
Fig.4
).
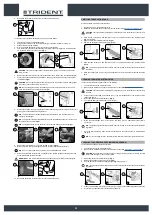
5. As soon as the correct password is inserted, the “ZONE PROGRAMMING” menu will appear on
the display (
Fig.5
).
6. To activate or deactivate the "MANUAL" function in the “ZONE” screen, simply select the “ON” or
“OFF” option (6) on the “MANUAL” row, which can be found on the right-hand side of the display
(
Fig.5
).
N.B.
: if the ON button is active, it means that MANUAL MODE can be used. Meanwhile, if the
OFF button is active, it means that MANUAL MODE cannot be used.
OFFICE
0000.00
100%
0000.00
100%
ECO mode
1
2
1
2
Reset
Menu principale
Lingua
Contaore
Programmazione Zone
Parametri
Monitor
Allarmi
Esci
VISUALIZZATO
TOTALE PARZIALE
Chiave
0000.00 0000.00
Trazione
0000.00 0000.00
Spazzole
0000.00 0000.00
Aspirazione
0000.00 0000.00
Chiave
Enter
Inserire codice
3
4
3
8
4
5
OFF
Programmazione Zone
Zone 1
Zone 2
Zone 3
Zone 4
Esci
ZONE
MANUAL
ON
5
6
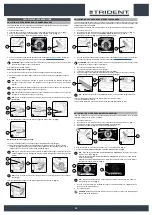
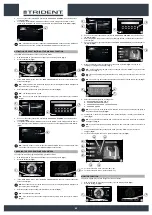
MONITOR FUNCTION
To perform a preliminary machine diagnosis, proceed as follows:
1. With the machine on, press the menu button (1) on the working screen (
Fig.1
).
2. Press the setting (2) (
Fig.2
).
OFFICE
0000.00
100%
0000.00
100%
ECO mode
1
2
1
2
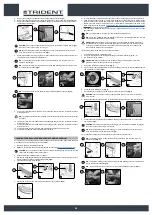
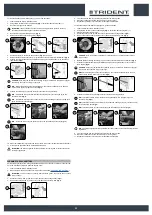
CHANGING THE PROGRAM ZONE PARAMETERS
To change the work zone program parameters, proceed as follows:
1. With the machine on, press the menu button (1) on the working screen (
Fig.1
).
2. Press the setting (2) (
Fig.2
).
3. In the “MAIN MENU” screen, select the “ZONE PROGRAMMING” option (3) on the left-hand side
of the screen (
Fig.3
).
N.B.
: when the button (3) is pressed, the pop-up menu for inserting the password will appear at
the centre of the screen (
Fig.4
).
4.
Enter the password chosen and press "ENTER" (4) to confirm (
Fig.4
).
N.B.
: the default password is 2234.
N.B.
: if you enter one of the password digits incorrectly, simply press the key (5) to delete it
(
Fig.4
).
OFFICE
0000.00
100%
0000.00
100%
ECO mode
1
2
1
2
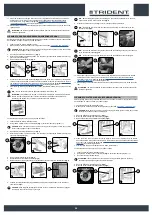
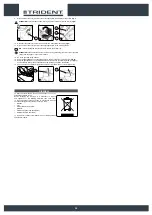
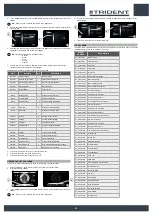
5. As soon as the correct password is inserted, the “ZONE PROGRAMMING” menu will appear on
the display (
Fig.5
).
6. Select the program that you wish to change by selecting the name on the left-hand side of the
screen (
Fig.5
).
7. As soon as the zone program is selected, the “CHANGE ZONE PROGRAM” menu will appear on
the display (
Fig.6
).
8. When the button (6) on the right-hand side of the screen is pressed (
Fig.6
), the pop-up for
changing the program name appears (
Fig.7
).
N.B.
: as soon as the program name has been changed, press the “ENTER” key (7) to save the
change made (
Fig.7
).
N.B.
: if you make a mistake when entering the name, simply press the key (8) to correct the error
(
Fig.7
).
N.B.
: if you want to go back without changing the name, simply press the “BACK” key (9) (
Fig.7
).
9. Select the parameter you wish to change from:
A. DETERGENT SOLUTION FLOW
B. VACUUM MOTOR EFFICIENCY;
C. PRESSURE EXERTED ON THE BRUSH HEAD;
D. FORWARD SPEED.
N.B.
: as soon as one of the parameters is selected, the machine icon will display the group to
which this parameter belongs (
Fig.8
).
10. Pressing the “+” button (10) increases the value, while pressing the “-” button (11) decreases the
value (
Fig.8
).
N.B.
: each parameter is associated with a horizontal row; this row is composed of rectangles
which light up (
Fig.8
).
N.B.
: each parameter can be adjusted to three levels, from a minimum of one to a maximum of
three.
11. As soon as the desired changes have been made, press the “SAVE” key (12) to save the
changes (
Fig.8
).
12. To return to the program zone menu, press the “BACK” key (13) (
Fig.8
).
13. To return to the main menu, press the “EXIT” key.
14. To return to the work screen, press the “EXIT” key.
Reset
Menu principale
Lingua
Contaore
Programmazione Zone
Parametri
Monitor
Allarmi
Esci
VISUALIZZATO
TOTALE PARZIALE
Chiave
0000.00 0000.00
Trazione
0000.00 0000.00
Spazzole
0000.00 0000.00
Aspirazione
0000.00 0000.00
Chiave
Enter
Inserire codice
3
4
3
8
4
5
OFF
Programmazione Zone
Zone 1
Zone 2
Zone 3
Zone 4
Esci
ZONE
MANUAL
ON
5
6
6
Modifica nome zona
7
7
8
9
8
A
B
C
D
13
10
11
12
40