


20
Chapter 2 Installing and Removing an Expansion Module
|
Hillstone
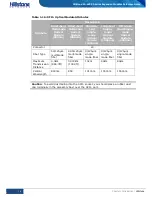
Hillstone SG-6000 X-Series Expansion Modules Reference Guide
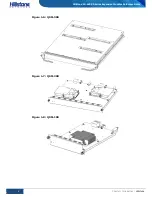
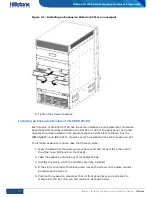
Figure 2-1: Installing an Expansion Module (SCM as an example)
6.
Tighten the screws clockwise.
Installing an Expansion Module of SG-6000-X7180
Each module of SG-6000-X7180 has the same installation and replacement procedure.
Note that SCM should be installed in the slot SC0 or SC1 of the back panel, and other
modules should be installed in the general expansion slots Slot1 to Slot10, but the
IOM- and IOM-8SFP+ module cannot be installed in the Slot7 expansion slot.
To install an expansion module, take the following steps:
1.
Wear the ESD wrist strap around your bare wrist and connect the other end of
the strap to an ESD point on the chassis.
2.
Take the expansion module out of its antistatic bag.
3.
Identify the slot in which the module should be installed.
4.
If the slot is covered with a blank plate, loosen the screws on the plate counter-
clockwise and remove it.
5.
Position the expansion module so that its front panel faces you and slide the
module into the slot until you feel resistant, as shown below.