HIKVISION NVR-100MH-D/W Series User Manual Download Page 28

Network Video Recorder User Manual 

16 

Chapter 5 Configuration (Easy Mode) 

Easy mode contains basic configurations. Go to Configuration, and click Easy Mode

5.1 System Configuration 

5.1.1 General 

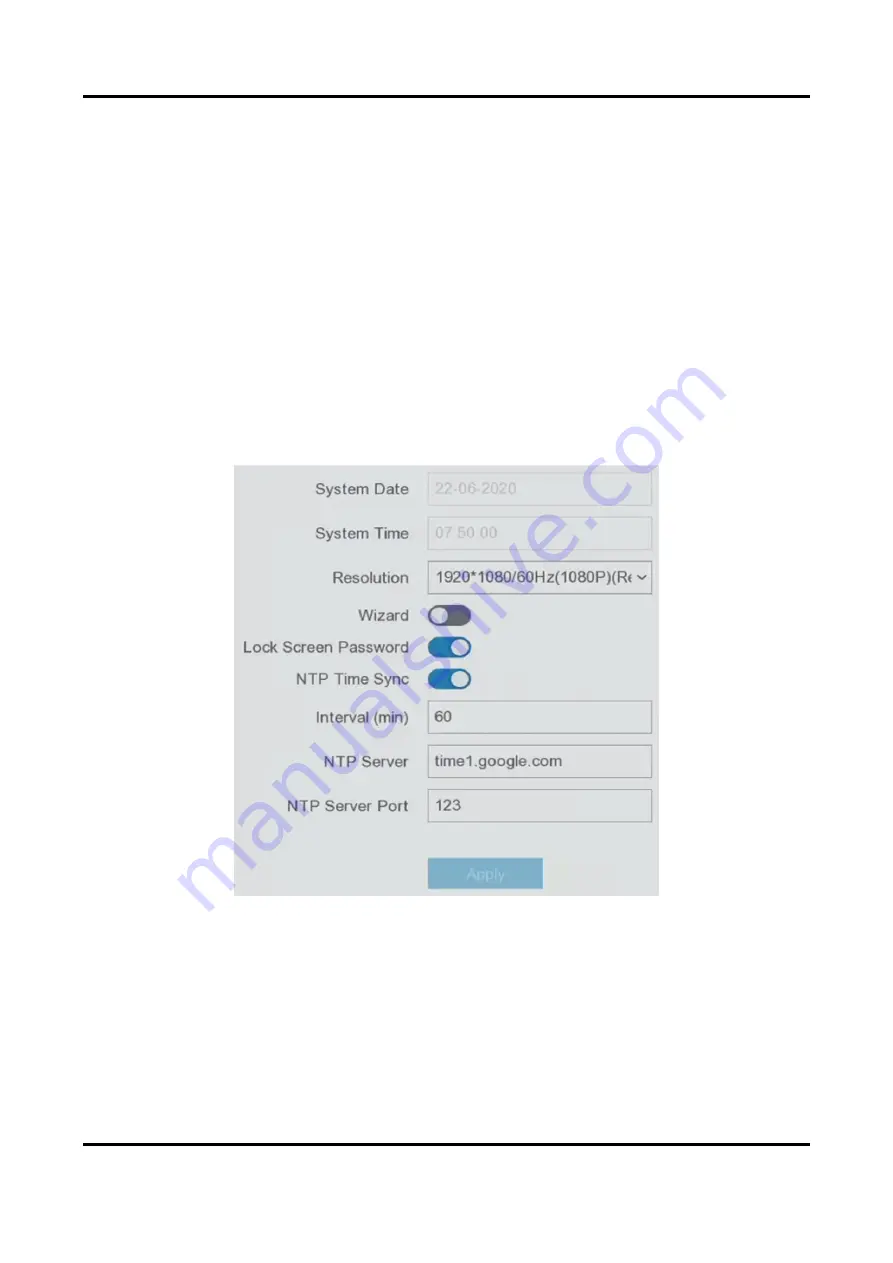
You can configure the output resolution, system time, etc. 

Steps   
1. Go to Configuration → System → General


Figure 5-1 General Settings 

2. Configure the parameters as your desire. 

Wizard   

The wizard will pop up after the device starts up. 

Lock Screen Password   

You need to enter your password if the screen is locked. 

Summary of Contents for NVR-100MH-D/W Series

Page 1: ...Network Video Recorder User Manual...

Page 2: ...TY OR FITNESS FOR A PARTICULAR PURPOSE THE USE OF THE PRODUCT BY YOU IS AT YOUR OWN RISK IN NO EVENT WILL HIKVISION BE LIABLE TO YOU FOR ANY SPECIAL CONSEQUENTIAL INCIDENTAL OR INDIRECT DAMAGES INCLUD...

Page 3: ...TION THE DEVELOPMENT OR PRODUCTION OF CHEMICAL OR BIOLOGICAL WEAPONS ANY ACTIVITIES IN THE CONTEXT RELATED TO ANY NUCLEAR EXPLOSIVE OR UNSAFE NUCLEAR FUEL CYCLE OR IN SUPPORT OF HUMAN RIGHTS ABUSES IN...

Page 4: ...ures Reorient or relocate the receiving antenna Increase the separation between the equipment and receiver Connect the equipment into an outlet on a circuit different from that to which the receiver i...

Page 5: ...ntes l appareil ne doit pas produire de brouillage et 2 l utilisateur de l appareil doit accepter tout brouillage radio lectrique subi m me si le brouillage est susceptible d en compromettre le foncti...

Page 6: ...Network Video Recorder User Manual v Applicable Model This manual is applicable to the following models Table 1 1 Applicable Model Series Model NVR 100MH D W NVR 104MH D W NVR 108MH D W...

Page 7: ...cates a hazardous situation which if not avoided will or could result in death or serious injury Caution Indicates a potentially hazardous situation which if not avoided could result in equipment dama...

Page 8: ...y If smoke odor or noise rise from the device turn off the power at once and unplug the power cable and then please contact the service center Use the device in conjunction with an UPS and use factory...

Page 9: ...acing the equipment on a bed sofa rug or other similar surface For certain models ensure correct wiring of the terminals for connection to an AC mains supply For certain models the equipment has been...

Page 10: ...gure PTZ Parameter 6 2 2 2 PTZ Control Panel Introduction 8 2 2 3 Customize Preset 8 2 2 4 Customize Patrol 8 2 2 5 Customize Pattern 9 Chapter 3 Playback 10 3 1 GUI Introduction 10 3 2 Normal Playbac...

Page 11: ...System Configuration 41 6 1 1 General 41 6 1 2 Live View 43 6 1 3 User 45 6 2 Network Configuration 45 6 2 1 TCP IP 45 6 2 2 DDNS 46 6 2 3 NAT 47 6 2 4 NTP 48 6 2 5 Ports More Settings 49 6 2 6 HiLook...

Page 12: ...ter 7 Maintenance 78 7 1 Restore Default 78 7 2 Search Log 78 7 3 System Service 78 7 4 Upgrade 79 7 4 1 Local Upgrade 79 7 4 2 Online Upgrade 80 7 5 View Wi Fi Information 81 Chapter 8 Alarm 82 8 1 S...

Page 13: ...end you create a strong password of your own choosing Using a minimum of 8 characters including at least three of the following categories upper case letters lower case letters numbers and special cha...

Page 14: ...eral for details For storage device configuration Refer to Storage Device for details For adding network cameras Refer to Network Camera for details For Wi Fi Match Refer to Add Wi Fi Camerafor detail...

Page 15: ...pre defined pattern to enter the menu operation Note If you have forgotten your pattern you click Forgot My Pattern or Switch User to log in via password If you have drawn the wrong pattern for more t...

Page 16: ...User Name Figure 1 4 Login Interface 2 Input password 3 Click Login Note When you forget the password of the admin you can click Forgot Password to reset the password If you enter the wrong password 7...

Page 17: ...le 2 1 Shortcut Menu Description Button Description Start playing videos recorded in the latest five minutes Digital zoom You can adjust zoom in times and view the desired area Click it to enter PTZ c...

Page 18: ...Switch Start screen auto switch Add IP Camera Click to add IP camera as you desire Playback Start playback of the selected view PTZ Control Click to access PTZ Control Wi Fi Match Search and add avail...

Page 19: ...Network Video Recorder User Manual 7 Figure 2 2 PTZ Settings 2 Click 3 Set the PTZ camera parameters Note All parameters should be the same as the PTZ camera 4 Click OK...

Page 20: ...ra in live view and click on shortcut menu 2 Select a desired preset in preset list 3 Use direction buttons to wheel the camera to required locations Adjust zoom and focus as your desire 4 Click What...

Page 21: ...7 Click Save What to do next Select a patrol and click to call it The PTZ camera will move according the predefined patrol path 2 2 5 Customize Pattern A pattern records the movement path and dwell t...

Page 22: ...utton Operation Button Operation 30 s reverse 30 s forward Full screen Start playback Speed down Speed up Speed Figure 3 2 Timeline Position the cursor on the timeline drag the timeline to position to...

Page 23: ...able means no video 4 Optional Position the cursor on playback window to show control bar Figure 3 3 Control Bar Table 3 2 Button Description Button Description Button Description Window division grou...

Page 24: ...era has enabled Dual VCA You can enable it via the camera web browser interface in Configuration Video Audio Display Info on Stream Ensure your video recorder has enabled Save VCA Data You can enable...

Page 25: ...igure the play strategy Do not Play Normal Videos If it is enabled videos without smart information will not be played Normal Video Set normal video playback speed The option is only valid when Do not...

Page 26: ...to your video recorder Steps 1 Start playback Refer to Normal Playback for details 2 Click 3 Set the start and end time You can also adjust cursors on the time bar to set the time period 4 Click Save...

Page 27: ...1 Go to Search Figure 4 1 Search 2 Select a search type video picture event etc 3 Set search conditions 4 Click Search Click to play the video Click to lock the file Locked file will not be overwritte...

Page 28: ...Mode 5 1 System Configuration 5 1 1 General You can configure the output resolution system time etc Steps 1 Go to Configuration System General Figure 5 1 General Settings 2 Configure the parameters as...

Page 29: ...h NTP server NTP Server IP address of the NTP server 3 Click Apply 5 1 2 User Add User There is a default account Administrator The administrator user name is admin Administrator has the permission to...

Page 30: ...evice will send an email contains verification code to your email for password resetting Steps 1 Go to Configuration System User 2 Click Password Resetting Email 3 Enter admin password for authorizati...

Page 31: ...and password Steps 1 Click Forgot Password at the password login interface 2 Click Next if you agree the Privacy Policy you can scan the QR code to read it 3 Follow the wizard to reset password 5 1 3...

Page 32: ...ser Manual 20 Figure 5 3 Exceptions 5 Click Apply 5 2 Network Configuration 5 2 1 General You shall properly configure the network settings before operating the device over network Steps 1 Go to Confi...

Page 33: ...HiLookVision HiLookVision provides mobile phone application and platform service to access and manage your connected devices which enables you to get a convenient remote access to the surveillance sy...

Page 34: ...QR code below Refer to HiLookVision Mobile Client User Manual for details Figure 5 5 Download HiLookVision 2 Use HiLookVision to scan the device QR and bind the device Note If the device is already bo...

Page 35: ...e The user account of email sender for SMTP server authentication Password The password of email sender for SMTP server authentication SSL TLS Optional Enable SSL TLS if it is required by the SMTP ser...

Page 36: ...hem to the device automatically Select Wi Fi Match from the right click menu in live view mode and the device will search and add Wi Fi cameras The process will take about 2 minutes The Wi Fi camera w...

Page 37: ...n the switch s in Auto Repeater of Wi Fi camera s as your desire Note The repeater camera and repeated camera shall both enable this function Only two layers are allowed for the topology 4 Optional Cl...

Page 38: ...automatically with the password you have set during device activation Add Network Camera Manually Before You Start Ensure your network camera is on the same network segment with that of your video re...

Page 39: ...ded network cameras Steps 1 Go to Configuration Camera IP Camera 2 Click to edit the selected camera Channel Port If the connected device is an encoding device with multiple channels you can select th...

Page 40: ...ame network segment with your video recorder Ensure the network connection is valid and correct Steps 1 Go to Configuration Camera IP Camera 2 Click 3 Click Yes to confirm 4 Select the camera upgrade...

Page 41: ...uration Camera OSD 2 Select a camera Figure 5 10 OSD 3 Set parameters as your desire 4 Drag the text frames on the preview window to adjust the OSD position 5 Click Apply 5 3 3 Event Motion Detection...

Page 42: ...higher value results in the more readily to triggers motion detection 6 Optional Set Target Detection as Human or Vehicle to discard alarms which are not triggered by human body or vehicle Only certa...

Page 43: ...configured line from the A side to the B side can be detected B A Only an object crossing the configured line from the B side to the A side can be detected 3 Set Sensitivity The higher the value is t...

Page 44: ...a Up to 4 arming areas are selectable 2 Set Sensitivity The size of the object that can trigger the alarm The higher the value is the easier the detection alarm can be triggered Its range is 1 100 3 O...

Page 45: ...eas 1 Set Arming Area Up to 4 arming areas are selectable 2 Set Sensitivity The higher the value is the easier the detection alarm can be triggered Its range is 1 100 3 Optional Set Target Detection a...

Page 46: ...arming areas are selectable 2 Set Sensitivity The higher the value is the easier the detection alarm can be triggered Its range is 1 100 3 Optional Set Target Detection as Human or Vehicle to discard...

Page 47: ...linkage actions trigger channel etc Alarm Pop up Window The local monitor will pop up the alarming channel image when an alarm is triggered It requires to select the alarming channel s in Trigger Cha...

Page 48: ...disk drive HDD must be initialized before it can be used to save videos and information Before You Start Install at least an HDD to your video recorder For detailed steps refer to Quick Start Guide S...

Page 49: ...Steps 1 Go to Configuration Record Parameter 2 Set the continuous main stream sub stream recording parameters for the camera Refer to Configure Recording Parameter for details 3 Go to Configuration R...

Page 50: ...t Schedule for details Edit Schedule Steps 1 Go to Configuration Record Schedule Figure 5 18 Recording Schedule Continuous Continuous recording Event Recording is triggered by events 2 Select a camera...

Page 51: ...with higher resolution and frame rate Sub Stream Sub stream is a second codec that runs alongside the mainstream It allows you to reduce the outgoing internet bandwidth without sacrificing your direc...

Page 52: ...0 of bits time unit and not distance time unit Note Higher resolution frame rate and bitrate provide you better video quality but it also requires more internet bandwidth and uses more storage space o...

Page 53: ...assword etc Go to Configuration System General Basic Settings configure the parameters as your desire and click Apply Language The default language is English VGA HDMI Resolution Select the output res...

Page 54: ...n System General DST Settings configure the parameters as your desire and click Apply Configure More Settings You can configure your device name lock screen time output mode etc Go to Configuration Sy...

Page 55: ...de Choose output to display local menu Figure 6 2 More Settings 6 1 2 Live View Configure General Parameters You can configure the output interface mute or turning on the audio event output interface...

Page 56: ...Click Apply Configure Live View Layout Steps 1 Go to Configuration System Live View View 2 Set Output Interface 3 Select a window and double click a camera the list you would like to display means no...

Page 57: ...gure network parameters Working Mode Multi address Mode The parameters of the two NIC cards can be configured independently You can select LAN1 or LAN2 in the NIC type field for parameter settings You...

Page 58: ...P address and other network settings from that server MTU The maximum transmission unit MTU is the size of the largest network layer protocol data unit that can be communicated in a single network tra...

Page 59: ...tus 6 2 3 NAT Two ways are provided for port mapping to realize the remote access via the cross segment network UPnP and manual mapping Before You Start Enable the UPnP function of your router if UPnP...

Page 60: ...d be 554 or between 1024 and 65535 while the value of the other ports should be between 1 and 65535 and the value must be different from each other If multiple devices are configured for the UPnP sett...

Page 61: ...00 HTTP Port For remote web browser access The default value is 80 Multicast IP Multicast can be configured to enable live view for cameras that exceed the maximum number allowed through network A mul...

Page 62: ...Network Video Recorder User Manual 50 Figure 6 7 Port Settings...

Page 63: ...e IP Camera Activation Password as its password Refer to Activate Your Device Note It is recommended to keep the distance between Wi Fi camera and device within 50 meters Only certain Wi Fi camera mod...

Page 64: ...repeated camera shall both enable this function Only two layers are allowed for the topology 4 Optional Click Enable Repeater or Disable Repeater to enable or disable the repeater function of all cam...

Page 65: ...ure your network camera is on the same network segment with your video recorder Ensure the network connection is valid and correct Ensure the network camera password is the same as your video recorder...

Page 66: ...k segment with your video recorder Ensure the network connection is valid and correct Ensure the network camera is activated Steps 1 Go to Configuration Camera Camera IP Channel 2 Click Figure 6 11 Ad...

Page 67: ...mera upgrade firmware Ensure your network camera is on the same network segment with your video recorder Ensure the network connection is valid and correct Steps 1 Go to Configuration Camera Camera IP...

Page 68: ...ard protocols you can configure the customized protocols for them The system provides 16 customized protocols Camera Activation Password Settings Change the default password for activating and adding...

Page 69: ...g illumination and the object have large differences in brightness you should set the WDR value Image Enhancement For optimized image contrast enhancement Figure 6 12 OSD 4 Drag the text frames on the...

Page 70: ...s of the areas will be marked with different colors Note Up to 4 privacy mask areas can be configured The size of each area can be adjusted 5 Click Apply 6 4 Event Configuration 6 4 1 Normal Event Mot...

Page 71: ...Tampering 2 Set Camera 3 Turn on Enable 4 Adjust Sensitivity as your desire The higher the value is the more easily the video tampering can be triggered 5 Set the arming schedule Refer to Configure A...

Page 72: ...ered by the external device that connected to the video recorder s terminal block 2 Click of a desired alarm input Figure 6 16 Edit Alarm Input 3 Customize Alarm Name 4 Set alarm type as N O normally...

Page 73: ...igure 6 18 Edit Alarm Output 5 Set Settings as Input to enable the function 6 Set the arming schedule Refer to Configure Arming Schedule for details 7 Click Apply Exception Exception events can be con...

Page 74: ...tails 5 Click Apply 6 4 2 Smart Event Line Crossing Detection Line crossing detection detects people vehicles and objects crossing a set virtual line The detection direction can be set as bidirectiona...

Page 75: ...region Steps 1 Go to Configuration Event Smart Event Intrusion 2 Set Camera 3 Turn on Enable 4 Optional Check Save VCA Picture to save the captured pictures of VCA detection 5 Set the detection rules...

Page 76: ...Configure Arming Schedule for details 7 Set the linkage actions Refer to Configure Alarm Linkage Action for details 8 Click Apply Region Exiting Detection Region exiting detection function detects peo...

Page 77: ...s activated Steps 1 Go to Configuration Event Smart Event 2 Select a thermal camera detection event 3 Set Camera 4 Set the arming schedule Refer to Configure Arming Schedule for details 5 Set the link...

Page 78: ...n images will be switched at an interval of 10 seconds default dwell time 3 Click Linkage Action of the alarm detection 4 Select Alarm Pop up Window alarm linkage action 5 Select the channel s in Trig...

Page 79: ...ion Trigger Alarm Output The alarm output can be triggered by the normal and smart events Steps 1 Go to Linkage Action interface of the alarm input or event detection 2 Click Trigger Alarm Output 3 Se...

Page 80: ...ured Steps 1 Click Linkage Action 2 Select audio or light as your desire 3 Click Apply Note If you require to set audio and light parameters please log into the network camera via web browser to confi...

Page 81: ...uration Record Parameter 4 Set the continuous main stream sub stream recording parameters for the camera 5 Go to Configuration Record Schedule 6 Select recording type as Event Edit Schedule Steps 1 Go...

Page 82: ...efore the scheduled time or event For example when an alarm triggers the recording at 10 00 and if you set the pre record time as 5 seconds the camera records at 9 59 55 Post Record The time you set t...

Page 83: ...r resolution and frame rate Sub Stream Sub stream is a second codec that runs alongside the mainstream It allows you to reduce the outgoing internet bandwidth without sacrificing your direct recording...

Page 84: ...ce the need of bandwidth and HDD storage space 3 Click Apply 6 5 3 Storage Device Initialize HDD If it is the first time you use your HDD please initialize it after it is installed Before You Start In...

Page 85: ...work disk Result The added network disks will be displayed in the storage device list 6 5 4 Configure Storage Mode Configure HDD Groups Multiple HDDs can be managed in groups Video from specified chan...

Page 86: ...DD to set the group 9 Select a group number for the current HDD 10 Click OK Note Regroup the cameras for HDD if the HDD group number is changed Configure HDD Quota Each camera can be configured with a...

Page 87: ...rd will continue to write new files by deleting the oldest files Enable HDD Sleeping HDDs which are free of working for a long time will turn into sleep status Save Camera VCA Data Camera VCA data wil...

Page 88: ...here the router is used Channel Select the best channel according to your situation Bandwidth Select the bandwidth mode Security Mode Select the security protocol for the wireless network Encryption T...

Page 89: ...Network Video Recorder User Manual 77 3 Click Apply to save the settings...

Page 90: ...all parameters to the factory default settings Restore to Inactive Restore the device to the inactive status and leave all settings unchanged except restoring user accounts 3 Click Yes The device will...

Page 91: ...connect the video recorder HTTP The admin user account can disable the HTTP service from the GUI or the web browser After the HTTP is disabled all the related services including ISAPI and ONVIF will...

Page 92: ...Before You Start Ensure HiLookVision is enabled and properly configured Refer to HiLookVision for details Steps 1 Click at the upper right corner 2 Click 3 Click Online Upgrade 4 Download the latest f...

Page 93: ...Network Video Recorder User Manual 81 7 5 View Wi Fi Information You can view Wi Fi information if you go to Maintenance More Operation Wi Fi Figure 7 1 View Wi Fi Information...

Page 94: ...corner 2 Set Exception Basic Event or Smart Event as your desire Figure 8 1 Alarm Center 3 Click and select events to hint 4 Click OK When the selected events occur the alarm information will be displ...

Page 95: ...windows WebComponents standard WebCompo nents exe 9 2 Login You shall acknowledge that the use of the product with Internet access might be under network security risks For avoidance of any network at...

Page 96: ...4 Note You may have to close the web browser to finish the installation of the plug in 9 3 Live View After login live view interface shows Figure 9 2 Live View 9 4 Playback Click Playback to enter pla...

Page 97: ...order User Manual 85 9 5 Configuration Click Configuration to enter configuration interface Figure 9 4 Configuration 9 6 Log Steps 1 Go to Maintenance System Maintenance Log 2 Set the search condition...

Page 98: ...Network Video Recorder User Manual 86 Figure 9 5 Log...

Page 99: ...ices DHCP clients to obtain configuration information for operation in an Internet Protocol network HTTP Acronym for Hypertext Transfer Protocol A protocol to transfer hypertext request and informatio...

Page 100: ...corder An NVR can be a PC based or embedded system used for centralized management and storage for IP cameras IP Domes and other DVRs PAL Acronym for Phase Alternating Line PAL is also another video s...

Page 101: ...UD24564B...

Reviews: