


Digital Video Recorder User Manual
v
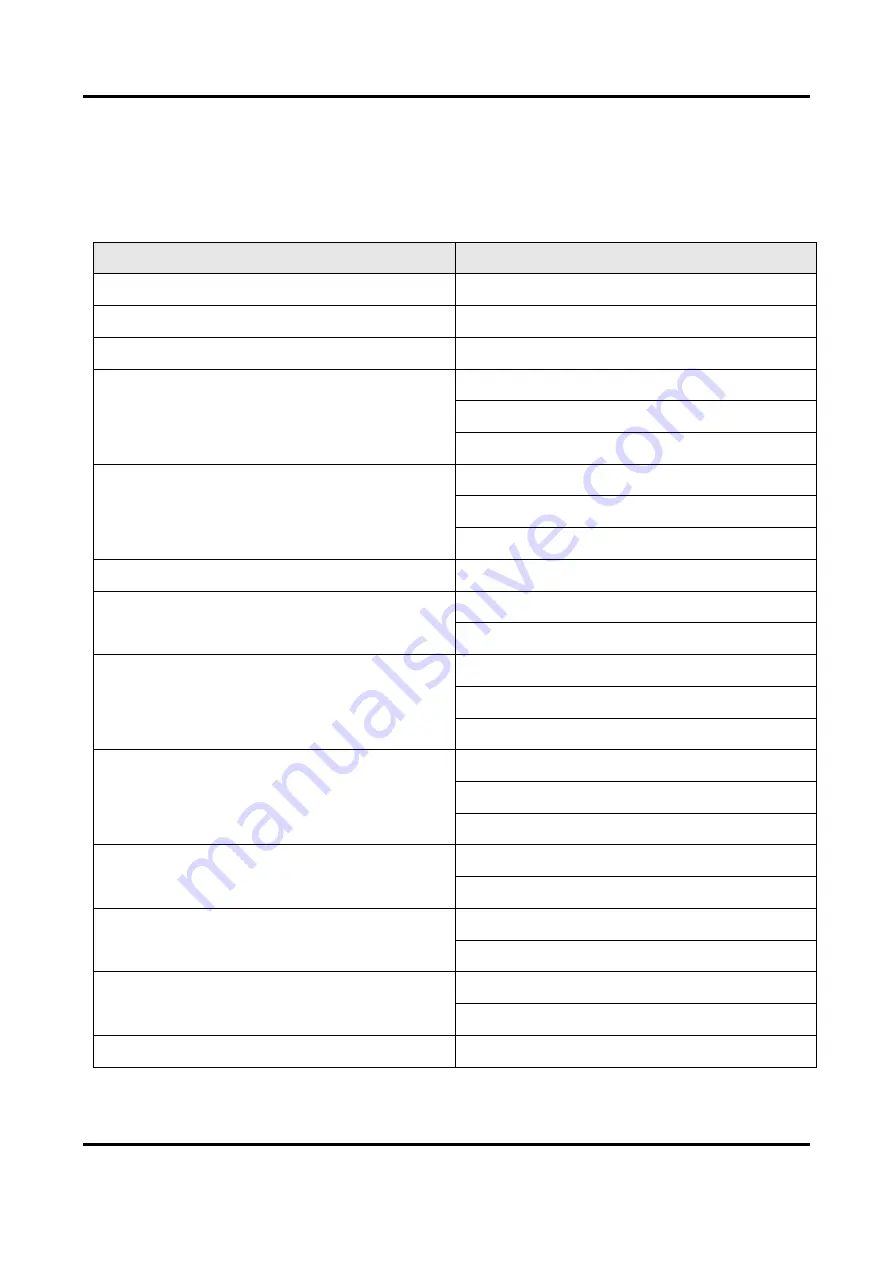
Applicable Model
This manual is applicable to the following models.
Series
Model
DS-7100HQHI-K1
DS-7116HQHI-K1
DS-7200HQHI-K1/E
DS-7216HQHI-K1/E
iDS-7100HQHI-M1/S
iDS-7116HQHI-M1/S
iDS-7200HQHI-M1/FA
iDS-7204HQHI-M1/FA
iDS-7208HQHI-M1/FA
iDS-7216HQHI-M1/FA
iDS-7200HQHI-M1/S
iDS-7204HQHI-M1/S
iDS-7208HQHI-M1/S
iDS-7216HQHI-M1/S
iDS-7200HQHI-M1/E
iDS-7216HQHI-M1/E
iDS-7200HQHI-M2/FA
iDS-7208HQHI-M2/FA
iDS-7216HQHI-M2/FA
iDS-7200HQHI-M2/S
iDS-7208HQHI-M2/S
iDS-7216HQHI-M2/S
iDS-7232HQHI-M2/S
iDS-7200HTHI-M/S
iDS-7204HTHI-M1/S
iDS-7204HTHI-M2/S
iDS-7208HTHI-M2/S
iDS-7200HUHI-M1/FA
iDS-7204HUHI-M1/FA
iDS-7208HUHI-M1/FA
iDS-7200HUHI-M1/S
iDS-7204HUHI-M1/S
iDS-7208HUHI-M1/S
iDS-7200HUHI-M2/FA
iDS-7204HUHI-M2/FA
iDS-7208HUHI-M2/FA
iDS-7200HUHI-M2/S
iDS-7204HUHI-M2/S
Summary of Contents for iDS-7100HQHI-M1/S Series
Page 1: ...Digital Video Recorder User Manual...
Page 105: ...UD27270B...


