


Quick Operation Guide of DS-6600HFHI (/L) Series HD Audio/Video Encoder
4
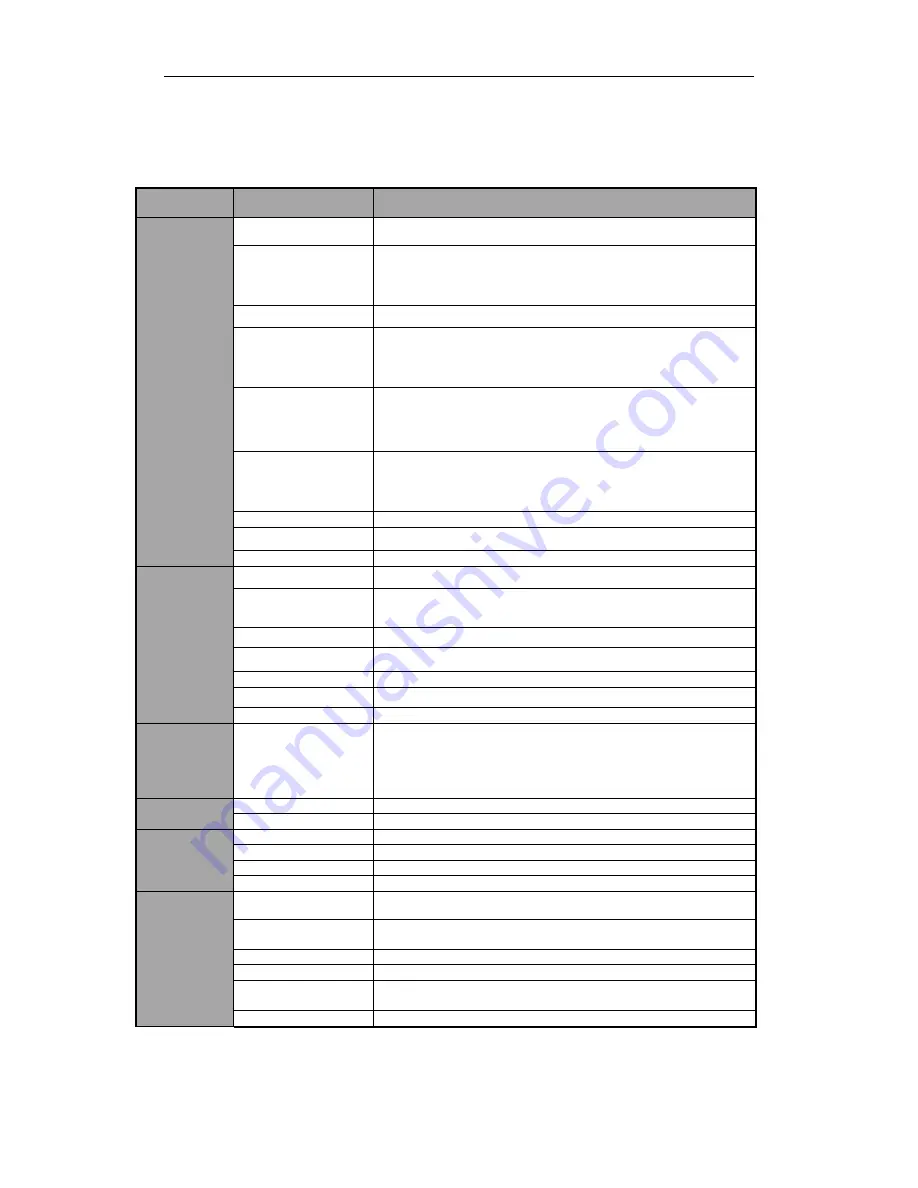
Specifications
DS-6601HFHI
Note:
Each of the HD-SDI, HDMI, VGA, OPT and YPbPr video input interfaces must be connected
independently.
Model
DS-6601HFHI
Video/
Audio
input
Video compression
H.264
HD-SDI video input
1-ch, HD-SDI (800mVp-p, 75Ω)
1920×1080P/25Hz,
1920×1080P/30Hz,
1920×1080I/50Hz,
1920×1080I/60Hz,
1920×720P/25Hz,
1280×720P/30Hz,
1920×720P/50Hz, 1280×720P/60Hz
FC video input
Resolution: 1920×1080P/25Hz, 1280×720P/25Hz, 1600×1200/25Hz
HDMI video input
1-ch,
Resolution:
1600×1200/60Hz, 1920×1080P/60Hz, 1280×720P/60Hz, 1280
×
1024/60Hz, 1024
×
768/60Hz
VGA video input
1-ch,
Resolution:
1600×1200P/60Hz,
1920×1080P/60Hz,
1920×1080P/50Hz,
1280×720P/60Hz, 1280
×
1024/60Hz, 1024
×
768/60Hz
YPbPr video input
1-ch,
Resolution:
1920×1080I/60Hz,
1920×1080I/50Hz,1920×1080P/25Hz,
1920×1080P/30Hz, 1280×720P/60Hz, 1280×720P/50Hz
Audio compression
G.711
Audio input
1-ch, RCA (2.0 Vp-p, 1 kΩ)
Two-way audio
1-ch, RCA (2.0 Vp-p, 1 kΩ)
Video/
Audio
output
Audio output
1-ch, RCA (Linear, 1 kΩ)
Encoding resolution
1920×1080/1600×1200/1280×1024/1280×720/1024×768/704×576/
352×288 (depending on the type of video input interface connected)
Frame rate
1/16~25/30/50/60 fps
Video bit rate
32 Kbps ~ 16 Mbps
Audio bit rate
64 Kbps
Dual stream
Support
Stream type
Video, Video & Audio
Network
Protocols
Protocols Supported
TCP/IP, UDP, IPv4, IPv6;
HTTP, RTP, RTSP, NFS, ISCSI, DHCP, NTP, SMTP, SNMPv1,
SNMPv2c, SNMPv3, UPNP, SADP, PPPoE, DNS, FTP;
IP Server, Dyndns, PeanutHull, NO-IP;
PSIA.
Network disk
Network Disk
8 network disks (NAS/IP SAN)
Capacity
Up to 2TB for each disk
External
interface
Network interface
1 10 M / 100 M /1000 Mbps Ethernet interface
Serial interface
1 RS-485, 1 RS-232
Alarm in
2
Alarm out
1
Others
Power supply
12 VDC
Power
Consumption
≤ 13W
Working temperature
-10°C ~ +55°C
Working humidity
10% ~ 90%
Dimensions
(W × D × H)
200 × 123 × 39 mm
Weight
≤ 1.5 kg