HIKVISION DS-2CE12HFT-E Quick Start Manual Download Page 16

Digital Video Recorder Quick Start Guide


15 

Chapter 4 Accessing by Web Browser 


You shall acknowledge that the use of the product with Internet access might be under network security risks. 
For avoidance of any network attacks and information leakage, please strengthen your own protection. If the 
product does not work properly, please contact with your dealer or the nearest service center. 

Purpose 

You can get access to the device via web browser. You may use one of the following listed web browsers: 
Internet Explorer 6.0, Internet Explorer 7.0, Internet Explorer 8.0, Internet Explorer 9.0, Internet Ex plorer 10.0, 
Apple Safari, Mozilla Firefox, and Google Chrome. The supported resolutions include 1024*768 and above. 

Step 1


Open web browser, enter the IP address of the 
device and then press Enter. 

Step 2


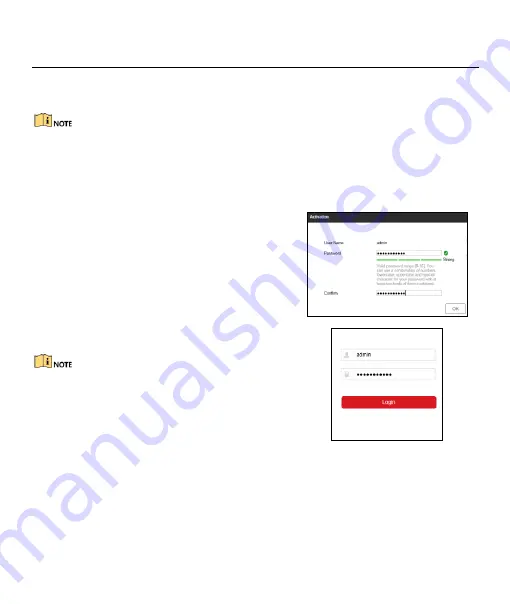
Log in to the device. 


If the device has not been activated, you need 

to activate the device first by setting the 
password for the admin user account. 


If the device is already activated, enter the 

user name and password in the login 
interface, and click 

Login

Step 3


Install the plug-in before viewing the live video and 
managing the camera. Please follow the installation 
prompts to install the plug-in. 


You may have to close the web browser to finish the 

installation of the plug-in. 


After login, you can perform the operation and 

configuration of the device, including the live view, 
playback, log search, configuration, etc. 


Figure 4-1


Activate the Device 


Figure 4-2


Login 


03050201070623 

UD06125B 

Summary of Contents for DS-2CE12HFT-E

Page 1: ...Digital Video Recorder Digital Video Recorder Quick Start Guide...

Page 2: ...nd logos mentioned below are the properties of their respective owners Legal Disclaimer TO THE MAXIMUM EXTENT PERMITTED BY APPLICABLE LAW THE PRODUCT DESCRIBED WITH ITS HARDWARE SOFTWARE AND FIRMWARE...

Page 3: ...erence 2 This device must accept any interference received including interference that may cause undesired operation EU Conformity Statement This product and if applicable the supplied accessories too...

Page 4: ...ps Before connecting and operating your device please be advised of the following tips Ensure unit is installed in a well ventilated dust free environment Unit is designed for indoor use only Keep all...

Page 5: ...O IN RCA connector AUDIO OUT RCA connector LINE IN Connector for two way audio input USB Interface Universal Serial Bus USB port for additional devices VGA DB15 connector for VGA output Displays local...

Page 6: ...of 10 to 55 C 14 to 131 F Environmental humidity should be within the range of 10 to 90 2 2 Hard Disk Installation Before you start Before installing a hard disk drive HDD please make sure the power...

Page 7: ...and Controller Connection To connect PTZ to the DVR Step 1 Disconnect pluggable block from the RS 485 terminal block Step 2 Press and hold the orange part of the pluggable block insert signal cables...

Page 8: ...so activate the device via Web Browser SADP or client software Step 1 Enter the same password in the text fields of Create New Password and Confirm New Password Step 2 Click OK to save the password an...

Page 9: ...same pattern again to confirm it When the two patterns match the pattern is configured successfully Step 3 You can use the configured unlock pattern for future login Figure 3 2 Draw the Pattern 3 4 Us...

Page 10: ...signal input can be recognized and connected automatically For some series of DVR you can configure 5 MP long distance transmission on the Signal Input Status interface For other models there is no S...

Page 11: ...For Initial Access for the connected IP camera supporting H 265 Then the IP camera will be encoded with H 265 Figure 3 7 Add IP Camera 3 8 Connecting PoC Cameras Purpose Some models support PoC Power...

Page 12: ...General Settings Purpose Network settings must be properly configured before you operate DVR over network Step 1 Go to Menu Configuration Network General Step 2 Configure the general parameters of net...

Page 13: ...to 12 letters or numbers and is case sensitive Every time you enable Hik Connect the Service Terms interface pops up and you should check the checkbox before enabling it Step 3 Optional Check Custom...

Page 14: ...ation appears at the lower left corner of the screen 3 11 Recording Settings Before you start Make sure that the disk has already been installed If not please install a disk and initialize it You may...

Page 15: ...back by normal event smart tag system logs sub periods external file search picture Step 1 Go to Menu Playback Step 2 Check the channel s in the channel list for playback Step 3 Double click a date on...

Page 16: ...d Google Chrome The supported resolutions include 1024 768 and above Step 1 Open web browser enter the IP address of the device and then press Enter Step 2 Log in to the device If the device has not b...

Reviews: