HIKVISION DS-2CE12HFT-E Quick Start Manual Download Page 14

Digital Video Recorder Quick Start Guide


13 

3.10 Live View 

Icons are provided on screen in Live View mode to indicate camera status. These icons include: 

Live View Icons 

In the live view mode, there are icons at the upper-right corner of the screen for each channel, showing the 
status of the record and alarm in the channel for quick reference.


Alarm (video loss, tampering, motion detection, VCA or sensor alarm) 

  Record (manual record, continuous record, motion detection, VCA or alarm triggered record) 

  Alarm and Record 

  Event/Exception (event and exception information, appears at the lower-left corner of the screen.) 

3.11 Recording Settings   

Before you start 

Make sure that the disk has already been installed. If not, please install a disk and initialize it. You may refer to 
the user manual for detailed information. 

Purpose 

Two kinds of record types are introduced in the following section, including Instant Record and All-Day Record. 
And for other record types, you may refer to the user manual for detailed information. 


After rebooting all the manual records enabled are canceled. 
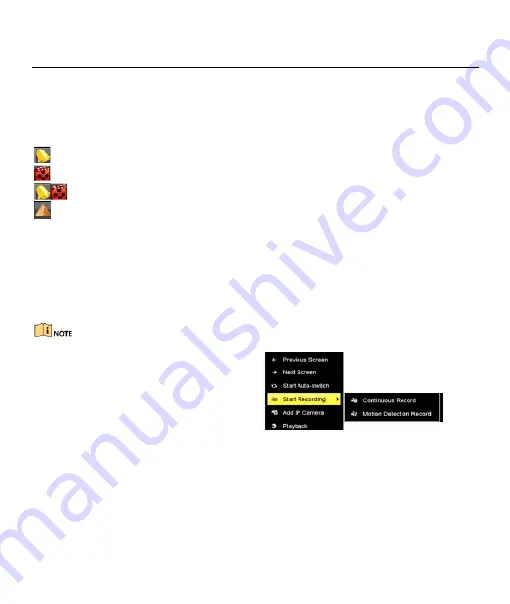
Step 1


Click 

Start Recording 

from the 

right-click menu. 

Step 2


Select

 Continuous Record

 or 

Motion Detection Record

 on your 

demand. 

Step 3


Click 

Yes

 in the pop-up box to 

confirm the settings. 


Figure 3-13


Start Recording from Right-Click Menu 

Summary of Contents for DS-2CE12HFT-E

Page 1: ...Digital Video Recorder Digital Video Recorder Quick Start Guide...

Page 2: ...nd logos mentioned below are the properties of their respective owners Legal Disclaimer TO THE MAXIMUM EXTENT PERMITTED BY APPLICABLE LAW THE PRODUCT DESCRIBED WITH ITS HARDWARE SOFTWARE AND FIRMWARE...

Page 3: ...erence 2 This device must accept any interference received including interference that may cause undesired operation EU Conformity Statement This product and if applicable the supplied accessories too...

Page 4: ...ps Before connecting and operating your device please be advised of the following tips Ensure unit is installed in a well ventilated dust free environment Unit is designed for indoor use only Keep all...

Page 5: ...O IN RCA connector AUDIO OUT RCA connector LINE IN Connector for two way audio input USB Interface Universal Serial Bus USB port for additional devices VGA DB15 connector for VGA output Displays local...

Page 6: ...of 10 to 55 C 14 to 131 F Environmental humidity should be within the range of 10 to 90 2 2 Hard Disk Installation Before you start Before installing a hard disk drive HDD please make sure the power...

Page 7: ...and Controller Connection To connect PTZ to the DVR Step 1 Disconnect pluggable block from the RS 485 terminal block Step 2 Press and hold the orange part of the pluggable block insert signal cables...

Page 8: ...so activate the device via Web Browser SADP or client software Step 1 Enter the same password in the text fields of Create New Password and Confirm New Password Step 2 Click OK to save the password an...

Page 9: ...same pattern again to confirm it When the two patterns match the pattern is configured successfully Step 3 You can use the configured unlock pattern for future login Figure 3 2 Draw the Pattern 3 4 Us...

Page 10: ...signal input can be recognized and connected automatically For some series of DVR you can configure 5 MP long distance transmission on the Signal Input Status interface For other models there is no S...

Page 11: ...For Initial Access for the connected IP camera supporting H 265 Then the IP camera will be encoded with H 265 Figure 3 7 Add IP Camera 3 8 Connecting PoC Cameras Purpose Some models support PoC Power...

Page 12: ...General Settings Purpose Network settings must be properly configured before you operate DVR over network Step 1 Go to Menu Configuration Network General Step 2 Configure the general parameters of net...

Page 13: ...to 12 letters or numbers and is case sensitive Every time you enable Hik Connect the Service Terms interface pops up and you should check the checkbox before enabling it Step 3 Optional Check Custom...

Page 14: ...ation appears at the lower left corner of the screen 3 11 Recording Settings Before you start Make sure that the disk has already been installed If not please install a disk and initialize it You may...

Page 15: ...back by normal event smart tag system logs sub periods external file search picture Step 1 Go to Menu Playback Step 2 Check the channel s in the channel list for playback Step 3 Double click a date on...

Page 16: ...d Google Chrome The supported resolutions include 1024 768 and above Step 1 Open web browser enter the IP address of the device and then press Enter Step 2 Log in to the device If the device has not b...

Reviews: