background image


Page 17 


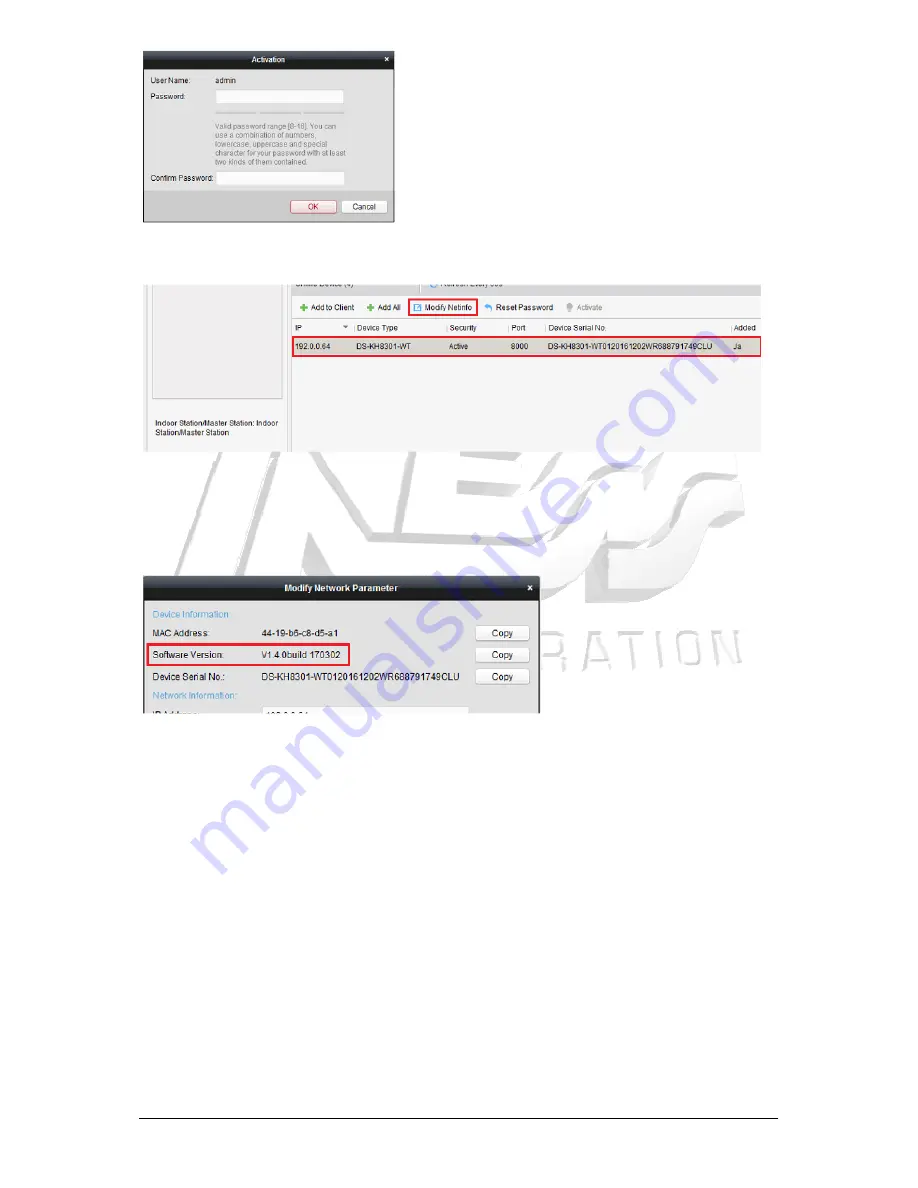
5. Select the room station you just activated and click on ‘Modify NetInfo’. 


6. Make sure the software version is v1.4.0 build 170302 or above before continuing. If it’s 
not then you will need to update the firmware before setting up the system. Refer to the 
firmware update tech note for steps on how to update the firmware. 


7. Each touch screen needs to use a different IP Address. 
 
Use the following IP address for each of the sub room stations: 
 
Sub Room Station 1 – 192.0.0.101 

Sub Room Station 9 – 192.0.0.109 

Sub Room Station 2 – 192.0.0.102 

Sub Room Station 10 – 192.0.0.110 

Sub Room Station 3 – 192.0.0.103 

Sub Room Station 11 – 192.0.0.111 

Sub Room Station 4 – 192.0.0.104 

Sub Room Station 12 – 192.0.0.112 

Sub Room Station 5 – 192.0.0.105 

Sub Room Station 13 – 192.0.0.113 

Sub Room Station 6 – 192.0.0.106 

Sub Room Station 14 – 192.0.0.114 

Sub Room Station 7 – 192.0.0.107 

Sub Room Station 15 – 192.0.0.115 

Sub Room Station 8 – 192.0.0.108 


Summary of Contents for 104-829

Page 1: ...w each of the Sub room stations Wi Fi room stations 104 829 to connect to the system by Wi Fi rather than using a LAN cable The Master room station and the door station still need to be connected by a...

Page 2: ...computer s IP address needs to have the IP address as 192 0 0 xx eg 192 0 0 1 while the system is being setup otherwise it will have issues communicating to the door station and room stations Only th...

Page 3: ...1 Setting up the iVMS 1 Click on Device Management 2 Click on Add new Device Type from the left side menu 3 Ensure that Encoding Device Door Station and Indoor Station Master Station is ticked and cli...

Page 4: ...o work out what room station you are setting up It is recommended that you setup the door station before setting up the room stations Door Station Setup 1 Connect a LAN cable into the door station and...

Page 5: ...reconfigure this door station at a later time you will need to know this password 6 Click on the door station from the bottom section and click on Modify NetInfo 7 Make sure the software version is v...

Page 6: ...lick on Add to Client 10 Now you need to set some settings for this door station Nickname Give the door station a name In my example it s going to be called Door Station Address Leave this as 192 0 0...

Page 7: ...long the top 12 Select Intercom Dial from the left side menu 13 Enter in a Room number for this door station to call then click Save In my example its going to call room number 1 14 Click on Network L...

Page 8: ...oor station s IP address 192 0 0 65 Leave all the other settings as default Once the IP has been set press Save 16 You now need to reboot the room station Click on System System Maintenance then click...

Page 9: ...nce they are all displaying in the list with the same IP address 1 Connect a LAN cable into the Master room station and connect it to your network Only the master room station needs to connect by the...

Page 10: ...t to reconfigure this door station at a later time you will need to know this password 5 Select the door station you just activated and click on Modify NetInfo 6 Make sure the software version is v1 4...

Page 11: ...ngs for this room station Leave the adding mode as IP Domain Nickname Give the room station a name In my example it s going to be called Master Room Station Address leave it as 192 0 0 100 Port Leave...

Page 12: ...rcom ID Configuration from the left menu 12 Give the room station a room number eg 1 then click Save Note make sure the device type is set to Indoor Station 13 Click on Network Linked Network Configur...

Page 13: ...rol panel Port No Set this to 0 Main Door Station Type Set this to Main Door Station V Series Connect Mode Set this to Different Network Once the above settings have been set click on Save 15 You now...

Page 14: ...on the toggle button next to Enable Wi Fi 18 It will now prompt you if the room station you are using is connected to the same LAN as the door station Tap on the No button for this since the WiFi sho...

Page 15: ...i Password has been entered in tap on the Connect button 21 If the connection is succuessful then you will see it say Wi Fi connected under the WiFi it has connected to 22 Tap on the arrow next to the...

Page 16: ...tion and connect it to your network 2 Wait for the touch screen to fully power up then select Indoor Station Master Station from the left menu in iVMS 3 Select the room station from the bottom list an...

Page 17: ...a different IP Address Use the following IP address for each of the sub room stations Sub Room Station 1 192 0 0 101 Sub Room Station 9 192 0 0 109 Sub Room Station 2 192 0 0 102 Sub Room Station 10...

Page 18: ...t some settings for this room station Leave the adding mode as IP Domain Nickname Give the room station a name In my example it s going to be called Sub 1 Room Station Address leave it as it is it sho...

Page 19: ...Remote Configuration 9 Click on Intercom ID Configuration from the left menu 10 Since this is a sub room station you need to select Station Extension as the device type You then need to enter in the...

Page 20: ...Configuration 13 Click on Network Linked Network Configuration from the left menu 14 You then need to set the parameters as per below Main Indoor Station IP The main indoor station IP needs to be set...

Page 21: ...from the home screen 17 Enable the WiFi by tapping on the toggle button next to Enable Wi Fi 18 It will now prompt you if the room station you are using is connected to the same LAN as the door statio...

Page 22: ...le and connect it to a separate 12v Power supply and the system will communicate by Wi Fi Note the Door station and the master room station still needs to be connected by a LAN cable Repeat this secti...

Reviews: