background image


VertX V1000 (CS) Quick Installation Guide 


2

.  Serial (RS-232) Adapter cable

 (P/N 70007) – The Serial Adapter cable is included with the V1000 

controller. 

The Serial Adapter cable is a six inch adapter that converts the 9 pin MTA header to a standard 
DB-9 male connector. This adapter is to be utilized for attaching a standard RS-232 serial modem 
cable (not included) to the VertX controller. This will allow one of the approved external modems 
(listed in 1.5.1 Modem Setup Requirements, page 10) to be attached to the V1000. 

The following table shows the P17 pin settings.  


Pin # 

P17 

1 DCD 

2 RX 


3 TX 


4 DTR 


5 GND 


6 DSR 


7 RTS 


8 CTS 


9 RI 


3

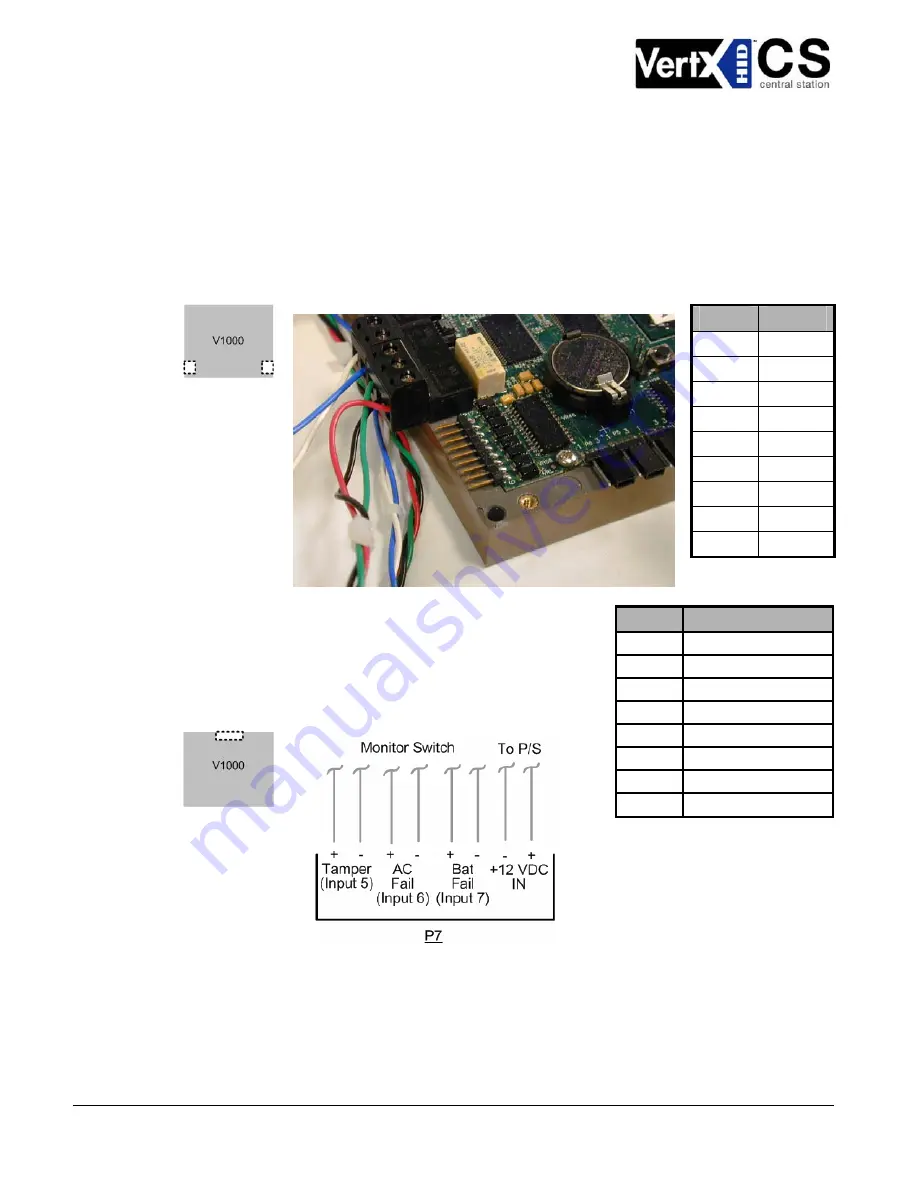
.  Power and Alarm Input connections: 

Connect power by 

providing 12VDC to the 

Pin # 

P7 

P7

 connector. +12VDC goes to 

Pin 1


and ground to 

Pin 2

. Bat Fail, AC Fail, and Tamper switch inputs 

are wired as shown in the table. Connect the Bat Fail and AC Fail 
inputs to the battery low/failure and AC failure contacts on the 
power supply. Connect the Tamper input to a tamper switch on 
the enclosure. 

1 +12VDC 

2 Ground 

Bat Fail - 

Bat Fail + 

AC Fail - 

AC Fail + 

7 Tamper 


8 Tamper 


October 2006 


Page 6 of 20 

© 2006 HID Global Corporation.  All rights reserved.


Summary of Contents for VertX V1000

Page 1: ...9292 Jeronimo Road Irvine CA 92618 1905 Quick Installation Guide V1000 ACCESS CONTROLLER 2006 HID Global Corporation All rights reserved Document Version 1 4 October 5 2006 Document Number 6080 904B 5...

Page 2: ...3 Mounting Instructions 5 1 4 Wiring VertX 10 1 5 Modem 11 Step 2 Contact 11 2 1 Discovery Client 12 2 2 Virtual Port 12 Step 3 Configure 12 3 1 VertX Communications 14 Step 4 Communicate 14 Appendice...

Page 3: ...L resistors 8 HID Serial Adapter cable P N 70007 1 Quick Installation Guide 1 Installation Wiring Diagram Example 1 Note One or more VertX Interface panels are required Note A modem and RS 232 Serial...

Page 4: ...t5 Cat5E and Cat6 Power Supply Refer to your Power Supply Installation Guide 12 VDC IN Minimum wire gauge depends on cable length and current requirements Overview The following outlines what is requi...

Page 5: ...be mounted in a secure area 2 Mount the V1000 using the four mounting screws provided or other appropriate fasteners Place the fasteners in the corner holes of the base 3 The V1000 can be stacked wit...

Page 6: ...ge 10 to be attached to the V1000 The following table shows the P17 pin settings Pin P17 1 DCD 2 RX 3 TX 4 DTR 5 GND 6 DSR 7 RTS 8 CTS 9 RI 3 Power and Alarm Input connections Connect power by providi...

Page 7: ...on bus and therefore cannot have panels with duplicate Interface Addresses assigned The same is true of the V1000 RS 485 Ports 3 and 4 P4 For example two panels both with Interface Address 0 factory d...

Page 8: ...Aux Relay 2 5 P2 Pins 4 5 6 6 P2 Pins 7 8 9 7 P4 Pins 9 8 7 8 P4 Pins 6 5 4 9 P4 Pins 3 2 1 10 P5 Pins 9 8 7 11 P5 Pins 6 5 4 12 P5 Pins 3 2 1 6 Input Connections Input connections are analog inputs u...

Page 9: ...Pins 8 7 3 P1 Pins 5 6 Door Monitor Tamper Door Monitor Tamper P5 Pins 2 1 P7 Pins 6 5 P5 Pins 2 1 P7 Pins 6 5 4 P1 Pins 7 8 REX Input AC Fail REX Input AC Fail P7 Pins 8 7 P7 Pins 4 3 P7 Pins 8 7 P1...

Page 10: ...Modem Setup 1 Connect the RS 232 Serial modem cable purchased separately 9 or 25 pin connector into the back of the modem 2 Connect the other end of the RS 232 Serial modem cable 9 pin connector into...

Page 11: ...nstallation An operating system of Windows XP with NET Framework v2 0 installed is a requirement for the Discovery Client to function properly 1 The Discovery Client can be downloaded by placing the...

Page 12: ...V1000 controller Dynamic Host Configuration Protocol DHCP TCP IP Addressing Static TCP IP Addressing see Configuration Checklist page 18 for a list of criterion needed for a Static TCP IP configurati...

Page 13: ...tion automation software page 16 3 1 3 1 Controller Login Passw ord During your first instance of accessing the Configuration GUI you must change the password located at the bottom of the screen Enter...

Page 14: ...eference the Add Unconfigured By clicking you can configure the V1000 for the attached panels and readers The assumption is that two readers are attached to any V100 interface panel and that both read...

Page 15: ...viewed by hovering the mouse over the image in question Initially all of the interface boards will be selected for a download to commence Note Depending on the VertX controller and system it may take...

Page 16: ...sing selected applications See the Central Station for information If you are not familiar with configuring a firewall for a network contact the Network IT administrator or manager CAUTION If the fire...

Page 17: ...r 949 598 1690 Europe Middle East and Africa HID Corporation Ltd Haverhill UK support support_emea hidvertx com sales salesemea hidvertx com telephone 44 1440 714 850 fax number 44 1440 714 840 Asia P...

Page 18: ...n expense Class B Digital Devices FCC Compliance Statement This equipment has been tested and found to comply with the limits for a Class B digital device pursuant to the limits for a Class B digital...

Page 19: ...HID 70007 AC Electrical Outlet or Surge Protector Optional Configuration Data Connection Type Network DHCP Static Modem Network with Modem VertX IP Address Subnet Mask Default Gateway Primary DNS Serv...

Page 20: ...VertX V1000 CS Quick Installation Guide Intentional Blank October 2006 Page 20 of 20 2006 HID Global Corporation All rights reserved...

Page 21: ...Tamper AC Fail BATT Fail Input 1 Input 2 Relay 1 Relay 2 V100 Series Information If V2000 there is a V100 at Interface Address 0 built in Interface Type Interface Address 0 31 V100 V200 V300 V2000 Ta...

Page 22: ...1 Door Switch 2 REX 2 Strike Relay 1 Aux Relay 1 Strike Relay 2 Aux Relay 2 Input 1 Input 2 Input 3 Input 4 Input 5 Input 6 Input 7 Input 8 V200 Input Interface Monitor Input 9 Input 10 Input 11 Input...

Reviews: