background image

QUICK-START GUIDE

Full manual available to download from: www.Helion-RC.com

Full manual available to download from: www.Helion-RC.com

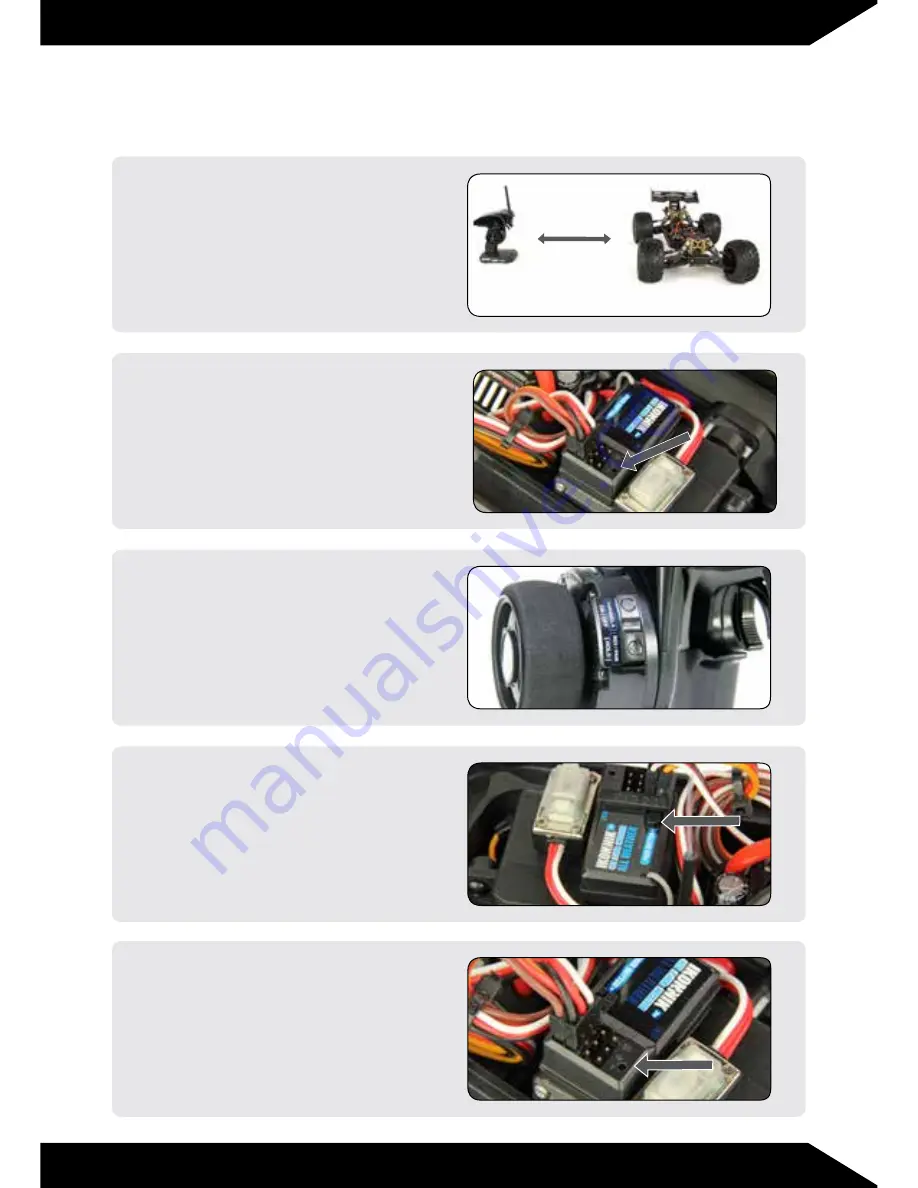
PAIRING/BINDING GUIDE

1

Place your Four 10TR and ET4 

transmitter in close proximity but 

not less than 12” (300mm) apart.

2

Switch ON your ET4 transmitter. 

Switch ON your Four 10TR. The 

receiver’s LED will blink. 

3

Switch OFF your ET4 transmitter, 

hold down the REV/PAIR button 

and switch the transmitter ON 

once again. 

4

Press the Pair button on the 

receiver. The LED will blink. 

Release the Pair button. 

5

When the LED on the receiver 

shows solid red your ET4 and Four 

10TR will be paired. Return to 

Step 13 of this guide to complete 

the set-up of your car. 

Having followed steps 1 to 13, in the unlikely event that your car does not operate please 

follow the 6 stage pairing/binding process detailed here.

300mm

Minimum

Summary of Contents for four 10 tr

Page 1: ...each of children 3 years of age and younger To download the full Owner s Manual Technical Information Guide please visit www Helion RC com or scan the QR code with your smart phone Distributed in the UK by J Perkins Distribution Ltd Lenham Kent UK ME17 2DL www jperkins com Distributed in Australia by Model Engines Aust Pty Ltd Unit 1 158 168 Browns Road Noble Park Victoria 3174 Australia www model...

Page 2: ...ct 1x Four 10TR 4WD truggy 1x IKONNIK ET4 2 4GHz 4 channel transmitter 1x wheelie bar 1x rear spoiler 1x screw set 1x Quick Start Guide 2 To complete the final assembly of your Four 10TR you will need the following items 1x 2 4S LiPo battery 1x Suitable LiPo battery charger 1x 2mm hex driver 1x 2 5mm hex driver 4x AA batteries 3 Peel the protective wrapping from your car remove all four body clips...

Page 3: ...plug Also note that if using a NiMH battery you will need to reset the Low Voltage Cut Off on your ESC to suit 7 Locate the battery cradle on the left side of the car insert the fully charged LiPo into the cradle and tighten the hook and loop straps to secure it firmly in position 8 Plug the two pin headlight lead into the channel 3 receiver socket noting the polarity i e black lead closest to the...

Page 4: ... Locate the switch and turn ON your Four 10TR In the unlikely event that the car does not operate see the PAIRING instructions at the back of this guide 14 Check the operation of the throttle and steering Pulling the throttle trigger back will drive the car forwards Pushing the trigger forwards will apply the brakes or drive the car in reverse Turning the wheel right will cause the car to turn rig...

Page 5: ...ET4 transmitter hold down the REV PAIR button and switch the transmitter ON once again 4 Press the Pair button on the receiver The LED will blink Release the Pair button 5 When the LED on the receiver shows solid red your ET4 and Four 10TR will be paired Return to Step 13 of this guide to complete the set up of your car Having followed steps 1 to 13 in the unlikely event that your car does not ope...

Page 6: ...PAIRING BINDING GUIDE Full manual available to download from www Helion RC com NOTE If you experience any problems please consult online troubleshooting guide 000632 002 REV A ...

Reviews: