Maintenance and Service
8.4
How to Remove the I/O Panel
Cross head screwdriver
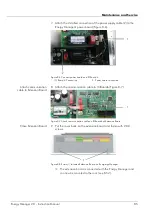
The I/O panel is fastened to the back side of the Energy Manager and to
the back of the Extension Board with four screws. It can be removed
without releasing the attached connectors. Thus the Energy Manager can
easily be replaced.
If there is enough space left behind the Energy Manager, you can remove
the I/O panel from the 50 pin plug connector. If there is not enough
space, you have to pull the Energy Manager out with the I/O panel about
20 cm or rotate the Energy Manger by 90 degrees then remove the I/O
panel form the 50 pin plug connector.
Figure 8-1 I/O Panel
Proceed as follows:
1.
Shut down Energy Manager. See
How to Shut Down Energy Manager
on page 80.
A message on the display indicates when the power supply can be
disconnected.
2.
Disconnect the power supply.
If there is enough space for wiring from the back:
3.
Unscrew the 4 screws on the left and on the right side of the I/O
Panel.
4.
Hold the I/O panel with both hands on the handles and remove it
from the Energy Manager or Extension Board.
If there is not enough space for wiring from the back:
Pull the Energy Manger and Extension Board out from the rack
until you can proceed as described in steps 3 and 4.
8.5
How to Install the Extension Board (Option)
The Extension Board connects to the Energy Manager. They are
integrated into a rack in two available 19-inch units, one on top of the
other.
8.5.1
Unpacking and Visual Inspection
A delivery receipt is included with the device.
Check for the correct number as per the delivery receipt.
Check all parts for external damage.
82
Energy Manager 2.0 - Instruction Manual
Summary of Contents for Energy Manager 2.0
Page 1: ...Energy Manager 2 0 Instruction Manual ...
Page 6: ......
Page 14: ......
Page 78: ......
Page 93: ...Energy Manager 2 0 Instruction Manual 93 ...
Page 94: ......
Page 101: ...Heliocentris Industry GmbH Rudower Chaussee 29 12489 Berlin Germany http www heliocentris com ...


