16
®
MAINTENANCE
MAINTENANCE
Replacing a Rotor Blade
Remove the screw holding the rotor blade to the motor shaft and pull the
blade up to remove it. There are arrows on the rotor blade and arm indicating
which direction the rotor blade will rotate. When installing the rotor blades
on the 230Si, please select a blade the same color and with an arrow in the
same direction.
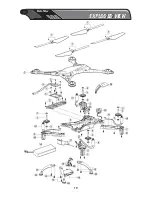
When the blades are correctly installed, they should look like the blades on
the quadcopter in this photo.
Replacing a Motor
1. Remove the landing gear below the arm with the defective motor.
2. Remove the five screws holding the upper and lower frames together and
separate the frames.
3. Remove the screw holding the LED board to the lower frame.
4. Unplug the wire from the control board and remove the LED board and motor.
Install the new motor/LED board and follow these steps in reverse order to
re-assemble the quadcopter.

