23
®
Link
Heat
Stk #
Size
Dimension X
11328
1"
13" ± 1⁄4" (330 ± 5 mm)
11335
11⁄4"
12-1⁄2" ± 1⁄4" (320 ± 5 mm)
11341
11⁄2"
12-3⁄4" ± 1⁄4" (325 ± 5 mm)
1", 11⁄4", & 11⁄2" Standard Press Tool Calibration
1. Close the tool handles until preload
is reached (point at which the jaws
butt together).
2. Measure Dimension X (see diagram
below) and compare against
the measurements listed in the
corresponding table below and
on the tool's adjustment sticker,
located on the handle (this sticker
supersedes information in this
manual).
3. To adjust the preload setting, loosen
the bottom set screw slightly by
turning counter clockwise. Tighten
the top set screw by turning
clockwise, or loosen by turning
counter-clockwise, until the preload
distance is within tolerance for
Dimension X. Tighten the bottom
set screw to clamp the setting.
4. Lubricate all joints and pivot points.
5. Make 3 test presses, testing each
with a Go/No-Go Gauge, to ensure
the tool is not damaged or worn.
Worn tools can often be refurbished
with new pins and clips HL Part #:
11903.
6. Recalibrate as needed.
All HeatLink Press Tools are precalibrated by the manufacturer, and do not normally require
an initial calibration. However, all press tools wear with use, and it is recommended that
every press tool be recalibrated as necessary.
A
calibration demonstration video
is available on the HeatLink website.
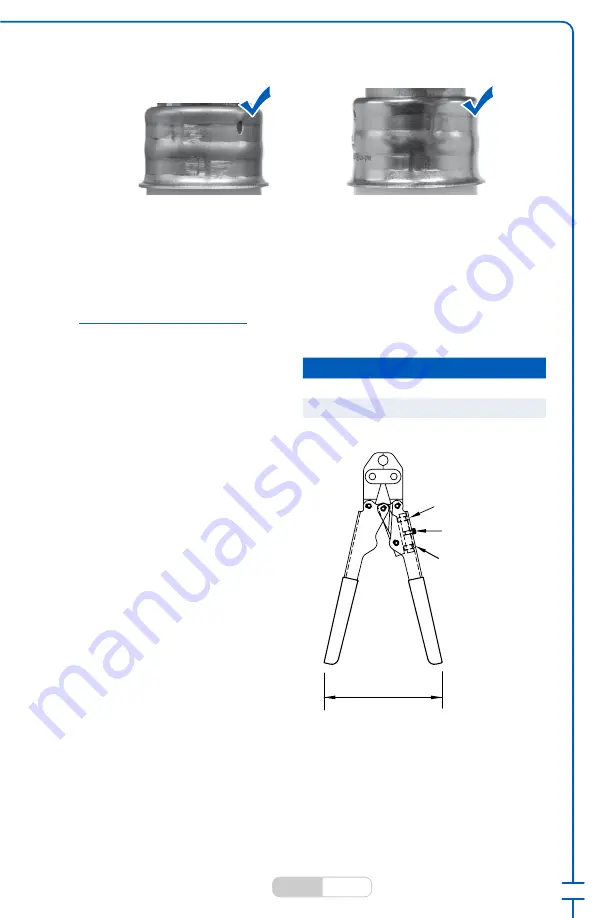
Standard Press Tools
11⁄4"
11⁄2"
Example Presses
Warranty is null and void if the date coded adjustment sticker is removed from the tool.
Never exceed the specified handle distance or premature wear will result.
New tools may slightly exceed Dimension X until broken in by use.
Always wear eye protection when working with the HeatLink® press tool and fitting system.
DIMENSION X
top set screw
frame screw
(do not loosen)
bottom screw
(clamping)
Handle Preload


