background image

HearthStone Quality Home Heating Products Inc

                                                                   Champlain 

Model #8300


28

NOT INSTALL

 the heater. Contact your 

dealer for the correct model or conversion 
kit. 
 

G

AS 

P

RESSURE 

A

DJUSTMENT


NOTE: A QUALIFIED TECHNICIAN 
MUST PERFORM THIS PROCEDURE! 
 

The supply line pressure is tested to ensure 
is meets minimum pressure requirements, as 
listed in the Specifications sections of this 
manual, for the type of fuel in use (NG or 
LP).  
 
The unit must be isolated from the gas 
supply piping system by closing its 
individual manual shutoff valve during any 
pressure testing of the gas supply piping 
system at test pressures equal to or less than 
½ psig. 
 
 During tests in excess of ½ psig (14” w.c.), 
the heater must be disconnected from the 
gas supply system. Test by connecting a 
manometer to the supply line. Adjust the 
incoming pressure, if necessary, to meet the 
required supply line pressure.  
 
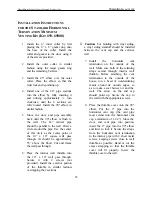
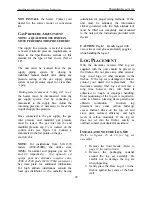
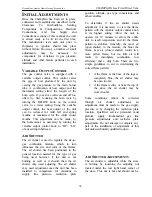
Once connected to the gas supply, the gas 
inlet pressure and manifold gas pressure 
must be tested. The gas inlet tap (6) and 
manifold  pressure tap (7) is located on the 
control valve (see Figure 14). Connect a 
manometer to the test points on the gas  
control valve. 
 

NOTE: 

For installations from 610-1370 

meters (2000-4500ft), the orifice sizes 
(DMS) for natural and propane gas are 32 
and  49 respectively.  (

Cet appareil est 

equipé pour des altitudes compries entre  
2000 et 4500 pieds (610-1370m) seulement.) 

See data plate for additional information. 
For high altitude installations consult the 
local gas distributor or the authority having 

jurisdiction for proper rating methods.  If the 
unit must be adjusted, the information 
sticker (provided with the high altitude kit) 
must be filled out completely and mounted 
to the unit per the instructions provided with 
the kit. 


CAUTION:

 Fragile!   Handle log set with 

care. Always wear gloves and safety goggles 
while handling the log set. 
 

L

OG 

P

LACEMENT


Only the decorative ceramic fiber log set 
supplied with the unit should be placed in 
the firebox. Do not place any other ceramic 
logs, wood logs, or other materials in the 
firebox.  If the log set is damaged or broken 
contact your dealer for replacement.  The 
decorative ceramic fiber log set will last a 
long time, however, they will break if 
subjected to rough or improper handling. 
Exact positioning of the log set is required in 
order to obtain a pleasing flame pattern and 
efficient combustion.  Incorrect log 
placement may cause carbon build-up; 
excess thermal stress on the log set and 
stove parts, reduced efficiency, and high 
levels of carbon monoxide. If the log set 
does not set into the firebox exactly as 
outlined, contact your dealer for assistance. 

 
I

NSTALLATION OF THE 

L

OG 

S

ET


(Refer to figures 15 & 16 for log set 
assembly) 


1.  Remove the front façade. 

(Refer to 

page 12 for instructions)


2.  Remove the packaging 

material 

around the log set assembly. Be 
careful not to damage the log set 
when unpacking. 

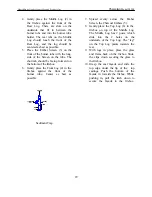
3.  Gently place the Rear Log (1) in the 

firebox against the center of the back 
wall. 

Summary of Contents for Champlain

Page 1: ...upplier must perform installation and service AVERTISSEMENT Assurez vous de bien suivre les instructions donné dans cette notice pour réduire au minimum le risque d incendie ou pour éviter tout dommage matéeriel toute blessure ou la mort Ne pas entresposer ni utiliser d essence ni d autre vaperurs ou liquides inflammables dans le voisinage de cet apprareil ou de tout autre appareil QUE FAIRE SI VO...

Page 2: ...y claims if necessary Keep your original receipt in a safe place as proof of purchase Serial Number Fuel type check one Natural Gas Liquid Propane Sold by Phone Date of Purchase Installed by Phone Date of Installation Gas Supplier Phone Read this Owner s Manual before installing or operating the CHAMPLAIN heater Retain this manual for future reference SERVICE RECORD Date Who Performed Work Work Pe...

Page 3: ...hermostat switch is set to Thermostat the wall mounted thermostat will control the on off cycling of the unit At any time you can override the thermostat with the On Off Thermostat switch by setting it to ON or OFF The Unit can also be equipped with an optional blower fan which turns on and off independently of the burner flames When the speed switch which allows you to turn the fan on or off and ...

Page 4: ...been under water Immediately call a qualified service technician to inspect the heater and to replace any part of the control system and gas control that has been under water Ne pas se servir de cet appareil s il a été plongé dans l eau complétement ou en partie Appeler un technicien qualifié pour inspector l appareil et remplacer toute partie du systéme de contrôle et toute commande qui ont été p...

Page 5: ...qualified service personnel Prior to servicing the unit turn the valve control knob clockwise to OFF The unit should be cool prior to servicing and cleaning Any safety screen guard or component removed during servicing should be replaced prior to operation Use of any components not supplied by HearthStone on the stove voids all warranties Do not substitute components HOT SURFACES Certain exposed s...

Page 6: ...E DO NOT SLAM OR STRIKE GLASS CERAMIC FIBER LOG SAFETY INFORMATION If the decorative ceramic log material supplied with the Champlain is damaged or missing it must be replaced with the same approved replacement parts supplied by the manufacturer These components affect the combustion quality and safety of the heater Do not replace fiber ceramic logs with unapproved ceramic logs or any other materi...

Page 7: ...21 88 1998 CSA 2 33 M98 CAN CGA2 17 Figure 1 Champlain Dimensions NG LP Input rating Btu hr 0 2000ft 37 000 37 000 Maximum output Btu hr 0 2000ft 26 200 26 800 Minimum input rating Btu hr 20 300 22 600 Orifice size DMS 0 2000ft 31 49 Man pressure HI setting in w c kPa 3 5 0 84 10 0 2 48 Man pressure LO setting in w c kPa 1 2 0 30 3 3 0 80 Inlet pressure HI in w c kPa 7 0 1 74 13 0 3 22 Inlet press...

Page 8: ...settle on the floor If you smell gas immediately follow the What To Do If You Smell Gas warning on the cover of this Manual If you do not smell gas proceed to the next step 5 Turn gas control knob counter clockwise to PILOT 6 Push in control knob all the way and hold in Immediately light the pilot with the gas lighter push in and click the piezoelectric spark ignitor button several times until lit...

Page 9: ...red heater is easily operated by the homeowner once installed and adjusted by a qualified service technician Following is a list of the controls available to the owner user A ON OFF PILOT Built into Valve B VARIABLE OUTPUT CONTROL Built into Valve C ON OFF THERMOSTAT SWITCH Standard D THERMOSTAT Standard E REMOTE CONTROL w o thermostat Optional F REMOTE CONTROL w thermostat Optional G BLOWER Optio...

Page 10: ... The unit may be equipped with an OPTIONAL blower fan available through your local HearthStone dealer The fan helps to circulate heat away from the stove Note the ON OFF T STAT switch or the THERMOSTAT controls the on off cycling of the main burners but the pilot remains lit regardless of any of the control settings B G listed previously except the ON OFF PILOT control knob which is the only way t...

Page 11: ...ree of obstruction safe and in good working order If service or maintenance is required qualified service personnel should perform it INSTALLER S INFORMATION CODES Adhere to all local codes or in their absence the latest edition of THE NATIONAL FUEL GAS CODE ANSI Z223 1 NFPA 54 or CAN CGA B149 Installation Code that can be obtained from AMERICAN NATIONAL STANDARDS INSTITUTE INC 1430 BROADWAY NEW Y...

Page 12: ... visible or concealed damage is found contact your dealer The decorative ceramic fiber logs supplied with the Champlain are located in the firebox Always use great care when handling the decorative ceramic logs as they are fragile and subject to damage and breakage To open the firebox remove the two upper front screws located in the grill of the front that hold the cast façade onto the unit THESE ...

Page 13: ...low for adequate ventilation Be sure to consider the need for access to the gas control valve access door on the front of the unit as well as full access for periodic cleaning and servicing Also consider the location of the Optional Blower Fan NOTE These clearances represent minimum distances in all cases which through testing in an independent laboratory to ANSI and CSA standards will prevent fir...

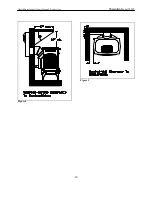
Page 14: ...HearthStone Quality Home Heating Products Inc Champlain Model 8300 14 Figure 4 Figure 5 ...

Page 15: ...HearthStone Quality Home Heating Products Inc Champlain Model 8300 15 Acceptable Direct Vent TERMINATION Cap locations Figure 6 ...

Page 16: ...te the installation 2 Attach the inner starter collar and gasket to the unit with the eight 8 32 x 3 8 Phillips Head self tapping screws 3 Place the outer starter collar and gasket onto the back of the stove Secure the outer adapter with the eight 8 32 x 3 8 Phillips Head self tapping screws that are provided Install the rest of the vent system according to the manufacturer s instructions 1 Gasket...

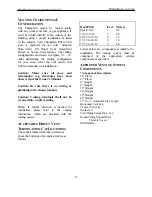
Page 17: ... the chosen location Caution Venting terminals shall not be recessed into a wall or siding Note If further direction is needed for installation please refer to the venting instructions which are provided with the venting system ACCEPTABLE DIRECT VENT TERMINATION CAP LOCATIONS The vent air intake termination clearances above the high side of an angled roof are as follows Roof Pitch Feet Meters Flat...

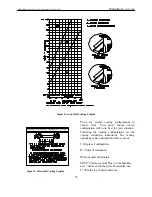
Page 18: ... must choose which configuration will work best for your situation Following the venting configurations are the venting connection instructions The venting options have been divided into three sections I Fireplace Configuration II Vertical Termination III Horizontal Termination NOTE Clearances from Pipe to Combustibles are 1 below and to the side of horizontal runs 2 from the top of horizontal run...

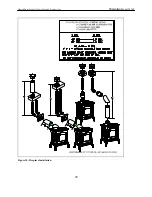
Page 19: ...max Co Linear Flex Connector High Wind Termination Cap DV CHIMNEY CO LINER SYSTEM Chimney Liner Termination Kit includes Co Liner to Co Axial Termination and Flashing 2 Sections 3 Flex Liners 10ft min 30ft max High Wind Termination Cap Co Axial to Co Linear Appliance Connector 4 3 1 2 Hose Clamps DV CHIMNEY CO AXIAL LINER SYSTEM Chimney Liner Termination Kit includes Co Linear to Co Axial Terminat...

Page 20: ...HearthStone Quality Home Heating Products Inc Champlain Model 8300 20 Figure 10 Fireplace Installation ...

Page 21: ...gures 8 9 11 note shutter setting maximum rise to run 1 to 5 refer to Figures 8 9 note shutter setting The termination must fall within the area outlined by the shaded area shownin Figure 8 and the Chart in Figure 9 should be considered as well Figure 11 Vertical Termination APPROVED VERTICAL TERMINATION VENTING CONFIGURATIONS WITH 1 Two 90º Elbows 90º Elbow Straight Pipe 2 Two 45º Elbows 45º Elbo...

Page 22: ...n in Figure 8 and the Chart in Figure 9 should be considered as well Use a vinyl siding stand off when installing against a vinyl siding Horizontal sections require a rise every 12 of horizontal run For each 90º elbow after the second remove 5 from horizontal run At minimum vertical rise maximum horizontal run is 10 Use with snorkel termination 10 maximum horizontal run Figure 12 Horizontal Termin...

Page 23: ...through 6 Place the interior wall thimble into the 10 x 10 wall pass through Secure it with 4 screws not provided Install the exterior portion of the thimble in similar fashion overlapping the 2 sections Caution For building with vinyl siding a vinyl siding standoff should be installed between the vent cap and the exterior wall 7 Install the horizontal vent termination on the outside of the wall M...

Page 24: ...0 56912 can be used If you would like to control the temperature via the remote control use Kit 90 56914 Installation instructions are provided with the kits THERMOSTAT PLACEMENT The thermostat should be placed in the same room or living space as the unit Typically 5 1 5m off the floor and away from any influences that may cause the temperature in the vicinity of the thermostat to be unrepresentat...

Page 25: ... control the speed of the fan to suit your needs is set to On the fan will automatically turn on when the stove is hot and cycle off when the unit is no longer hot Installation instructions are provided with the Kit ELECTRICAL GROUNDING INSTRUCTIONS This appliance is equipped with a three prong grounding plug for your protection against shock hazard and should be plugged directly into a properly g...

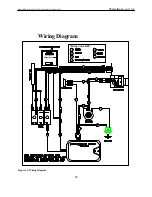
Page 26: ...eating Products Inc Champlain Model 8300 26 Bk Bk W Bk Wiring Color KEY Br B G YG R Hearthstone Bk Y V c 50 70 90 10 20 30 O OFF 50 60 70 80 90 c 10 20 30 O Wiring Diagram Bk V Y YG Bk W Bk B W G G W Bk Figure 13 Wiring Diagram ...

Page 27: ...mmend using new black iron or steel pipe only with a flexible line to the valve and to ease thread alignment but refer to local codes Internally tinned copper tubing can be used in some areas when permitted by local codes The gas supply line must include a manual shut off valve and union so the unit can be disconnected for servicing Also a sediment trap and a 1 8 N P T plugged tapping must be inst...

Page 28: ...data plate for additional information For high altitude installations consult the local gas distributor or the authority having jurisdiction for proper rating methods If the unit must be adjusted the information sticker provided with the high altitude kit must be filled out completely and mounted to the unit per the instructions provided with the kit CAUTION Fragile Handle log set with care Always...

Page 29: ...ont Log 4 in the firebox against the front of the burner tube Center as best as possible 7 Spread evenly across the Ember Screen the Charcoal Embers 5 8 Gently place the Top Log 6 in the firebox on top of the Middle Log The Middle Log has 2 posts which slide into the 2 holes on the underside of the Top Log The leg on the Top Log points towards the rear 9 With logs in place place the glass and fram...

Page 30: ...HearthStone Quality Home Heating Products Inc Champlain Model 8300 30 Figure 15 Log Set Assembly ...

Page 31: ...nd or textiles Such odors will dissipate However opening a window or otherwise providing additional ventilation to the area can alleviate the condition If any odor persists contact your dealer or an authorized service technician PILOT LIGHT WARNING The Champlain has a piezoelectric spark igniter the red push button located next to the gas control valve behind the valve access door which ignites th...

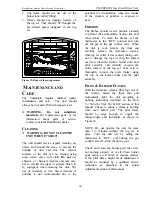
Page 32: ...ed in the general location needed for the type of gas being used however if the unit is not burning as well as it should then the air shutter may need adjusting The air shutter may need adjustment once the unit has been installed to compensate for variations in supply line pressure restriction plate position altitude gas type conversions and other variables To determine if the air shutter needs ad...

Page 33: ...ust engulf the thermopile so that the thermopile can generate sufficient milli voltage 325 to 500 mv to power the milli volt gas control valve The flame on the pilot should look like Figure 18 Controlling the Champlain by the wall mounted thermostat may become erratic nonexistent or the unit may go out if the pilot flame is too small or misdirected away from the thermopile Figure 18 Pilot Adjustme...

Page 34: ...lation of dust lint and other debris To clean the firebox set the thermostat to the OFF position and turn off the gas at the gas control valve When the unit is cool remove the front and carefully remove the decorative ceramic fiber log set after it has cooled taking care not to damage the logs or chip the enamel cast iron Clean the firebox burner tube and pilot assembly and carefully vacuum the en...

Page 35: ...to ensure that it is clean free of obstruction safe and in good working order If service or maintenance is required a qualified service technician should perform it CLEANING THE GLASS If operating on propane it may be necessary to clean the inside of the glass occasionally Do not use abrasive cleaners steel wool or a razor blade Scratching the glass will weaken the integrity of the glass Your deal...

Page 36: ...0 THERMOPILE 5300 040 HEAT SHIELD REAR LEFT 7211 390 3 WAY PILOT HOOD WITH CLIP 5300 050 HEAT SHIELD REAR RIGHT 7211 009 PILOT TUBE 5300 080 BRACKET VALVE SHIELD 7211 017 TUBE GAS FLEX 3 8 x 12 BURNER 5300 095 EMBER SCREEN 7211 020 BURNER INLET ELBOW 3 8 COMP 5300 102 BOTTOM GLASS FRAME MOUNT 7210 007 FITTING STRT 3 8 NPT x 3 8 CMP 5300 108 GLASS FRAME 3030 036 FRONT GLASS 5300 086 LATCH MOUNT 316...

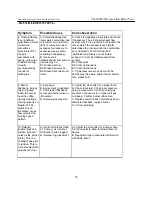
Page 37: ...E After sitting for off season summer pilot assembly may be dirty E Clean or replace the pilot assembly 2 Pilot will not stay lit after carefully following lighting instructions A Low or too high gas pressure A Check for proper inlet pressure for the gas being used B Faulty connections B Measure voltage between valve body and solder connection on the rear of the valve where the blue wire connects ...

Page 38: ... pilot assembly If the meter reading is OK but the burner does not come on replace the gas valve C Plugged burner orifice C Remove and check burner orifice clean or replace Note do not use any metal cleaning device as this may damage the orifice 4 Pilot and burner come on but go out after some warm up A Inconsistent of insufficient flame on thermopile A Adjust pilot flame size and assure that the ...

Page 39: ...r ports B2 Clear obstructions B3 Clear obstructions C If gas pressures are correct and the flames stay the same adjust the air shutter for a proper burn 9 Burner flashback Air gas mixture ignites inside the burner near the orifice usually creating a roaring noise like a blowtorch The problem is an imbalance of gas flow velocity and burning speed pattern A Excessive B Burner input underrated C Valv...

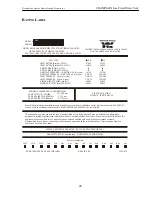
Page 40: ...WALL EDGE OF SIDE TO SIDEWALL 14 356 mm 2 50 mm 4 102 mm ELECTRICAL RATING 115 VOLTS LESS THAN 2 0A VENTED GAS FIREPLACE HEATER NOT FOR USE WITH SOLID FUEL MANUFACTURED BY HearthStone MORRISVILLE VERMONT 05661 Date of Manufacture 2001 2002 2003 Jan Feb Mar Apr May Jun Jul Aug Sep Oct Nov Dec DO NOT REMOVE OR COVER THIS LABEL MADE IN USA 3300 523 FUEL TYPE Several Optional kits are available throug...

Page 41: ... result from defects in material and workmanship Firebox and firebox baffle against breakage cracking or burn through Convective heat exchanger against breakage cracking or burn through Burners air shutters and orifices against breakage cracking or burn through Ceramic logs and embers against breakage cracking or burn through This warranty expires on the fifth 5th anniversary of the Purchase Date ...

Page 42: ...HE ORIGINAL PURCHASER IN LIEU OF ALL OTHER EXPRESS WARRANTIES AND ANY OBLIGATIONS LIABILITIES RIGHTS CLAIMS OR REMEDIES IN CONTRACT OR TORT WHETHER OR NOT ARISING FROM HEARTHSTONE S NEGLIGENCE ACTUAL OR IMPUTED ALL IMPLIED WARRANTIES INCLUDING THE WARRANTIES OF MERCHANTABILITY AND FITNESS FOR A PARTICULAR PURPOSE ARE GIVEN ONLY TO THE EXTENT REQUIRED BY FEDERAL OR STATE LAW EXCEPT AS OTHERWISE REQ...

Page 43: ...ser is responsible for the cost of labor Shipping cost for parts Within the first ninety 90 days after the Purchase Date HearthStone will pay for the shipping of Stove parts covered by any of the foregoing warranties to and from HearthStone or a Dealer as the case may be Thereafter the Original Purchaser is responsible for all shipping costs related to shipping Stove parts to and from HearthStone ...

Reviews: