background image

12

Memory Recall

There are a total of 10 memory readings. 

NOTE: The memory bank holds memories for both ear and object mode.

The current measurement is always stored as number 1, while the oldest  

reading is always stored as number 10.

To recall measurements in memory:

1. If the thermometer is OFF, press the POWER button to turn 

it ON. The screen will run a quick self test then appear as 

shown in Fig. 1 indicating the thermometer is ready to 

take a measurement.

2. Press and hold the POWER button for approximately 3 

seconds. 

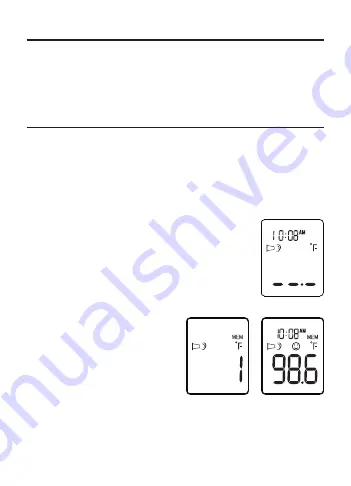
3. The screen will display the memory number (Fig. 2) and 

then the actual measurement (Fig. 3). Press the POWER 

button to scroll through additional saved readings.

NOTE: All subsequent measurements 

taken will fill the memory spaces until 

they reach the number 10 spot. Once all 

of the spaces are filled, the oldest  

measurement will automatically be 

deleted from memory.

FIG. 2

FIG. 1

How To Take A Reading - Object 

(continued)

3. Press and hold the SCAN button. The thermometer will take a reading and 

make a ‘beep’ sound, indicating the measurement is complete.

NOTE: in Object mode, the temperature shown is the actual surface  

temperature, which is different from body temperature. 

FIG. 3

Summary of Contents for 18-220-000

Page 1: ...ion Manual Standard Infrared Ear Thermometer Item 18 220 000 Please read this guidebook completely before operating this unit Includes 1 Thermometer 1 Storage Case 30 Lens Covers 2 AAA Batteries 1 Use...

Page 2: ...e user manual Index Introduction 2 Intended for Use 3 Safety Precautions 3 4 Recommendations 5 Body Temperature Chart 5 Product Overview LCD Display 6 Temperature Taking Hints 7 Before Use 7 8 Setting...

Page 3: ...f you have or suspect any health concerns The infrared sensor must be kept clean dry and undamaged at all times to ensure accurate measurements If the probe tip is placed into the ear canal without a...

Page 4: ...MC and needs to be in stalled and put into service according to the EMC information provided This unit can be affected by portable and mobile RF communications equipment The materials e g ABS of expec...

Page 5: ...t going to use the unit for a long period of time Body Temperature Chart A person s normal temperature will vary and trends to decrease with age The following table shows normal temperature ranges by...

Page 6: ...2 Ear temperature symbol 3 Object temperature symbol 4 Lens cover alert 5 Display date and time in standby mode 6 AM PM display 7 Low battery symbol 8 Memory mode symbol 9 Fahrenheit Celsius degree sy...

Page 7: ...to take the temperature in the same ear 2 External factors may influence ear temperature particularly when an individual has been lying on one ear or the other had their ears covered been exposed to v...

Page 8: ...ou will need to reset the time and date 1 If installing batteries for the first time skip to step 2 Otherwise follow this step if resetting the date time With the thermometer OFF press and hold the PO...

Page 9: ...on set the mode and turn off the thermometer Changing Measurement Modes NOTE The thermometer is set at the factory to measure in Ear mode However you may follow the steps below to switch between Ear a...

Page 10: ...nuggly onto the probe tip Fig 1 2 If the thermometer is OFF press the POWER button to turn it ON The screen will run a quick self test The thermometer is ready to take a measurement 3 Insert the probe...

Page 11: ...sed 1 time please discard the used lens cover by squeezing the Lens Cover Ejector 7 After 1 minute the thermometer will automatically shut OFF NOTE This thermometer is equipped with a Fever Indicator...

Page 12: ...for approximately 3 seconds 3 The screen will display the memory number Fig 2 and then the actual measurement Fig 3 Press the POWER button to scroll through additional saved readings NOTE All subseque...

Page 13: ...to part 15 of the FCC Rules These limits are designed to provide reasonable protection against harmful interference in a residential installation This equipment generates uses and can radiate radio f...

Page 14: ...ter into water or other liquids Storage 1 After each use clean the thermometer 2 Store the thermometer and lens covers in a clean dry place at room temperature NEVER leave the thermometer exposed to d...

Page 15: ...perature between 50 F 104 F 10 40 C The thermometer is placed incorrectly or is unsteady Refer to How To Take A Reading Ear and take a new tempera ture reading The thermometer is de tecting rapid amb...

Page 16: ...cover Or refer to How To Take A Reading Object and take a new tempera ture reading In Ear mode Tempera ture taken is lower than 82 4 F 28 0 C In Object mode Tem perature taken is lower than 4 F 20 C R...

Page 17: ...2 C from 95 9 F 107 6 F or 35 5 C 42 0 C 0 5 F 0 3 C for other temperature range Object Measuring Range 4 F 212 F 20 C 100 C Object Measuring Accuracy 4 F or 4 F 2 C which ever is greater Measurement...

Page 18: ...o this EN60601 1 2 2007 standard for both immunity and emissions Nevertheless special precautions need to be observed The use of accessories and cables other than those specified by manufacturer with...

Page 19: ...missions test Compliance Electromagnetic environment guidance RF emissions CISPR 11 Group 1 The thermometer use RF energy only for its internal function Therefore its RF emissions are very low and are...

Page 20: ...contact 8 kV air 6 kV contact 8 kV air Electrostatic discharge ESD IEC 61000 4 2 Electrostatic transient burst IEC 61000 4 4 2 kV for power supply lines 1 kV for input output lines N A Surge IEC 6100...

Page 21: ...ions equipment should be used no closer to any part of the device including cables than the recommended separation distance calculated from the equation applicable to the frequency of the transmitter...

Page 22: ...r of transmitter W Table 4 Separation distance according to frequency of transmitter m 80 MHz to 800 MHz 800 MHz to 2 5 GHz 0 01 0 1 1 10 100 0 12 0 38 1 2 3 8 12 0 23 0 73 For transmitters rated at a...

Page 23: ...bsorption and reflection from structures objects and people Warranty Three year warranty is available from purchasing date excluding user caused failures listed below 1 Failure resulted in unauthorize...

Page 24: ...220 000 Por favor lea esta gu a por completo antes de operar esta unidad Incluye 1 term metro 1 caja de almacenamiento 30 cubiertas de lente 2 bater as tipo AAA 1 manual de usuario Term metro est ndar...

Page 25: ...ndice Introducci n 25 Uso Destinado 26 Precauciones de seguridad 26 27 Recomendaciones 28 Cuadro de temperatura corporal 28 Resumen del producto Monitor LCD 29 Recomendaciones al tomar la temperatura...

Page 26: ...ente una referencia Contacte con su m dico si tiene o sospecha que tiene problemas de salud El sensor infrarrojo debe mantenerse limpio seco y sin da os en todomomento para garantizar mediciones exact...

Page 27: ...requiere precauciones especiales relativas a la CEM y debe insta larse y ponerse en funcionamiento seg n la informaci n de CEM proporcionada Esta unidad puede verse afectada por los equipos de comuni...

Page 28: ...uso de la unidad durante un per odo de tiempo largo Cuadro de temperatura corporal La temperatura normal de una persona var a y tiende a disminuir con la edad La tabla siguiente muestra los rangos nor...

Page 29: ...lo de temperatura del o do 3 S mbolo de temperatura de objeto 4 Alerta de cubierta de lente 5 Fecha y hora en el modo en espera 6 Visualizaci n am pm 7 S mbolo de bater a baja 8 S mbolo del modo de me...

Page 30: ...ulares retire el dispositivo y espere 30 minutos antes de tomar la temperatura 4 En caso de que la persona haya recibido gotas para el o do u otra medicaci n en el canal auditivo tome la temperatura e...

Page 31: ...bot n SCAN Confirme la hora deseada pulsando el bot n POWER 5 Comenzar a parpadear el a o seguido del mes y del d a 6 Repita el paso 4 con la fecha Tras ajustar el d a el term metro se APAGAR autom ti...

Page 32: ...R para ajustar el modo y apagar el term metro Cambio de modos de medici n NOTA El term metro viene ajustado de f brica para tomar mediciones en el modo O do No obstante puede seguir estos pasos para i...

Page 33: ...Si el term metro est APAGADO pulse el bot n POWER para ENCENDERLO La pantalla mostrar una r pida prueba de inicio El term metro est listo para realizar una medici n 3 Introduzca la sonda MUY suave y...

Page 34: ...xpulsor de cubierta de lente 7 Tras 1 minuto el term metro se APAGAR autom ticamente NOTA Este term metro est dotado de un indicador de fiebre que muestra los siguientes s mbolos en la pantalla LCD 34...

Page 35: ...la posici n 10 Para recuperar las mediciones de la memoria 1 Si el term metro est APAGADO pulse el bot n POWER para ENCENDERLO La pantalla mostrar una r pida prueba de inicio y luego mostrar lo que se...

Page 36: ...se ha determinado que cumple con los l mites para un dispositivo digital de Clase B conforme a la secci n 15 de las Normas de la Comisi n Federal de Comunicaciones Federal Communications Commission F...

Page 37: ...y las cubiertas de la lente en un lugar limpio y seco a temperatura ambiente No deje NUNCA el term metro expuesto a la luz directa del sol a temperaturas altas humedad fuego llamas descargas o golpes...

Page 38: ...endida entre los 10 y los 40 C 50 104 F El term metro est colocado incorrecta mente o est inestable Consulte la secci n C mo realizar una medici n O do y tome una nueva lec tura de temperatura El term...

Page 39: ...ci n C mo realizar una medici n Objeto y tome una nueva lectura de temperatura En modo O do La temperatura tomada es inferior a 28 4 C 28 4 C En modo Objeto La temperatura tomada es inferior a 20 C 4...

Page 40: ...do 0 2 C o 0 4 F desde 35 5 C 42 0 C o desde 95 9 F 107 6 F 0 3 C 0 5 F para otros rangos de temperatura Rango de medicion de objeto 20 C 100 C 4 F 212 F Exactitud de medici n de objeto 4 F o 4 F 2 C...

Page 41: ...n a esta norma EN60601 1 2 2007 tanto para inmunidad como para emisiones No obstante es preciso tomar precauciones especiales El uso de accesorios y cables distintos de aquellos especificados por el f...

Page 42: ...tro usa energ a de radiofrecuencia RF solo para su funciona miento interno Por tanto sus emisiones de RF son muy bajas y no es probable que causen ninguna interferencia en equipos electr nicos pr ximo...

Page 43: ...Nivel de conformidad Gu a de entorno electromagn tico Descarga electros t tica DES IEC 61000 4 22 6 kV contacto 8 kV aire 6 kV contacto 8 kV aire Los suelos deben ser de madera hormig n o baldosas de...

Page 44: ...o electromagn tico Ca das de voltaje interrupciones cortas y variaciones de voltaje en las l neas de entrada de alimentaci n de energ a IEC 61000 4 11 5 UT 95 de ca da en UT para 0 5 ciclos 40 UT 60 d...

Page 45: ...ort tiles o m viles de radio frecuencia no deben ser usados a menor distancia de cualquier parte del dispositivo cables inclui dos que la distancia de separaci n recomendada calculada a partir de la e...

Page 46: ...ia nominal m xima de salida del transmisor W Distancia de separaci n de acuerdo a la frecuencia del transmisor M 80 MHz to 800 MHz 800 MHz to 2 5GHz 0 01 0 12 0 23 0 1 0 38 0 73 1 1 2 2 3 10 3 8 7 3 1...

Page 47: ...paraci n para el rango de frecuencia m s alta NOTA 2 Estas gu as pueden no aplicar en todas las situaciones La propagaci n electromagn tica es afectada por la absorci n y reflexi n de estructuras obje...

Page 48: ...l usuario reinicie la unidad 2 Deseche con cuidado por favor consulte al vendedor para m s detalles Fabricado por HealthSmart International 1931 Norman Drive Waukegan IL 60085 Registre este producto e...

Reviews: