--------------------------------------------------------------------------------------GEN II OPERATIONS MANUAL
HealthCare Information, LLC
29
SOURCE SETUP
TV SETUP
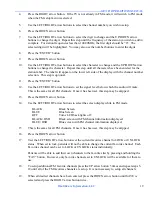
Channel setup for analog TV.
CHANNEL
Displays current channel number. Use right and left arrow buttons to change
NUMBER
channel. Selected channel will be displayed behind the menu.
ADD/REMOVE Manually add or remove the current channel from the channel line up. This affects the
current selected bank only. See pages 55 and 56.
FREQUENCY
Displays the frequency of the current channel. Cannot be changed.
LABEL
Set a channel label to be displayed for the currently selected channel. Use the right and
left arrow buttons to select the character and the up and down arrow keys to change the
selected character. Press and hold the up or down arrow buttons to scroll through the
characters at a fast rate. Press the “ENTER” button when done.
NOTE: Press the blue arrow at the bottom of the IR Remote to clear all characters.
FINE TUNE
Used to manually fine-tune the channel frequency. This should be left at “0”.
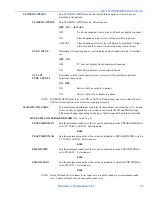
SOURCE
Selects the TV input source type. Selections are:
AIR – CATV – CATV HRC – CATV IRC
Select AIR if you are connected to an off air antenna
Select CATV if you are connected to a cable system.
Select CATV HRC if you are connected to cable system using HRC frequencies.
Select CATV IRC if you are connected to cable system using IRC frequencies
NOTE: Most in house systems such as DIRECT-TV will use CATV.
NOTE: If you are on a CATV system and AIR is selected as the source, you will not see
any channels above channel 13.
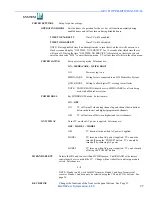
CH PREVIEW CH PREVIEW MODE displays 9 channels on the screen at the same time and scans
MODE
from one channel to the next as determined by the CHANNEL PREVIEW MODE
setting. Audio will be heard from the currently selected channel window. To start and
stop brows mode, press the preview button on the IR remote. As each channel is
scanned, full motion video will be displayed for about 10 seconds, then the video
will freeze and the next channel will be scanned and displayed. Only active
channels for the current selected BANK will be scanned. See pages 55 and 56.
Selections are:
9 CHANNELS – ALL CHANNELS – EDUCATION – OFF – CH GUIDE
9 CH
Displays 9 channels on the screen starting with the current channel
being viewed. After the 9
th
channel is scanned, the scanning will start
over with the first scanned channel. You can use the arrow keys on
the IR remote to select which channel is currently being scanned.
Audio will be heard from the currently selected channel.
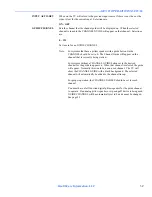
ALL CH
Displays 9 channels on the screen starting with the current channel
being viewed. After the 9
th
channel is scanned, the next channel in
the programmed channel list will be scanned starting in the upper left
window on the screen. You can use the arrow keys on the IR remote
to select which channel is currently being scanned. Audio will be
heard from the currently selected channel.
Summary of Contents for RoomMate RM20II
Page 1: ...REVISION 7 0 TM ...
Page 2: ......
Page 50: ... GEN II OPERATIONS MANUAL HealthCare Information LLC 50 ROOMMATE SERIES SETUP MENU TREE ...
Page 58: ... GEN II OPERATIONS MANUAL HealthCare Information LLC 58 SPECIFICATIONS DIMENSIONS RM20II ...
Page 59: ... GEN II OPERATIONS MANUAL HealthCare Information LLC 59 DIMENSIONS RM22II ...
Page 60: ... GEN II OPERATIONS MANUAL HealthCare Information LLC 60 DIMENSIONS RM26II ...
Page 61: ... GEN II OPERATIONS MANUAL HealthCare Information LLC 61 DIMENSIONS RM32II ...
Page 62: ... GEN II OPERATIONS MANUAL HealthCare Information LLC 62 DIMENSIONS RM42II ...
Page 63: ... GEN II OPERATIONS MANUAL HealthCare Information LLC 63 DIMENSIONS RM52II ...
Page 64: ... GEN II OPERATIONS MANUAL HealthCare Information LLC 64 GENERAL SPECIFICATIONS ...
Page 65: ... GEN II OPERATIONS MANUAL HealthCare Information LLC 65 ...
Page 67: ......


