background image

11

A

B

M

32

D

16

M

E

X/2

X

F

20

1.

3.

4.1

4.2

2.

5

6

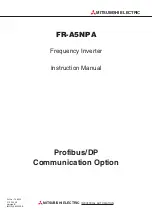
Netzanschluss (Standard)

Mains connection (standard)

Oberkante Flügel 

Top edge of sash

Mindestabstände beachten 4 /

 Check minimum spacings 4

4

A

 = 380 mm  (SKA 20-118)

A

 = 380 mm  (SKA 20-213) 

A

 = 380 mm  (SKA 20-308) 

A

 = 480 mm  (SKA 20-403) 

A

 = 480 mm  (SKA 20-498)

B

 = 22 mm 

B

 = 26 mm  

bei flächenbündigen Profilen / 

at surface-flush profiles

Anreißen 5 + 6

Flügel zum Rahmen ausrichten!
Der Antrieb wird mittig auf den Flügel montiert, d. h. der 

 Flügelbock sitzt außermittig.

5

 Flügelbock

Mitte 

M

 des Flügels markieren und auf den Rahmen 

 übertragen. Löcher für den Flügelbock am Rahmen 

anreißen und bohren.

6

 Antrieb

Die Löcher für die Kippkonsolen am Flügel anreißen,  

den Abstand 

X

 kontrollieren und Löcher bohren.

Anschrauben 

Siehe Kapitel “Anschrauben”.

Positioning 5 + 6

Adjust sash to frame!
The drive has to be placed right centered on the sash, that 

means the sash bracket has to be placed out of centre.

5

 Sash bracket

Mark the centre 

M

 of the sash. Transfer the centre to mark on 

the frame, mark out and drill holes for the bracket on the frame.

6

 Drive

Mark the holes for swivel brackets on the sash, check distance 

X

 and drill holes.

Fixing

See chapter “Fixing”.

SKA 20-118 

SKA 20-213 

SKA 20-308

SKA 20-403 

SKA 20-498

E

47,5

97,5

X

360

460

X/2

180

230

D

  = 9,5 mm 

D

  = 13,5 mm    

bei flächenbündigen Profilen  

at surface-flush profiles

F

  = 15 mm 

F

  = 11 mm  


bei flächenbündigen Profilen  

at surface-flush profiles

Anwendung Bohrlehre 

Application of drilling jig

Bohrbild schematisch / 

Hole pattern schematically

D einstellen / 

Adjust D

entspr. Typ 

acc. to type

Oberkante Flügel 

Top edge of sash

Stifte für Einstellung D anlegen 

Attach pins for adjustment of D

Summary of Contents for 20-118

Page 1: ... Montageanleitung für Kettenantriebe in 24 V DC SKA 20 118 20 213 20 308 20 403 20 498 Mounting instructions for chain drives in 24 V DC SKA 20 1 18 20 213 20 308 20 403 20 498 11 2015 226225E Inhaltsverzeichnis Sicherheitshinweise 2 Technische Daten 6 Übersicht 7 Montage am Kipp und Drehfenster einwärts Festmontage 8 Flexible Montage 10 Montage am Klappfenster auswärts u Senkklappfenster Festmont...

Page 2: ...g auf Händigen Sie die Bedienungsanleitung dem Endanwender aus und nehmen Sie eine Einweisung vor WARNING Important safety instructions The safety of personnel requires that the following instructions be observed Incorrect installation can lead to severe injury Declaration of Conformity state of the art The drive has been constructed and tested in conformity with all applicable European direc tive...

Page 3: ...atz teile oder Erweiterungen verwenden Sie ausschließlich Original Ersatzteile Installation and operation Prior to installation Test window and safety elements The physical integrity and smooth operation of the window must be ensured Before installing the drive the installer must verify that the drive s temperature range has been adapted to its operating environment No other persons are allowed in...

Page 4: ...m Rahmen der Wartung und sind nach der vorgeschriebenen Betriebszeit ca 4 Jahre auszutauschen This device may be used by children age 8 and older as well as all persons without limited physical sensory or mental abilities or lack of experience and knowledge provided they act under supervision or have received prior instructions on the safe use of the device and any hazards resulting from using the...

Page 5: ...abzüge Zentralen Feuertaster Lüftungs taster usw dürfen nicht in ihrer Funktionstüch tigkeit z B durch bauliche Maßnahmen oder Lagergut beeinträchtigt werden Für die Reinigung der Gehäuseteile verwenden Sie ein weiches leicht befeuchtetes Tuch Um eine Beschädigung der Gehäuseoberfläche zu vermeiden verwenden Sie für die Reinigung keine ätzenden Chemikalien aggressiven Reingungslösungen oder lösung...

Page 6: ...ke 308 100 N at stroke 403 and 498 Locking pressure 3000 N Connecting terminal 4 pole plug in terminal for max 1 0 mm flexibel supply line Cut off OPEN build in limit switch Cut off CLOSE integrated electronic overload cut off Operating time approx 18 sec 100 mm stroke Duty cycle 60 sec ED ON 120 sec AD OFF Range of temperature 0 C to 70 C Emission sound pressure level LpA 70 dB A Protective syste...

Page 7: ...1 Chain drive 2 Swivel bracket SKA 20 3 Bearing pin 4 Sash bracket 5 Bearing bush 6 Bolt 7 Locking ring 8 Washer component sash bracket 1 mm 2 a Washer component sash bracket 3 mm 2 b Washer component sash bracket 5 mm 2 2 optional depends on sash height and overrebate step height Netzanschluss 24 V DC Standard Mains connection 24 V DC standard Netzanschluss 24 V DC Standard Mains connection 24 V ...

Page 8: ...Fixed mounting 1 2 2 2 Montagevarianten 1 Überschlaghöhe 0 10 mm bauseitige Unterfütterung des Antriebs 2 Überschlaghöhe 10 25 mm Mounting versions 1 overrebate step height 0 10 mm provide washer component s for the drive on site 2 overrebate step height 10 25 mm bauseitige Unterfütterung 10 Überschlaghöhe washer component on site 10 overrebate step height ...

Page 9: ... 498 B 18 mm B 21 mm bei flächenbündigen Profilen at surface flush profiles Positioning 4 5 Adjust sash to frame The drive has to be placed right centered on the sash that means the sash bracket has to be placed out of centre 4 Sash bracket Mark the centre M of the sash Transfer the centre to mark on the frame mark out and drill holes for the bracket on the frame 5 Drive Mark the holes for the dri...

Page 10: ...hlaghöhe 0 8 mm bauseitige Unterfütterung des Antriebs 2 Überschlaghöhe 8 25 mm Mounting versions 1 overrebate step height 0 8 mm provide washer component s for the drive on site 2 overrebate step height 8 25 mm Festlegung der Unterlegplatten 3 Define washer component 3 Flügelrücksprung a sash recess a Unterfütterung washer component 0 8 mm c 8 a 8 25 mm b a 8 a b Kippkonsole bauseits unterfüttern...

Page 11: ...ren Anschrauben Siehe Kapitel Anschrauben Positioning 5 6 Adjust sash to frame The drive has to be placed right centered on the sash that means the sash bracket has to be placed out of centre 5 Sash bracket Mark the centre M of the sash Transfer the centre to mark on the frame mark out and drill holes for the bracket on the frame 6 Drive Mark the holes for swivel brackets on the sash check distanc...

Page 12: ...t window and top hung casement Fixed mounting 1 2 2 2 Montagevarianten 1 Überschlaghöhe 0 10 mm bauseitige Unterfütterung des Antriebs 2 Überschlaghöhe 10 25 mm Mounting versions 1 overrebate step height 0 10 mm provide washer component s for the drive on site 2 overrebate step height 10 25 mm bauseitige Unterfütterung 10 Überschlaghöhe washer component on site 10 overrebate step height Bandmitte ...

Page 13: ...sash Transfer the centre to mark on the frame On the sash mark out and drill holes for the bracket 5 Drive Mark the holes for the drive housing on the frame check the measurements and drill holes D 12 mm D 15 mm flächenbündige Profile at surface flush profiles E 47 5 mm SKA 20 118 SKA 20 213 20 308 E 97 5 mm SKA 20 403 20 498 Anschrauben Siehe Kapitel Anschrauben Fixing See chapter Fixing Netzansc...

Page 14: ... Überschlaghöhe 0 8 mm bauseitige Unterfütterung des Antriebs 2 Überschlaghöhe 8 25 mm Mounting versions 1 overrebate step height 0 8 mm provide washer component s for the drive on site 2 overrebate step height 8 25 mm 1 2 2 2 Festlegung der Unterlegplatten 3 Define washer component 3 Flügelrücksprung a sash recess a Unterfütterung washer component 0 8 mm c 8 a 8 25 mm b a 8 Kippkonsole bauseits u...

Page 15: ...Flügelbock sitzt außermittig 5 Flügelbock Mitte M des Flügels markieren und auf den Rahmen übertragen Löcher für den Flügelbock am Flügel anreißen und bohren 6 Antrieb Die Löcher für die Kippkonsolen am Rahmen anreißen den Abstand X kontrollieren und Löcher bohren Positioning 5 6 Adjust sash to frame The drive has to be placed right centered on the frame that means the sash bracket has to be place...

Page 16: ...m Rahmen Klappfenster auswärts festschrauben Flexible Montage Kippkonsolen 2 am Flügel Kippfenster Drehfenster einwärts oder am Rahmen Klappfenster auswärts festschrauben Beide Lagerbuchsen 5 in das Antriebs gehäuse stecken Einen Lagerbolzen 3 in die linke Kippkonsole 2 drehen und mit 10 Nm Torx 20 anziehen Den Antrieb 1 auf den linken Lagerbolzen 3 stecken anschließend den zweiten Lagerbolzen 3 d...

Page 17: ...Kerbe D liegen 3 Mit den Schrauben G die Verschlusskappe F am Antriebs gehäuse E befestigen Funktionstest Fährt der Antrieb bei AUF Betätigung Zu oder umgekehrt so sind die Leitungen umzupolen Connecting 1 3 1 Connect the 2 pole connection cable A to the plug B 2 Put plug B into the coupler C of the drive Press connection cable A into the notch D of the drive housing E Attach the flap F onto the d...

Page 18: ...4 Antrieb mit Schallisolierung auf die Unterfütterungen montieren 1 Carry out required cutouts and drills for the sash bracket drive and washer component on the sash respectively window frame profile 2 Mount the sash bracket on the sash frame 3 Mount the washer component on the window frame 4 Mount the drive with sound insulation on the washer component 1 Kettenantrieb 9 Flügelbock Oberteil Ö Flüg...

Page 19: ...19 ...

Page 20: ...HAUTAU GmbH Postfach 1 1 51 D 31689 Helpsen Tel 495724 393 0 Fax 125 Info HAUTAU de www HAUTAU de ...

Reviews: