OPERATION
Form No. mCGm-1113
7
English
General
Hatco multi Contact Grills are designed for ease of operation
and versatility. Use the following information and procedures to
operate the grill.
Read all safety messages in the IMPORTANT SAFETy
INFORMATION section before operating this equipment.
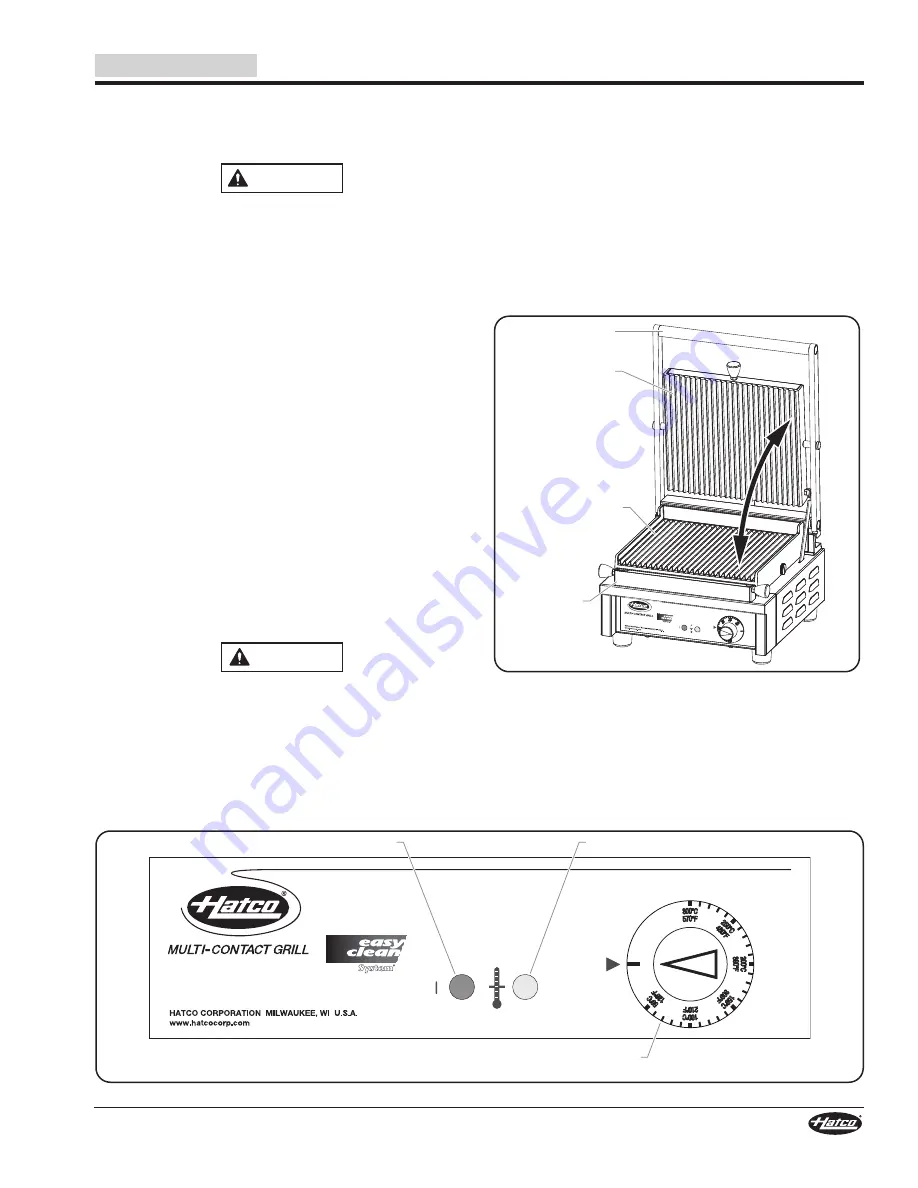
Control Panel
The following are descriptions of the controls used to operate a
multi Contact Grill. all controls are located on the control panel
at the front of the unit.
Power Indicator
The Power Indicator illuminates when the unit is on.
Heating Indicator
The Heating Indicator illuminates when the heating elements
are on and heating the grill plates.
Temperature Control
The Temperature Control controls the power to the unit as well
as the temperature setting. Turn the Temperature Control
clockwise to turn on and increase the temperature setting. Turn
the Temperature Control counterclockwise to decrease the
temperature setting and turn off the unit.
Operating the Unit
Startup
1. Plug the unit into a properly grounded electrical receptacle
of the correct voltage, size, and plug configuration. See the
SPECIFICaTIONS section for details.
2. make sure the grease trap is in position and the top grill
plate is down in the closed/operating position.
BURN HAzARD:
• Some exterior surfaces on unit will get hot. Avoid
unnecessary contact with unit.
• Do not come in contact with grill plates during
operation. Both plates are very hot.
3. Turn the Temperature Control clockwise to the desired
temperature setting.
• Both the Power Indicator and the Heating Indicator will
illuminate.
WARNING
CAUTION
4. allow the unit approximately 20 minutes to reach operating
temperature.
• The Heating Indicator will go dark when the unit reaches
the selected temperature.
NOTE: Refer to the “Suggested Cook Temperatures and
Times” chart in this section for examples of food
products that can be cooked on the Multi Contact Grill.
5. Lift the top grill plate handle to open up the unit.
6. Carefully apply a small amount of cooking oil to the top and
bottom grill plates.
7. Place food product onto the bottom grill plate, and close
the top grill plate onto the food product.
model mCG10G in open position
NOTE: It the top grill plate does not stay down and rest flat on top
of the food product, it needs to be balanced. Refer to the
“Balancing the Top Grill Plate” procedure in this section.
8. When cooking is complete, lift the top grill plate handle to
open up the unit and remove the food product.
continued...
Top Grill Plate
Bottom
Grill Plate
Handle
Grease
Trap
Power Indicator
Temperature Control
(in “off” position)
Heating Indicator
Control Panel (mCG10G shown)


