background image

5

Han

®

  F + B  Assembly instructions    

DE

EN

IT

  Montage  Han

®

 F+B Kontakteinsatz  

im Tüllengehäuse (ohne Adapter)

Schritt 6:

Führen Sie die gecrimpten Kontakte in die Kam-

mern ein, bis sie mit einem hörbaren Klicken 

verrasten.


Prüfen Sie die Kontakte auf Festsitz!

Schritt 7:

Führen Sie den bestückten Han

®

 F+B Kontakt-

einsatz Ⓓ in das Tüllengehäuse Ⓔ ein.

Schritt 8:

Stecken Sie den Buchsen-Kontakteinsatz Ⓕ auf 

den Stift-Kontakteinsatz. Drücken Sie auf beide 

Kontakteinsätze – bis ein hörbares Klicken die 

korrekte Verrastung im Tüllengehäuse bestätigt.

Nehmen Sie den Buchsen-Kontakteinsatz Ⓕ 

wieder ab.

Schritt 9:

Verschrauben Sie den Doppelnippel im Tüllen-

gehäuse und ziehen Sie die Druckschraube Ⓖ 

mit 5 Nm an.

Click!

Click!

Punto 6:

Inserire il contatto crimpato nella cavità 

dell’inserto, facendo attenzione alla numerazi-

one; spingere a fondo il contatto fino ad udire il 

“click” di aggancio.


▶ Tirare i cavi in modo da controllare il fis

-

saggio!

Punto 7:

Inserire l’inserto Han

®

 F+B cablato Ⓓ nella 

custodia Ⓔ.

Punto 8:

Accoppiare l’inserto femmina Ⓕ con l’inserto 

maschio. Premere entrambi gli inserti nella cus-

todia fino ad udire il “click” di aggancio. 

Disaccoppiare l’inserto femmina Ⓕ.

Punto 9:

Avvitare a fondo il pressacavo nella custodia e 

stringere la ghiera stringi-cavo Ⓖ applicando 

una coppia di 5 nm.

  Assemblaggio di inserti Han

®

 F+B 

nelle custodie (senza adattatore) 

  Assembly of Han

®

 F+B insert into 

hood (without adapter)
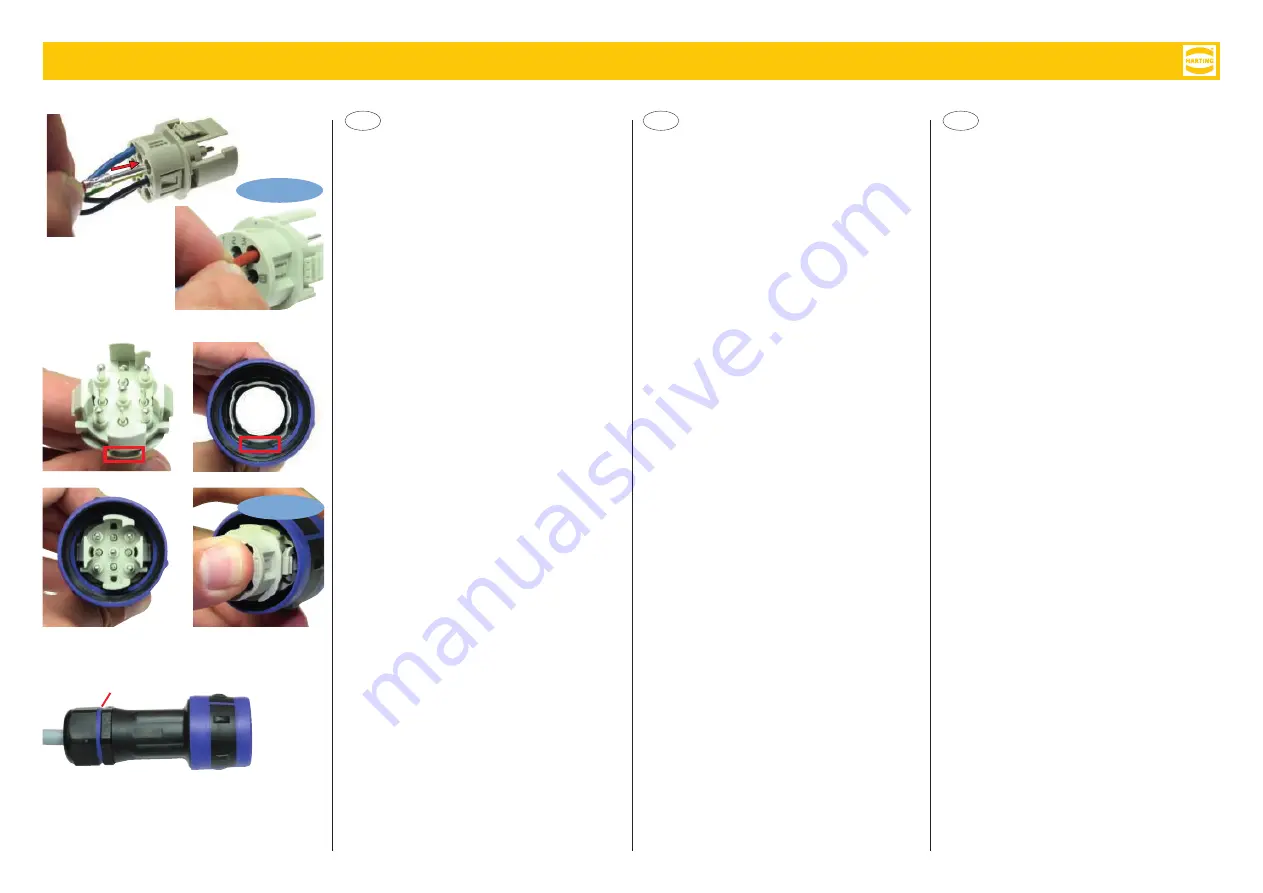
Step 6:

Insert the crimped contacts into the chambers, 

until they lock into the correct position with an 

audible “click”.


Check the contacts for tightness!

Step 7:

Insert the equipped Han

®

 F+B insert Ⓓ into the 

hood Ⓔ.

Step 8:

Plug the female insert Ⓕ into the male insert. 

Press both inserts into the hood until an audible 

“click” confirms that the insert is properly locked. 

Withdraw the female insert Ⓕ.

Step 9:

Screw the double nipple into the hood and 

tighten the pressure screw Ⓖ with a tightening 

torque of 5 Nm.

Summary of Contents for Han 3 A

Page 1: ...tatura del pressacavo Istruzioni di assemblaggio IT Immagine Descrizione Codice Custodia volante per prolunghe 09 15 503 1701 Custodia fissa passan te con fori di fissaggio 09 15 503 0301 Custodia vol...

Page 2: ...A Sezione cavo 1 mm 09 33 200 6118 09 33 200 6218 Perni di codifica il codice comprende 20 pezzi 09 12 000 9924 Ulteriori opzioni vedi data sheet Han F B Montaggio inserti con adattatore Immagine Desc...

Page 3: ...parti elettriche Pericolo di morte dovuta a folgorazione I connettori industriali sono componenti elettrici che devono essere installati esclusivamente da personale qualificato Non sconnettere o conne...

Page 4: ...lunghezza di spellatura Han E 2 5 mm 7 5 mm Han D 1 0 mm 8 0 mm Nota La lunghezza di spellatura relativa ad altri tipi di contatti Han indicata nelle pagine di pertinen za del catalogo HARTING Indust...

Page 5: ...ire il click di aggancio Tirare i cavi in modo da controllare il fis saggio Punto 7 Inserire l inserto Han F B cablato nella custodia Punto 8 Accoppiare l inserto femmina con l inserto maschio Premere...

Page 6: ...parts must be rotated clockwise to the stop NOTICE Protection from humidity and dirt Protect the connectors in unmated condition from humidity and dirt by screwing Han F B covers onto both the bulkhe...

Page 7: ...he gland for a distance of 5 cm Step 3 Strip the conductors at the length which is requi red for the specific type of contact Example Type of contact stripping length Han 4A Quick Lock 10 mm Step 4 Re...

Page 8: ...e Han F B hood Pay attention to the coding element and press the insert into the hood until it locks into place An audible click confirms that the insert has been locked into place correctly Afterward...

Page 9: ...o the cut out and screw it to the mounting surface 4 x M4 hight of screw head including washer 4 5 mm tightening torque 1 Nm Step 3 Route the cable from the back through the bulk head mounted housing...

Page 10: ...sert the Han F B female insert into the Han F B bulkhead mounted housing pay ing attention to the coding Press the insert into the housing until a Click confirms that it is correctly locked in place N...

Reviews: