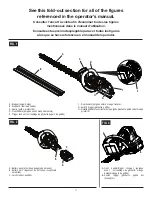
background image

7 – English

OPERATION

 WARNING:

Do  not  allow  familiarity  with  this  product  to  make  you 
careless. Remember that a careless fraction of a second is


sufficient to inflict serious injury.

 WARNING:

Always wear eye protection with side shields marked to 
comply with ANSI Z87.1. Failure to do so could result in 
objects being thrown into your eyes resulting in possible 
serious injury.

 WARNING:

Do not use any attachments or accessories not recom

-

mended by the manufacturer of this product. The use of 
attachments or accessories not recommended can result 
in serious personal injury.

NOTICE:

Before each use, inspect the entire product for damaged, 
missing, or loose parts such as screws, nuts, bolts, caps, 
etc. Tighten securely all fasteners and caps and do not 
operate this product until all missing or damaged parts 
are replaced. Please contact customer service or an au

-

thorized service center for assistance.

APPLICATIONS

You may use this product for the purpose listed below:

 

Trimming and shaping hedges and shrubbery

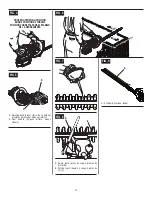
INSTALLING/REMOVING BATTERY PACK

See Figure 2.

 WARNING:

Always remove battery pack from your tool when you are 
assembling parts, making adjustments, cleaning, or when 
not in use. Removing battery pack will prevent accidental 
starting that could cause serious personal injury.

To install:

  Insert the battery pack into the product as shown.

 WARNING:

Make sure the latch on the bottom of the battery pack 
snaps in place and the battery pack is fully seated and 
secure in the hedge trimmer battery port before beginning 
operation. Failure to securely seat the battery pack could 
cause  the  battery  pack  to  fall  out,  resulting  in  serious 
personal injury.

NOTICE:

When placing battery pack in the tool, be sure raised rib 
on battery pack aligns with the bottom of the tool and 
latches into place properly. Improper installation of the 
battery pack can cause damage to internal  components.

To remove:

 

Depress the latch on the battery pack and remove from 
the hedge trimmer. 

 WARNING:

Battery tools are always in operating condition. Remove 
battery pack when transporting or carrying hedge trimmer 
to avoid accidental starting, which may result in serious 
injury.

For complete charging instructions, see the operator’s man

-

uals for your battery pack and charger.

STARTING AND STOPPING THE HEDGE 

TRIMMER

See Figure 3.

To start:

  Remove the scabbard, if installed.

  Grasp the front handle to release the trigger lock-out.

  Depress the switch trigger to begin operation.

To stop:

  Release the switch trigger to stop the hedge trimmer.

  Release the front handle to re-engage the trigger lock-out.

HOLDING THE HEDGE TRIMMER

See Figure 4.

The unit has both a front and rear handle. With the blade 
directed away from you, hold the unit by both handles.

 WARNING:

Always keep both hands on the hedge trimmer handles. 
Never hold shrubs with one hand and operate the hedge 
trimmer with the other. Improper operation of the hedge 
trimmer may result in serious injury.

ROTATING HANDLE

See Figure 5.

The handle can be rotated 45° or 90° to the left or to the right.

To rotate handle:

  Grasp the handles with both hands.

  Press on the rotating handle lever.

  Turn the front rotating handle to the right or to the left while 

still grasping the front and rear handles with both hands.

  Release the rotating handle lever.

  With both hands on the handles, keep turning the front 

handle until it locks into place in one of the 45° or 90° 
positions.

NOTE: 

The trimmer will only operate at one of these locked 

positions.  The  handle  is  locked  when  the  rotating  handle 
lever is securely in place and the handle will no longer move 
to either side.

Summary of Contents for HLHT01

Page 1: ...s S mbolos 5 6 Caracter sticas 6 Armado 7 Funcionamiento 7 9 Mantenimiento 9 10 Pedidos de piezas y servicio P g posterior THIS INSTRUCTION BOOKLET CONTAINS IMPORTANT SAFETY INFORMATION PLEASE READ AN...

Page 2: ...andle poign e avant mango delantero E Trigger lock out verrouillage de g chette seguro de gatillo A Battery pack bloc piles paquete de bater as B Battery port logement de batteries recept culo para pi...

Page 3: ...A Scabbard fourreau funda A B A PROPER OPERATING POSITION BONNE POSITION DE TRAVAIL POSICI N CORRECTA PARA EL MANEJO DE LA HERRAMIENTA A B A Rotating handle lever levier de la poign e pivotante palanc...

Page 4: ...equipment such as dust mask non skid safety shoes hard hat or hearing protection used for appropriate conditions will reduce personal injuries Prevent unintentional starting Ensure the switch is in th...

Page 5: ...ire when used with another battery pack Use power tools only with specifically designated battery packs Use of any other battery packs may create a risk of injury and fire When battery pack is not in...

Page 6: ...ed up or up high to prevent unauthorized use or damage Keep out of the reach of children or untrained individuals Replace blade cover when unit is not in use Never douse or squirt the unit with water...

Page 7: ...o rain No Hands Symbol Failure to keep your hands away from the blade will result in serious personal injury Keep Children and Bystanders Away Keep all children and bystanders at least 100 ft away Glo...

Page 8: ...Packing List are included WARNING Do not use this product if it is not completely assem bled or if any parts appear to be missing or damaged Use of a product that is not properly and completely assem...

Page 9: ...tool be sure raised rib on battery pack aligns with the bottom of the tool and latches into place properly Improper installation of the battery pack can cause damage to internal components To remove...

Page 10: ...d into the cutting blade Use a non powered hand saw or pruning saw to trim large stems If blades do become jammed stop the motor allow the blades to stop and remove the battery pack before at tempting...

Page 11: ...as described above Reinstall the battery pack and resume use SHARPENING THE BLADE See Figure 8 Allow the blades of the hedge trimmer to come to a stop in the position shown This will allow clearance...

Page 12: ...e dans un endroit humide employer un dispositif interrupteur de d faut la terre GFCI L utilisation d un GFCI r duit le risque de d charge lectrique S CURIT PERSONNELLE Rester attentif pr ter attention...

Page 13: ...cations pourlesquellesilssontcon us entenantcomptedes conditions et du type de travail ex cuter L usage d un outil motoris pour des applications pour lesquelles il n est pas con u peut tre dangereux U...

Page 14: ...me est immobilis e avant de poser l outil Ne jamais couper de tiges de plus de 25 4 mm 1 po de diam tre Arr ter le moteur quand l outil n est pas en train de tailler ou lorsqu il est transport d un en...

Page 15: ...te de s curit Indique un risque de blessure potentiel Lire manuel d utilisation Pour r duire les risques de blessures l utilisateur doit lire et veiller bien comprendre le manuel d utilisation avant d...

Page 16: ...contact avec les lames tranchantes lorsque l outil n est pas en usage Il vite galement que les lames soient br ch es ou endommag es pendant le remisage SYMBOLES Certains des symboles ci dessous peuve...

Page 17: ...s graves toujours d connecter le bloc piles du produit au moment d assembler les pi ces UTILISATION AVERTISSEMENT Ne pas laisser la familiarit avec ce produit faire oublier la prudence Ne pas oublier...

Page 18: ...e Pour tourner la poign e Tenir les poign es deux mains Enfoncer le levier de la poign e pivotante Tourner la poign e pivotante avant vers la droite ou la gauche tout en tenant les poign es avant et a...

Page 19: ...ager les composants lectroniques et ou le bloc pile ce qui peut entra ner un court circuit augmenter le risque d incendie ou des blessures corporelles graves Enlever toute accumulation de la salet et...

Page 20: ...anchants non aff t s des dents soient expos s Retirer le bloc piles du taille haies et reprendre les proc dures d aff tage ci dessus NETTOYAGE DU TAILLE HAIES Retirer le bloc piles Glisser le fourreau...

Page 21: ...e el riesgo de descargas el ctricas Si debe operar una herramienta en lugares h medos use un suministro protegido por un interruptor de circuito con p rdida a tierra GFCI El uso de un GFCI reduce el r...

Page 22: ...controlar Utilice la herramienta el ctrica los accesorios y brocas hojas y cuchillas de corte ruedas de esmeril etc de conformidad con estas instrucciones tomando en cuenta las condiciones de trabajo...

Page 23: ...que se haya detenido la hoja antes de poner en reposo la unidad Nunca corte ning n material de un di metro superior a 25 4 mm 1 pulg Siempre detenga el motor al retardar un corte o al caminar de un l...

Page 24: ...es Lea el manual del operador Para reducir el riesgo de lesiones el usuario debe leer y comprender el manual del operador antes de usar este producto Protecci n ocular Siempre p ngase protecci n ocula...

Page 25: ...afiladas hojas cuando no tenga en uso la herramienta Tambi n ayuda a impedir que las las hojas resulten melladas o da adas cuando est guardada la herramienta Capacidad de corte 25 4 mm 1 pulg Velocid...

Page 26: ...AMIENTO ADVERTENCIA No permita que su familarizaci n con este producto lo vuelva descuidado Tenga presente que un descuido de un instante es suficiente para causar una lesi n grave ADVERTENCIA Siempre...

Page 27: ...ra 5 El mango se puede girar 45 o 90 hacia la izquierda o hacia la derecha Para girar el mango Agarre los mangos con ambas manos Tire de la palanca del mango giratorio hacia atr s Gire el mango girato...

Page 28: ...de repuesto id nticas El empleo de piezas diferentes puede causar un peligro o da ar el producto ADVERTENCIA Nunca use agua ni otros l quidos para limpiar o enjuagar la product y no exponga la unidad...

Page 29: ...y 6 4 mm 1 4 pulg o 5 6 mm 7 32 pulg de di metro Aseg rese de conservar el ngulo original de los dientes al limarlos Retire de la prensa de banco la podadora de setos coloque de nuevo el paquete de ba...

Page 30: ...ppel de service veuiller transmettre le num ro de mod le et de s rie situ s sur la plaquette de donn es du produit Enregistrer le produit https HARTtools com register Les d tails de la garantie sont d...

Reviews: