NetLinx Programming
18
MXA-MP & MXA-MPL Instruction Manual
Notes on Using the ^SDM and ^SLT Commands
Based on the user’s pages, the touch panel receiving video from an MXA-MPL will initiate that video feed as necessary, based on the
button receiving the video. However, if you are changing video resolution or mode, using the
^SDM
or
^SLT
commands may be
necessary to start and stop the video. To do so:
1.
Use the
^SDM
command first, with an empty URL value to stop the video.
2.
If this does not work, use
^SDM
with the URL value of "169.254.11.12:5700".
3.
If neither of these options, work, then and only then use
^SLT
to start and stop the video.
In early firmware versions,
^SLT-1,start
and
^SLT-1,stop
were used to start and stop video coming from the MXA-MP. These
commands are still available but using them is not recommended, as the stream is started and stopped automatically when a
button that contains MXA-MPL video fill is displayed, and stopped when it is no longer in view. Showing/hiding the button state
containing MXA-MPL video (e.g. via page flip, popup hide, or button state change) is the recommended way to start and stop MXA-
MPL video. However, if it becomes necessary to stop video while the button is displayed on screen (for example, if resolution needs
to be changed), then the
^SDM
command should be used to start and stop the video.
If a button containing MXA-MPL video must be left on screen, try the following options:
SEND_COMMAND 10001:1:0,"'^SDM-10,1,'"
(stops MXA-MPL video)
SEND_COMMAND 10001:1:0,"'^SLT-1,videomode=hdmi,640x480p@30'"
(changes MXA-MPL video resolution to 640x480 with a frame rate of 30fps)
SEND_COMMAND 10001:1:0,"'^SDM-10,1,udp://169.254.11.12:5700'"
(restarts MXA-MPL streaming)
NOTE:
When using the MXA-MPL for displaying live motion streams, make sure to use the supported resolutions with the video input
type. While the MXA-MPL is capable of supporting up to 60 Hz, the Modero X panels that use MXA-MPL only support 25-30 Hz.
Stand-Alone Images and Video Feeds
Adding a Preview Image to a Touch Panel Page
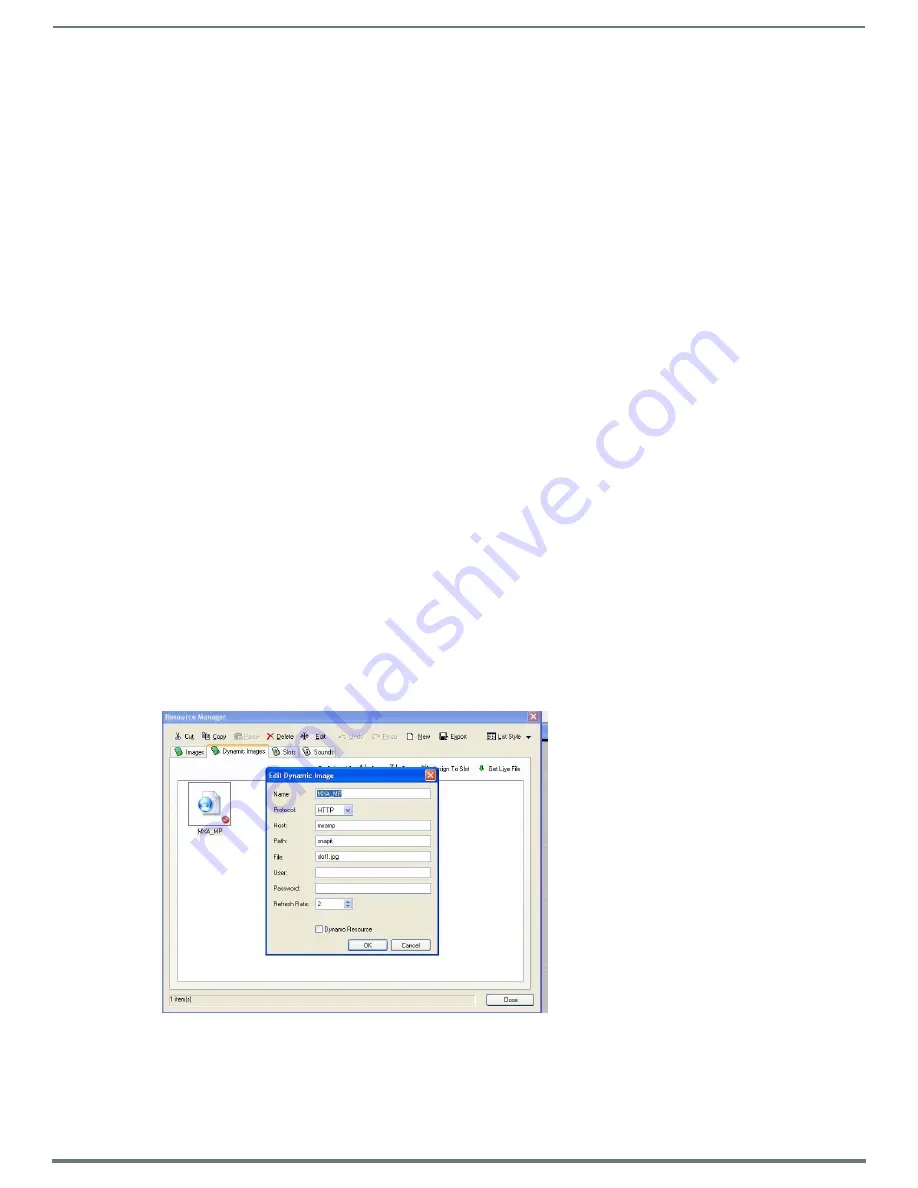
As an example of how to add a simple JPEG preview image to a touch panel page in TPDesign4:
1.
From the main TPDesign4 menu, select
Panel / Resource Manager
and select the
Dynamic Images
tab.
2.
Select a JPEG image in the project. In this example, call it
MXA_MP
.
3.
In the
Edit Dynamic Image
window (FIG. 9), add a new resource. In the example.
Protocol:
HTTP
Host:
mxamp
Path:
snapit
File:
slot1.jpg
In this example, make sure to use at least a 2-second Refresh Rate.
4.
When finished, click
OK
and then
Close
to close the Resource Manager.
5.
After adding the Dynamic Image, assign the image as a Bitmap to a button on a touch panel page.
FIG. 9
Edit Dynamic Image window


