88
9
MODEL: HS 2X0SO/230
Speaker
Outputs
Coaxial
Digital
Inputs
Optical
Digital
Inputs
Subwoofer
Output
Coaxial
Digital
Output
AC Power
Input
Sub
Trigger
Output
Line
Outputs
Line 2
Inputs
SCART
Connection
FM
Antenna
Connection
Line 1
Inputs
Ethernet
Port
USB
Port
HDMI
Output
Composite
Video
Output
S-video
Output
Remote Control
Input/Output
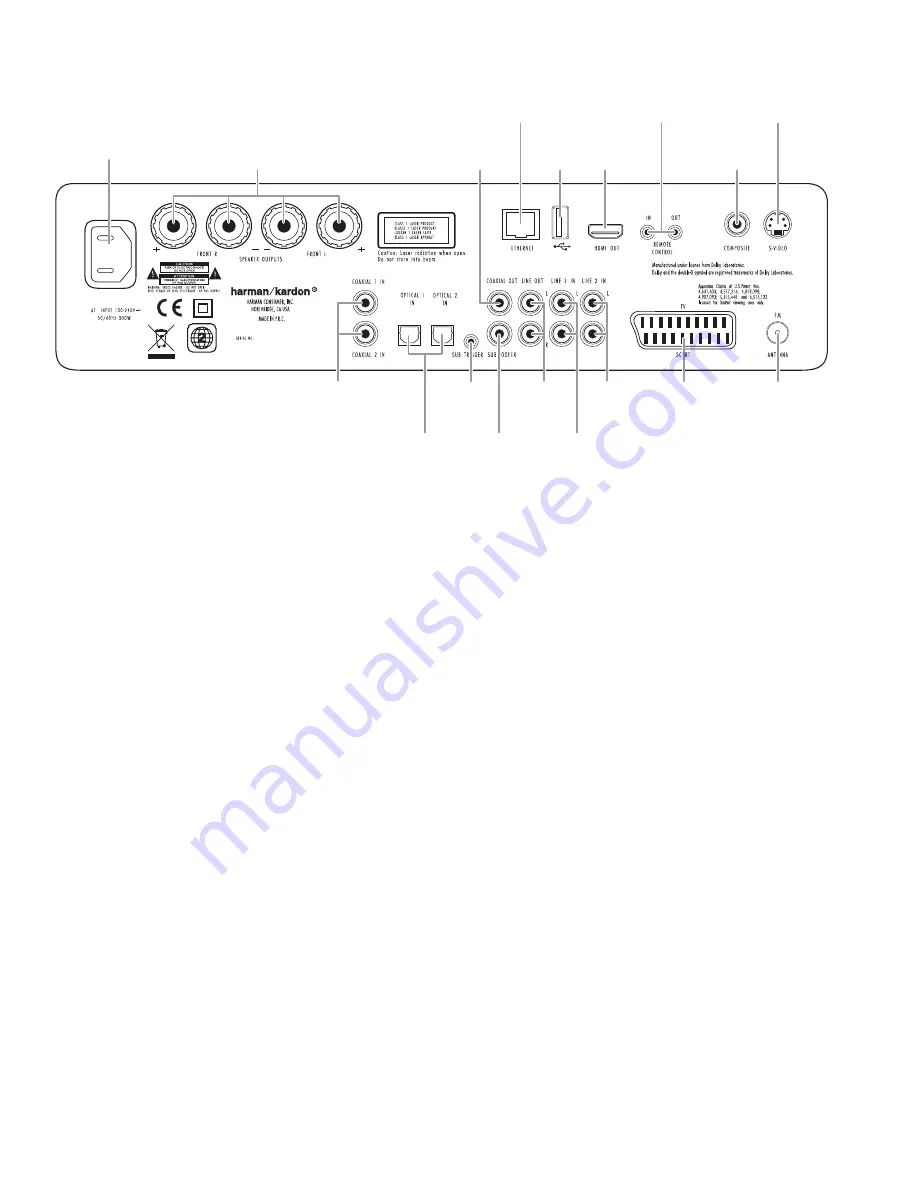
Receiver Rear-Panel Connections
AC Power
Input
Speaker
Outputs
Coaxial
Digital
Output
Ethernet
Port
USB
Port
HDMI
Output
Remote Control
Input/Output
Composite
Video
Output
S-Video
Output
Coaxial
Digital
Inputs
Optical
Digital
Inputs
Sub
Trigger
Output
Subwoofer
Output
Line
Outputs
Line 1
Inputs
Line 2
Inputs
SCART
Connection
FM
Antenna
Connection
See the
Connections
section, on page 14, for detailed information about making
connections
AC Power Input:
After you have made and confirmed all other connections, plug the
supplied AC power cord into this input and into an unswitched AC outlet
Speaker Outputs:
Use the speaker wires supplied with the SAT TS60 speakers to
connect the satellite speakers to the proper terminals
Be sure to connect the positive (+, colored red) connector on the speaker to the
positive (+, colored red and white) connector on the HS 280/HS 210, and the
negative (– , colored black) connectors on the speakers to the negative (–, colored
black) connectors on the HS 280/HS 210 See
Connecting the Satellite Speakers
, on
page 14, for more information about making connections
Coaxial Digital Inputs:
Connect the coaxial digital output of an audio-only source
component here The signal may be a Dolby Digital bitstream or a standard PCM
digital audio bitstream
NOTE: Use only one type of digital connection for each source component
Optical Digital Inputs:
Connect the optical digital output of an audio-only source
component here The signal may be a Dolby Digital bitstream or a standard PCM
digital audio bitstream
NOTE: Use only one type of digital connection for each source component
Coaxial Digital Output:
Connect this output to the coaxial digital input of a digital
recording device such as a CD-R or MiniDisc recorder
Sub Trigger Output:
Use the black mini-cable connector of the supplied
combination LFE and trigger cable to connect this jack to the HKTS200SUB
subwoofer’s External Trigger Input See
Connecting the Subwoofer
, on page 15, for
more details about making connections
Whenever the HS 280/HS 210 is turned on, it will send a trigger signal that will turn
the subwoofer’s amplifier on Turning the HS 280/HS 210 off removes the trigger
signal, and the subwoofer’s amplifier will turn off (This change will occur even when
the subwoofer’s Power On Mode switch – see page 9 – is in the Auto position )
Subwoofer Output:
Use the LFE (purple) connector of the supplied combination LFE
and trigger cable to connect this jack to the HKTS200SUB subwoofer’s Line-Level In
LFE jack See
Connecting the Subwoofer
, on page 15, for more details about making
connections
Ethernet Port:
Connect this port to your local area network (LAN) using a CAT 5 RJ45
network cable See
Connecting to a Local Area Network (LAN)
, on page 17, for details
Line Outputs:
Use the Line Outputs to connect to an audio-only recorder, such as a
CD-R recorder or tape deck
USB 2.0 Port:
Gently insert a flash drive, card reader, digital camera or other USB
device, or a USB Standard-A cable connected to a USB device, to this port
IMPORTANT: DO NOT connect a PC or other USB host/controller to this port, or you
may damage both the HS 280/HS 210 and the other device Orient the device’s plug
so it fits all the way into the HS 280/HS 210’s USB connector You may insert or remove
the device at any time – there is no installation or ejection procedure
The HS 280/HS 210 can display JPEG-format still-image files stored on the device and
can also play MP3 and Windows Media® Audio (WMA) files and MPEG4 and AVI video
files that are stored on the device
Line 1 Input/Line 2 Inputs:
Use these inputs to connect to an audio-only source
component (such as a tape deck) Do not connect a turntable to these jacks without a
phono preamp
HDMI Output (HDMI version 1.2):
If your video display is HDMI-capable, connect
it to the HS 280/HS 210’s HDMI output for improved video performance Since the
HDMI cable transmits both video and audio to the video display, we recommend that
you disable your display’s HDMI audio function to take full advantage of the HS 280/
HS 210 system’s superior audio performance (See page 19)
IMPORTANT:
The HS 280/HS 210 is in compliance with HDCP (High-Definition Copy
Protection) A video display must also be HDCP-compliant to be used with the HS 280/
HS 210’s HDMI output For best results, we do not recommend HDMI connections in
excess of ten feet without a repeater If your video display has a DVI input, you may
use an optional HDMI-to-DVI cable or adapter for the video connection to the display
(The DVI connection is video-only )


