16
16
17
ENGLISH
Coaxial 1/Coaxial 2 In and Optical 1/Optical 2 In:
If you have an audio-only
digital source component (such as a CD changer or video game), you can connect it to
one of these inputs, as shown in the illustration under
Connecting Audio Sources
, on
page 16 When using the Optical 1 and Optical 2 digital connections, gently push the
cable connector through the panel connector’s built-in shutter until it is firmly seated
in the connector
NOTE: Use only one type of digital connection for each source component
Connecting an Audio Recorder
Line Out:
If you have an analog recorder such as a cassette deck, connect its record
inputs to the HS 280/HS 210’s Line Out jacks NOTE: You should connect the recorder’s
analog outputs to the HS 280/HS 210’s Line 1 In or Line 2 In jacks
Coaxial Out:
If you have a digital recorder such as a CD-R or MiniDisc, connect its
coaxial input to the HS 280/HS 210’s Coaxial Out jack
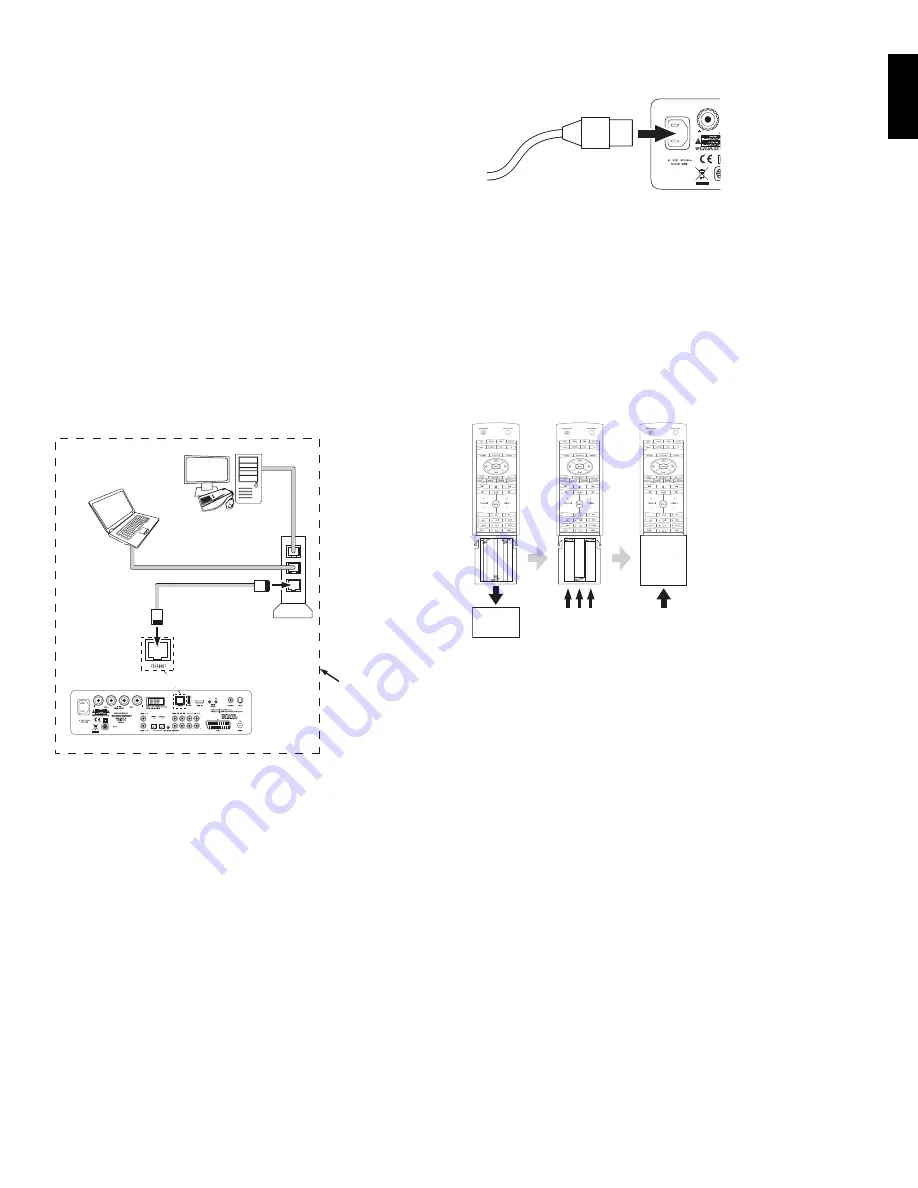
Connecting to a Local Area Network (LAN)
Use a CAT 5 RJ45 network cable (not supplied) to connect the HS 280/HS 210’s
Ethernet port directly to a network router, a network switch or an Ethernet network
wall jack
NOTE: For the HS 280/HS 210 to interface with a networked computer, that computer
must be running UPnP (Universal Plug and Play)-compliant media software such as
Windows Media Player, MediaLink or EyeConnect™
Laptop
Computer
Desktop
Computer
Local-Area
Network (LAN)
Network
Modem
Receiver
CAT 5 RJ45 Cable
(not supplied)
IMPORTANT: The HS 280/HS 210’s Ethernet connection will not support a proxy
network
Connecting the AC Power
The HS 280/HS 210 receiver comes with a detachable AC power cord This type of cord
makes it easier for you to install and connect all other system wiring to the receiver’s
rear panel The HKTS200SUB subwoofer has a non-detachable power cord Plug the
subwoofer’s power cord into a working, unswitched AC outlet
NOTES:
The power requirement for the
•
HS 280/HS 210 receiver is 100–240V AC ~
50/60Hz, 300W The power requirement for the HKTS200SUB subwoofer is
220–240V AC ~ 50/60Hz, 200W
Connecting to a power source other than the ones listed above may damage the
•
receiver or subwoofer, or cause abnormal operation
Before connecting the AC power cords to a wall outlet, confirm that all of the
•
speaker connections, video connections and audio-component connections have
been made correctly
Connect the female end of the receiver’s detachable power cord to the receiver’s
•
AC Power Input connector Plug the other end into a working, unswitched AC
outlet
Power Cord
(female end)
Power Chord
(female end)
The receiver’s Power Indicator will turn red, indicating that the receiver is in the
•
standby mode
The subwoofer’s LED will not illuminate until it receives a turn-on signal See
•
Subwoofer Controls and Connections
, on page 9, for details
Preparing the Remote Control
Installing the Batteries
The HS 280/HS 210’s system remote control uses three AAA batteries (supplied)
Insert the batteries as shown in the illustration, making sure to observe the correct
polarity
–
–
–
+
+
+
A Remove
Cover
B Insert 3 AAA
Batteries
C Replace Cover
Using the Remote Control
When using the remote, remember to aim it toward the HS 280/HS 210’s front panel
Make sure that no objects, such as furniture, block the remote’s view of the receiver
Bright lights, fluorescent lights, and plasma-video displays may interfere with the
function of the remote
The remote has a range of about 20 feet (6 1m), depending on the lighting
•
conditions
You can use the remote at an angle of up to 30° to either side of the
•
HS 280/
HS 210
If the remote seems to operate intermittently, or if pressing a button on the
•
remote does not cause one of the source buttons to illuminate, make sure that the
batteries are inserted correctly, or replace all three batteries with new ones
Programming the Remote Control
You can also program the remote so it will control two additional components –
typically your TV and a video source such as a satellite or cable receiver – in addition
to controlling the HS 280/HS 210 receiver
To control the TV and video component, you can teach codes from the TV and video-
component remotes onto the HS 280/HS 210 remote buttons shown shaded in the
following illustration:


