background image

Initial Setup

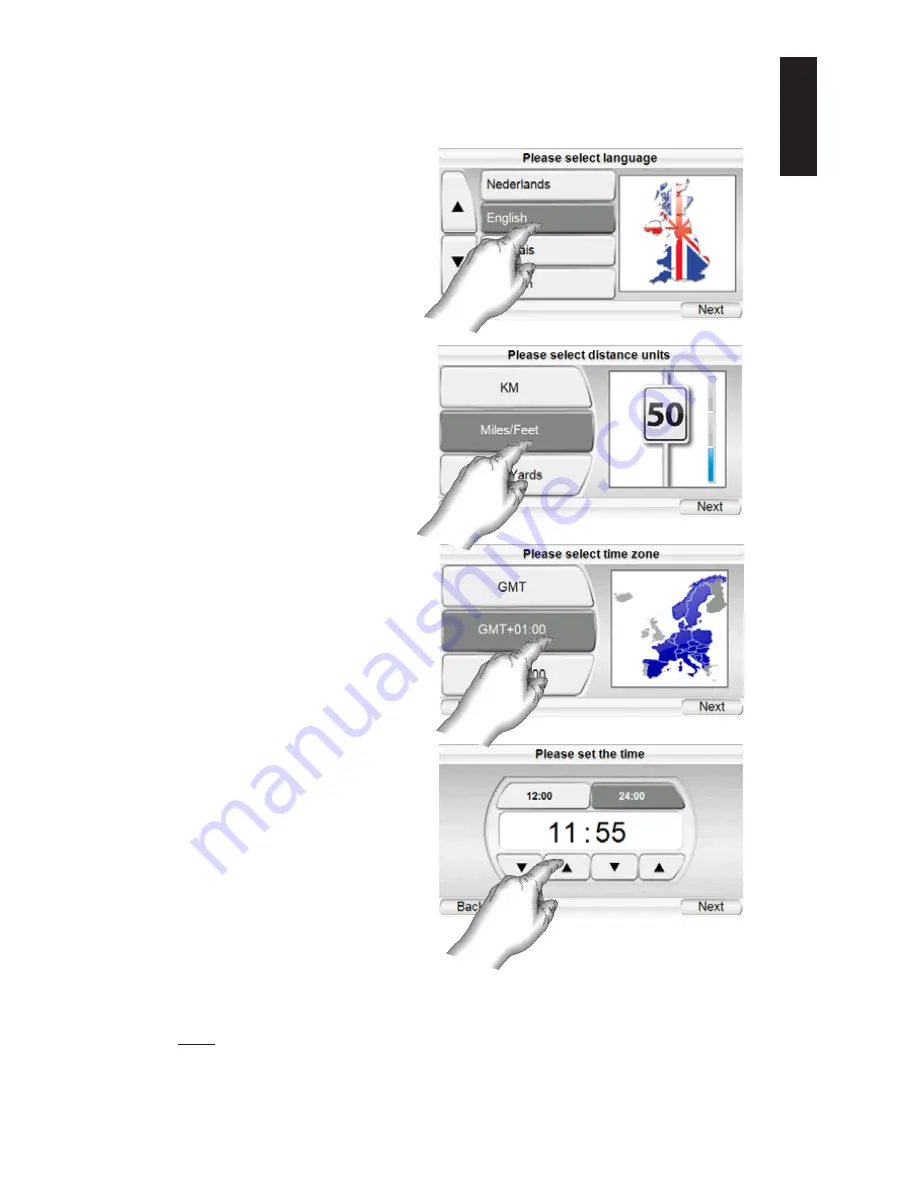
When you turn your GPS-410/510 on for the first time, the Setup Wizard will
appear. The Wizard will guide you through the GPS-410/510’s initial setup
steps:

When you touch the N

EXT

button on the P

LEASE

S

ET THE

T

IME

screen, the 

GPS-410/510 will display the N

AVIGATION

M

AIN

M

ENU

screen (see page 8). 

NOTE: Once you complete these initial setup steps, the Setup Wizard will not reappear.
To change any of these settings, see 

C

HANGING

N

AVIGATION

S

ETTINGS

, on page 16.

U

ser Manual

e

d

i

u

g

+

y

a

l

p

GPS-410/510

7

ENGLISH

1. 

Touch the button for the
screen language you want to
use Nederlands, English,
Français, Deutsch, Italiano,
Espagñol. 

Touch the N

EXT

button.

2. 

Touch the button for the 
distance units you want to
use (km/m, miles/ feet or
miles/yards).

Touch the N

EXT

button.

3. 

Touch the button for the
time zone where you are
located.

Touch the N

EXT

button.

4. Set the current local time.

You can also set the clock 
to display either 12-hour or
24-hour time.

Summary of Contents for GPS-410

Page 1: ...Portable Touchscreen Navigation System and A V Media Player User Manual ENGLISH e d i u g y a l p GPS 410 510...

Page 2: ...ymer battery Under normal operating conditions this battery will provide superior service with a lifespan that is superior to those of other battery types To protect the performance of your GPS 410 51...

Page 3: ...hould contain these items GPS 410 510 Unit Wall Charger Car Charger USB Cable Fold Flat Mounting Bracket Mounting Base Disc for Dash Mounting Adhesive Pad for Mounting Base Disc Alcohol Cleaning Pad f...

Page 4: ...LEFT SIDE FRONT TOP BOTTOM BACK RIGHT SIDE Lock Switch Volume Brightness Control Headphone Jack Mini USB Connector Charger Port GPS Antenna ON OFF Button SD Card Slot Reset Button Speaker Mounting Slo...

Page 5: ...ion that you have entered such as your home location etc MOUNTING SLOT Lets you lock the GPS 410 510 onto the included fold flat mounting bracket for use in a vehicle Left Side LOCK SWITCH Locks the G...

Page 6: ...t the GPS 410 510 s Mini USB Connector Charger port to the wall charger After the battery has charged for at least 6 hours 1 Make sure the LOCK switch is in the DOWN unlocked position 2 Go outdoors to...

Page 7: ...will not reappear To change any of these settings see CHANGING NAVIGATION SETTINGS on page 16 User Manual e d i u g y a l p GPS 410 510 7 ENGLISH 1 Touch the button for the screen language you want to...

Page 8: ...he appropriate button for the city you want to travel to If you select one of the city buttons the ENTER CITY NAME screen below appears Changing the country by pressing SELECT COUNTRY The ENTER CITY N...

Page 9: ...e map screen will appear Once you start driving the GPS 410 510 will guide you to your destination See Navigating To Your Destina tion on page 13 PLEASE NOTE WHEN ENTERING STREET AND CITY NAMES Specia...

Page 10: ...place you want to go The CONFIRM ADDRESS screen right appears 5 TouchGO tobeginnavigation The map screen will appear Once you start driving the GPS 410 510 will guide you to your destination See Navi...

Page 11: ...ight appears 5 Touch the GO button to begin navigation The map screen will appear Once you start driving the GPS 410 510 will guide you to the intersection you selected See Navigating to Your Destinat...

Page 12: ...t set your home address the GPS 410 510 will have you do so NAVIGATING TO RECENTLY VISITED OR SAVED LOCATIONS The GPS 410 510 stores a list of your recently visited locations in a HISTORY page and als...

Page 13: ...travel The route that the GPS 410 510 has calculat ed is indicated by the green line The map shows the distance to and direction of your next turn and also shows the remaining time and distance of yo...

Page 14: ...les the map view between 2D 2D north oriented and 3D See illustrations below right MAP ZOOM BUTTONS Repeatedly touching the and MAP ZOOM buttons zooms your view from a distance of just a few yards off...

Page 15: ...roaching a turn the map will automatically zoom in and switch to 2D mode in order to give a better view on the upcoming maneuver Thereafter it will return to the default zoom settings Overview mode Wh...

Page 16: ...ght The list shows the direction of each turn and how far to drive on each leg of the journey Touching the button for one leg of the journey will display a map showing that particular leg of the trip...

Page 17: ...nce units to kilome ters meters miles feet or miles yards This affects the units shown on the screen and the units given during voice navigation prompts ROUTE PRIORITY When the GPS 410 510 calculates...

Page 18: ...ap by touching it Simply hit Back on the map view to go back to this screen The TMC Settings Menu Normally the GPS 410 510 will automatically tune to the best FM station If you experience problems wit...

Page 19: ...Types In order to play on your GPS 410 510 audio and video files must be in one of the following formats AUDIO SUPPORTS ID3 TAGS V1 AND V2 1 2 3 MP3 16 bit VBR CBR 44kHz 64kbps up to 320kbps 2 channe...

Page 20: ...he GPS 410 510 to your computer s USB hub right 5 Launch Windows Media Player 6 Locate the files you want to transfer 7 Select Windows Media Player s SYNC mode see below 8 Drag the files you want to t...

Page 21: ...USB MASS STORAGE see page 19 4 Connect the GPS 410 510 to your computer s USB hub see page 20 5 Launch Windows Explorer not Internet Explorer on your computer Find it at Start Programs Accessories Wi...

Page 22: ...nre you want then touch the button for the song you want to hear The GPS 410 510 will play the song then play through the rest of the songs in that genre NOTE Genre classifications are predetermined a...

Page 23: ...videos stored on your SD card will be displayed in the order in which they were put on the SD card with the first one at the top To view a video use the SCROLL UP DOWN buttons to find it then touch it...

Page 24: ...r light There is also an AUTO button which auto matically changes the color mode according to the time of day Language The LANGUAGE button lets you set the GPS 410 510 s screen and voice guid ance lan...

Page 25: ...lat Mounting Bracket NOTE Do not mount the bracket in such a way that the GPS 410 510 will interfere with your driving or your view of the road On the Windshield On the Console On the Dashboard The in...

Page 26: ...adhesive covering 3 Attach the mounting base to the mounting location 4 Hold the mounting bracket s base against the mounting base 5 Push the mounting bracket lever towards the base to lock the brack...

Page 27: ...0 510 s built in speaker or connect its headphone jack to your vehicle s audio system connecting cable not supplied The installation and use suggestions provided by the manufacturer may be subject to...

Page 28: ...our SD Card on pages 19 21 Screen is too bright or too dim Adjust the screen brightness using the volume control see Volume Brightness Control on page 5 or adjust the screen brightness in the SETTINGS...

Page 29: ...ries Guide Play and Atlas are trademarks of Harman International Industries Incorporated Windows and Windows Media are registered trademarks of Microsoft Corporation in the United States and other cou...

Page 30: ...e Harman Consumer Group Inc 8500 Balboa Boulevard Northridge CA 91329 USA declare in own responsibility that the product described in this manual is in compliance with technical standards EN 55022 200...

Reviews: